
What a trading plan actually is
A trading plan turns vague intentions into a checklist. Its job is to make the decision for you before money is on the line, so emotion never gets a vote at the worst moment.
The clearest way to see that is the single rule at the heart of most plans, the setup criteria that splits a chart into a zone where you do nothing and a zone where you are allowed to act.
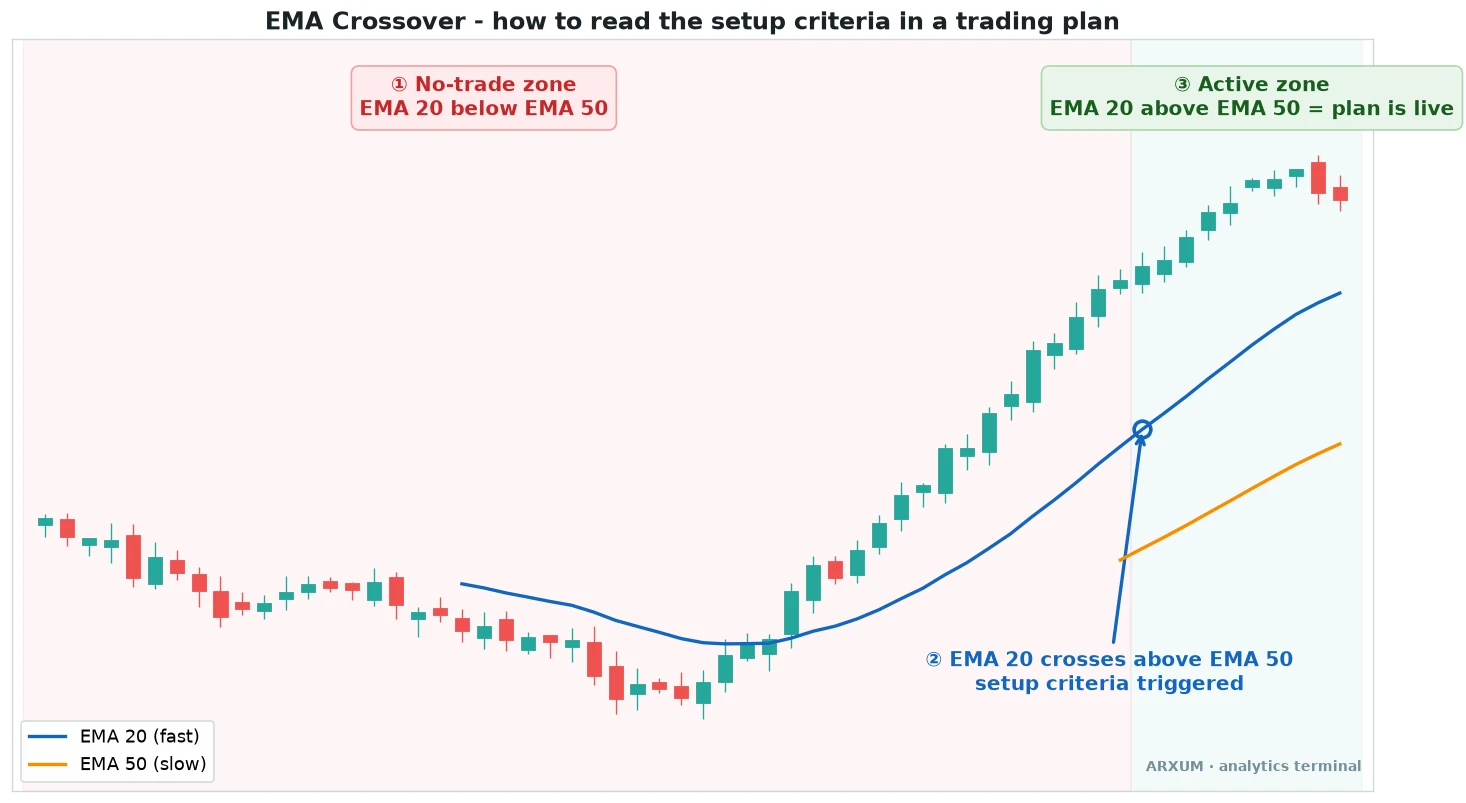
Now that the picture is on screen, the idea is simple. Read it left to right.
- The no-trade zone: the red half, where the fast line sits below the slow line. Your plan says hands off here.
- The trigger: the moment the fast EMA 20 crosses above the slow EMA 50. An EMA, or exponential moving average, is just a line that smooths price to show its direction, and the number is how many bars it averages. That cross is the setup criteria firing.
- The active zone: the green half, where the fast line stays above the slow. Only now does the plan let you hunt an entry.
The point is not this exact crossover. It is that a plan gives you an objective line between “wait” and “act,” so you are not guessing bar by bar.
| Part | What it is | What it tells you |
| No-trade zone | Conditions your rule fails | Stand aside, do nothing |
| The trigger | The exact signal event | A setup now exists |
| Active zone | Conditions your rule allows | Look for your entry |
The 7 components every trading plan needs
Ask “what should a trading plan include” and you get long lists, but they boil down to seven parts. Miss one and the plan has a hole a losing streak will find.
| Component | What it defines | Example rule |
| 1. Setup criteria | The signal that a trade exists | EMA 20 crosses above EMA 50 |
| 2. Entry and exit rules | Where you get in and out | Enter on the close, stop below support |
| 3. Risk per trade | The fixed slice you risk | 2% of the account, never more |
| 4. Daily loss limit | When you stop for the day | Down 2 trades, close the platform |
| 5. Position sizing | How big the trade is | Size set by the stop distance |
| 6. Instruments and sessions | What you trade and when | Gold and EUR/USD, London hours |
| 7. Review and journaling | How you improve | Log every trade, review weekly |
Two things about that list matter more than the rest.
- Only one component is about entries. Most beginners spend all their energy on the setup and none on the other six. The edge lives in risk, sizing and review.
- The plan is a system, not a wish. Each rule is testable, so you can look back and see whether you followed it, not just whether you won.
Your trading rules: the setup criteria
Your trading rules are the objective conditions that define a trade. The tighter you write them, the less room your mood has to invent a setup that is not there.
A crossover makes a clean example because it is either true or it is not. Here it is on the daily gold chart, the slow, patient version of the rule.
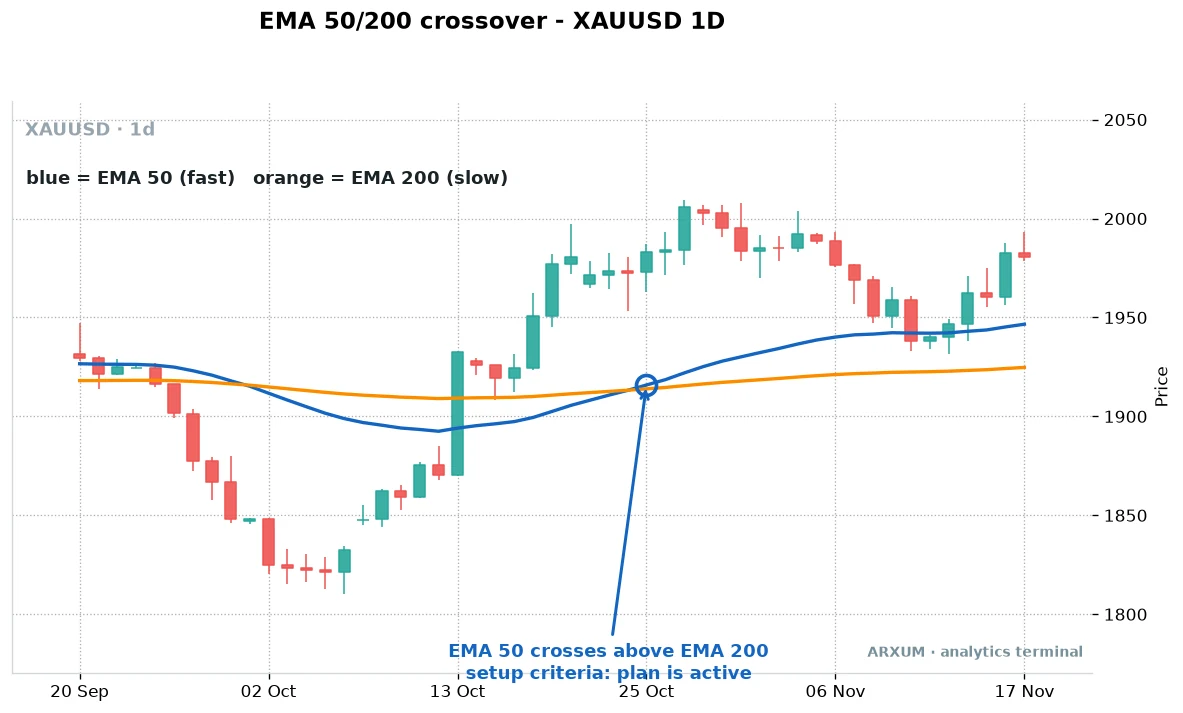
On that gold chart the two moving averages spend weeks apart, then the faster blue line lifts through the slower orange one. That single event is the whole entry rule.
- Objective, not a feeling: the cross either happened on the close or it did not. On the close just means you wait for the bar to finish before you act, so a mid-bar wobble does not fool you.
- Slow by design: a daily 50/200 cross fires a handful of times a year, so it filters out most of the noise.
- One rule, one job: it tells you the trend has turned up, nothing about where to place the stop or the target. Those are separate components.
- It works both ways: the mirror of this rule is a sell, when the fast line crosses below the slow one. To go long is to buy hoping price rises, to go short is to sell hoping it falls, and everything here applies the same, just flipped.
The same rule on a faster chart fires more often, and it fails more often too. That is the honest half of the picture.
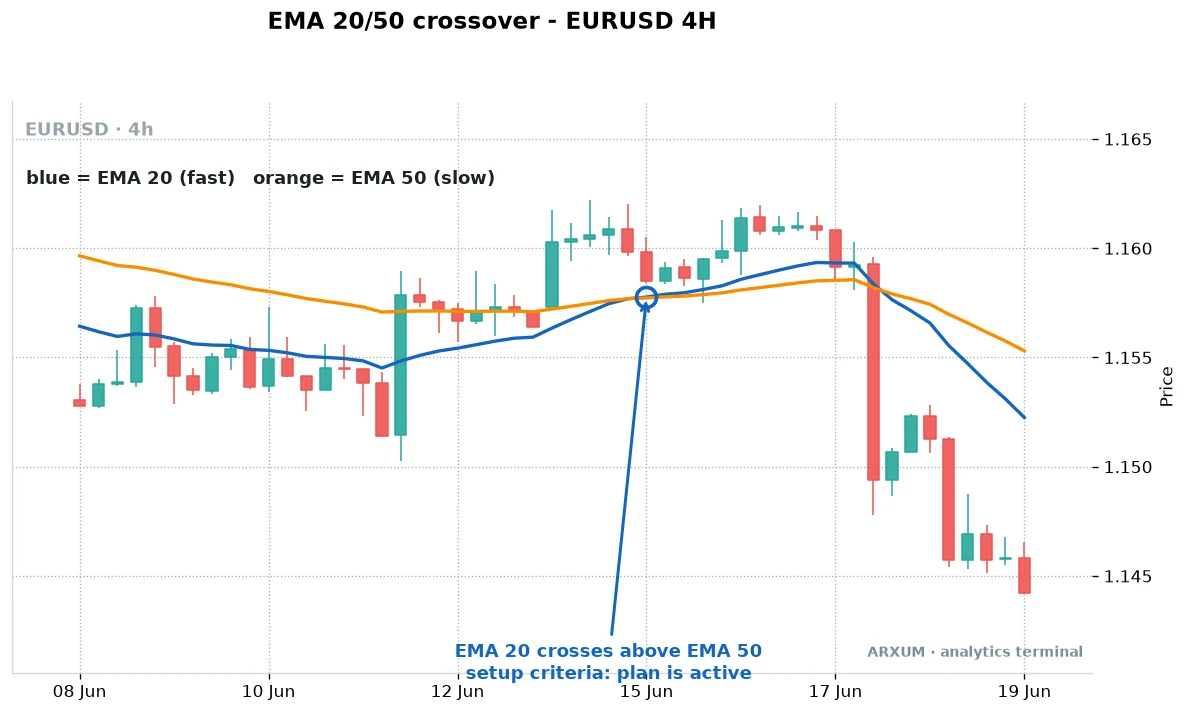
Read that EUR/USD chart honestly. The rule fired, price nudged higher, then it sold off hard into the following days.
- The signal was valid and the trade still lost. That is normal.
- No entry rule wins every time, so a plan that is all entry and no risk control is not a plan.
- The average lengths change with the timeframe, faster on a 4-hour chart (20 and 50) than on a daily one (50 and 200), but the faster line is always the one doing the crossing.
- This exact gap, a real signal that does not pay, is the reason the next four components exist. Your stop and your risk cap decide how much that failed signal costs you.
For the levels you hang your stops and targets on, the support and resistance guide covers how to mark them, and the same rule works whether you enter on a crossover, a breakout or a pullback.
| Weak rule | Strong rule |
| "Buy when it looks strong" | "Buy when EMA 20 closes above EMA 50" |
| "Get out if it drops" | "Stop below the prior swing low" |
| "Trade when I feel good" | "Trade only London and New York hours" |
| "Risk a bit" | "Risk 2% of the account per trade" |
Risk rules: the part that keeps you in the game
If the setup is the flashy part, the risk rules are the part that decides whether you are still trading in a year. They cap the damage on the trades that go wrong, and some always will.
| Rule | Typical setting | What it protects |
| Risk per trade | 1 to 2% of the account | Any single trade going wrong |
| Daily loss limit | 2 to 3 losing trades, then stop | A bad session snowballing |
| Max open positions | 2 to 3 at once | Hidden correlated exposure |
| Reward-to-risk floor | At least 1:1.5 | Taking trades that do not pay |
A few rules of thumb sit behind that table.
- Risk a fixed slice, not a fixed lot. Keep each trade to 1 to 2% of the account, and let the distance to your stop set the position size, never the other way around.
- The daily loss limit is a circuit breaker. Three or four stops in a row usually means conditions changed or you are off your game, so the rule closes the platform for you.
- Reward has to beat risk. The risk-reward ratio is written as 1:X, where the 1 is your risk to the stop and the X is the reward to the target. A plan that only takes 1:1.5 or better can lose more often than it wins and still make money.
- Correlation is sneaky. Buying gold, buying silver and betting the dollar falls can be one big bet wearing three names, so cap how many positions lean the same way.
None of this is exciting, and that is the point. The risk rules are what turn a good setup into a survivable one.
Position sizing: turning the stop into a lot
Sizing is the bridge between your risk rule and the order ticket. You decide the dollars you are willing to lose, then work out the lot that loses exactly that if the stop is hit.
The order is always the same: risk budget first, stop distance second, lot last.
- Start with the account. On a $1,000 account risking 2%, your budget is $20 per trade.
- Measure the stop. Say your rule puts the stop 40 pips away on EUR/USD. A pip is the standard unit a Forex price moves in, the fourth decimal place, so 1.1000 to 1.1040 is 40 pips.
- Turn the budget into risk per pip. $20 divided by a 40 pip stop is $0.50 of risk for every pip the price moves.
- Convert that into a lot. A lot is the size of your position, and a micro lot, the smallest common size, is worth about $0.10 per pip. So $0.50 per pip is 5 micro lots.
| Step | Question | Example |
| 1. Risk budget | Dollars you can lose | 2% of $1,000 = $20 |
| 2. Stop distance | How far to the stop | 40 pips on EUR/USD |
| 3. Position size | Lot that risks the budget | $20 / 40 pips = 5 micro lots |
Two honest notes on sizing.
- The stop sets the size, always. A wider stop means a smaller lot for the same 2%, not a bigger risk. This is the rule beginners break first.
- Leverage is headroom, not extra risk. Your broker offering 1:100 just lets you hold the position, the 2% risk cap is what actually governs your exposure.
Matching the plan to your style
The same seven components fit a scalper and a position trader, but the settings change with how long you hold. Pick the style that fits your screen time, then write the plan around it.
| Style | Timeframe | Hold | Fits |
| Day trading | M15 to H1 | Hours, flat by night | Screen time in session |
| Swing trading | H4 to D1 | Days to weeks | A check morning and night |
| Position trading | D1 to W1 | Weeks to months | Patience, a big-picture read |
The instrument you trade shapes the plan as much as the timeframe does, so know the personality of each one.
| Market | Best sessions | Plan note |
| Spot gold (XAU/USD) | London, New York | Big ranges, give stops room |
| EUR/USD, GBP/USD | London, NY overlap | Tight spreads, news moves it |
| Bitcoin (BTC/USD) | Trades 24/7 | No sessions, weekend gaps |
| Silver, oil | New York | Choppier, wider stops |
A couple of style rules carry across all of them.
- Timeframe sets the pace. A day plan needs you at the screen during the session, a swing plan needs a glance twice a day, and a position plan needs patience more than attention.
- Crypto has no sessions. Bitcoin runs around the clock, so a session-time rule that works for gold makes no sense there, and weekend gaps are a real risk to plan around.
If day trading is where you are headed, the day trading for beginners guide pairs a session plan with the setups that suit fast charts, and our trading strategies hub covers the systems you can drop into the setup slot of your plan.
The trading routine: before, during, after
A plan is only worth the discipline you bring to it, and discipline is easier when it is a routine. Split the day into three parts and give each a short checklist.
| When | What you do | Why it helps |
| Before the session | Mark levels, check the calendar | No surprises mid-trade |
| During a trade | Follow the rules, do not tinker | Emotion stays out of it |
| After the session | Log every trade, note the mistakes | You learn from real data |
The after-session part is the one most people skip, and it is the one that compounds.
- Journal every trade, win or lose. Note the setup, the size, the outcome and whether you followed the plan. Over weeks the journal shows you which rule is leaking money.
- Separate process from result. A trade that followed the plan and lost is a good trade, and one that broke the plan and won is a bad habit that will cost you later.
- Review on a schedule, not on a whim. A weekly read of the trading journal beats staring at every tick, and the best trading journals roundup covers tools that log this for you.
Trading plan template: copy this
Here is the whole plan as a fill-in-the-blanks template. Write your own answer next to each line and you have a working plan by the end of the page.
| Section | Your rule |
| Markets I trade | e.g. gold, EUR/USD, Bitcoin |
| Timeframe and style | e.g. swing, H4 and D1 |
| Sessions I trade | e.g. London and New York |
| Setup criteria (entry) | e.g. EMA 20 closes above EMA 50 |
| Stop-loss rule | e.g. below the last swing low |
| Take-profit rule | e.g. at least 1:2 reward-to-risk |
| Risk per trade | e.g. 2% of the account |
| Daily loss limit | e.g. stop after 2 losses |
| Position sizing method | e.g. size from the stop distance |
| Review schedule | e.g. journal daily, review weekly |
Keep it to one page. A plan you can read in thirty seconds is one you will actually follow, and you can tighten the rules as your journal shows you what works.
Once the rules are written, test them before you trust them. A quick look back over past charts, or a proper study covered in the backtesting a trading strategy guide, tells you whether the plan has any edge before real money rides on it.
Common trading plan mistakes
Most broken plans fail the same handful of ways. Watch for these.
- No plan for the losers. All entry, no risk cap or daily limit. The first losing streak then does real damage.
- Changing the rules mid-trade. Moving a stop further away to “give it room” is how a small loss becomes a big one.
- A plan too complex to follow. Ten indicators and five conditions look serious and get ignored under pressure. Simple and followed beats clever and skipped.
- Skipping the journal. Without a written history you repeat the same mistake, because you never see the pattern.
- Copying someone else’s plan whole. Their risk tolerance, screen time and markets are not yours, so borrow the structure but write your own rules.
- Ignoring the mental side. Revenge trading and chasing after a loss break more plans than bad setups do. The trading psychology guide covers keeping your head when the plan is under stress.
What works: the short version
If you remember three things about building a trading plan, make it these.
- Write it before you trade, not during. The whole value is deciding the rules while you are calm, so the plan can make the call when you are not.
- Spend your effort on risk, not entries. The setup is one of seven components. Risk per trade, a daily loss limit, sizing from the stop and a review routine are what keep you in the game.
- Keep it one page and journal against it. A short plan gets followed, and a weekly review of the journal is how the plan gets better over time.
A trading plan will not win every trade, and it is not meant to. It is meant to make sure the trades that lose stay small and the ones that follow your edge get their chance to add up.
Glossary
- Trading plan: a written rulebook set before trading that defines what you trade, when, how much you risk and how you exit.
- Setup criteria: the objective conditions that define a valid trade, such as a moving-average crossover.
- Trading rules: the full set of if-then conditions in your plan, covering entries, exits and risk.
- Risk per trade: the fixed share of the account, usually 1 to 2%, you are willing to lose on a single trade.
- Daily loss limit: the number of losses or the drawdown that makes you stop trading for the day.
- Position sizing: working out the lot size so a stop-out loses exactly your planned risk.
- Pip: the standard unit a Forex price moves in, usually the fourth decimal place, so 1.1000 to 1.1040 is 40 pips.
- Lot: the size of a trade; a micro lot is the smallest common size, worth about $0.10 per pip on most Forex pairs.
- Long and short: to go long is to buy hoping price rises, to go short is to sell hoping price falls.
- On the close: acting only once a candle has finished, rather than mid-bar.
- Reward-to-risk (1:X): the payoff of a trade, where 1 is the risk to the stop and X is the reward to the target.
- EMA: an exponential moving average, a line that smooths price and reacts faster to recent moves than a simple average.
- Session: a market’s active trading hours, such as London or New York, which shape when Forex and gold move most.
- Journal: a written log of every trade and whether you followed the plan, used to review and improve.
FAQ
What is a trading plan?
A trading plan is a written rulebook you set before the market opens that decides how you will trade in advance. It defines what markets you trade, the exact setup that counts as a trade, how much you risk per trade, where you place stops and targets, and when you stop for the day. The point is to make your decisions while you are calm, so emotion never gets a vote once a position is moving. A good plan has seven components, and only one of them is about entries. The rest, your risk rules, position sizing and review routine, are what actually keep you trading over the long run.
What should a trading plan include?
A complete trading plan includes seven components: setup criteria that define a valid trade, entry and exit rules, risk per trade, a daily loss limit, a position sizing method, the instruments and sessions you trade, and a review and journaling routine. Together they cover the three questions that matter: what you trade, how you get in and out, and how you protect the account when a trade goes wrong. Most beginners write only the setup and skip the other six, which is why their plans fall apart in the first losing streak.
How do you create a trading plan for beginners?
Start with one market and one timeframe you can actually watch, then fill in each component in plain language. Pick your setup criteria, write a stop-loss and take-profit rule, cap your risk at 1 to 2% per trade, set a daily loss limit, and decide how you will size positions from the stop distance. Keep the whole thing to one page so you will actually follow it. Then test the rules against past charts before risking real money, and journal every trade so you can tighten the plan as you learn what works.
Why is a trading plan important?
A trading plan is important because it removes emotion from the moment of decision. Without one, you make up rules while a trade is moving, which is exactly when fear and greed are loudest. A plan set in advance caps your loss on any single trade, stops a bad day from snowballing through a daily loss limit, and gives you a written history to learn from. It will not win every trade, but it keeps the losers small and the account intact so your edge has time to add up.
What is a trading plan template?
A trading plan template is a fill-in-the-blanks structure that lists every component of a plan so you just write your own rule next to each line. A good template covers the markets you trade, your timeframe and style, your sessions, your setup criteria, stop and target rules, risk per trade, a daily loss limit, your sizing method, and a review schedule. Keeping it to a single page matters more than making it detailed, because a plan you can read in thirty seconds is one you will actually follow under pressure.
How much should I risk per trade in my trading plan?
Most traders cap risk at 1 to 2% of the account on any single trade. The key is that the risk is a fixed share of the account, not a fixed lot size. You decide the dollars you are willing to lose, measure the distance to your stop, then size the position so a stop-out loses exactly that amount. A wider stop means a smaller lot for the same 2%, never a bigger risk. This one rule, applied every trade, is what lets a plan survive a run of losses.
Does a trading plan guarantee I will make money?
No. A trading plan does not guarantee profit, and any plan that promises it is a warning sign. Even a valid setup loses often, as the EUR/USD example in this guide shows, where a clean crossover signal fired and then price rolled over. What a plan does is make sure those losing trades stay small and consistent, so the trades that do follow your edge have room to add up. The plan controls risk and behaviour; it does not control the market.
How do I test and refine my trading plan?
Test the rules against past price action before you trust them with real money, either by scrolling back through charts or by running a proper backtest. Then journal every live trade, logging the setup, the size, the outcome and whether you followed the plan. Review the journal on a weekly schedule and look for the rule that keeps leaking money. Refine one thing at a time so you can tell what actually helped, and keep the plan to one page throughout so it stays simple enough to follow.
Real-time trade setups with entry, stop loss and take profit. Daily market analysis. No subscription, no complicated theory.
🌍 Our recommended brokers


Reader Reviews
Be the first to review this — tell other traders what actually helped, or where it fell short.
Leave a Review

Forex Analyst & Senior Trader
Former FX desk trader with 8 years in institutional forex. Works in multi-timeframe analysis and order flow, turning desk experience into systematic, testable rules across forex and metals.
