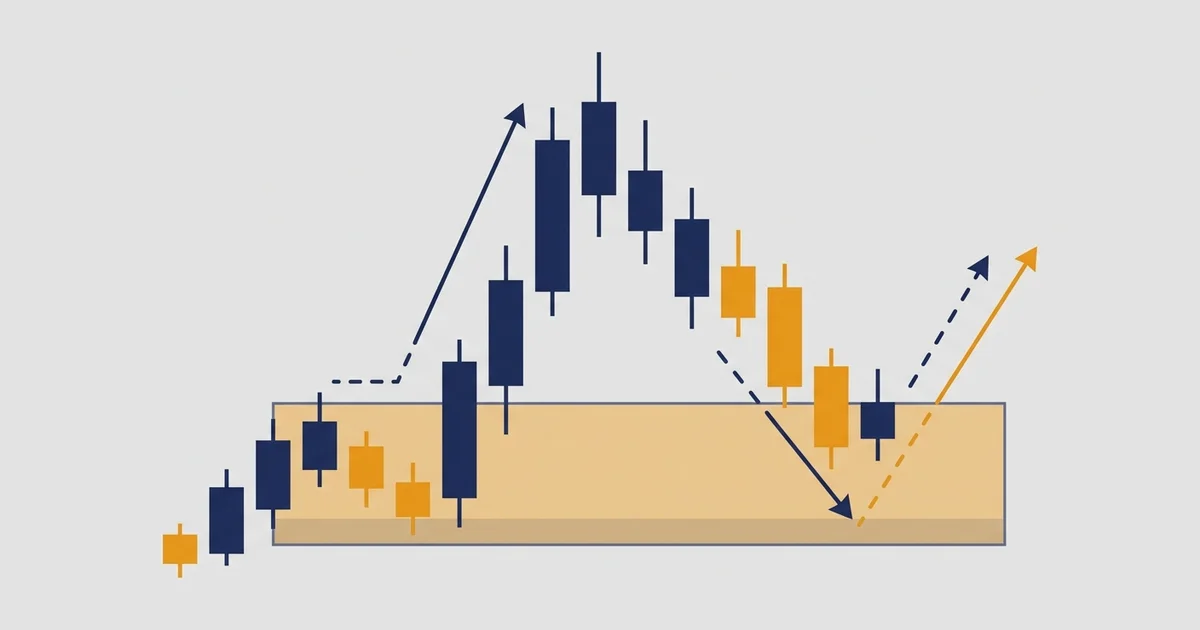

What an order block actually is
Forget the mystique for a second. An order block is the last candle before price bolts in one direction.
That final candle is where the heavy orders sat, so traders mark it as a zone and watch for price to come back to it later.
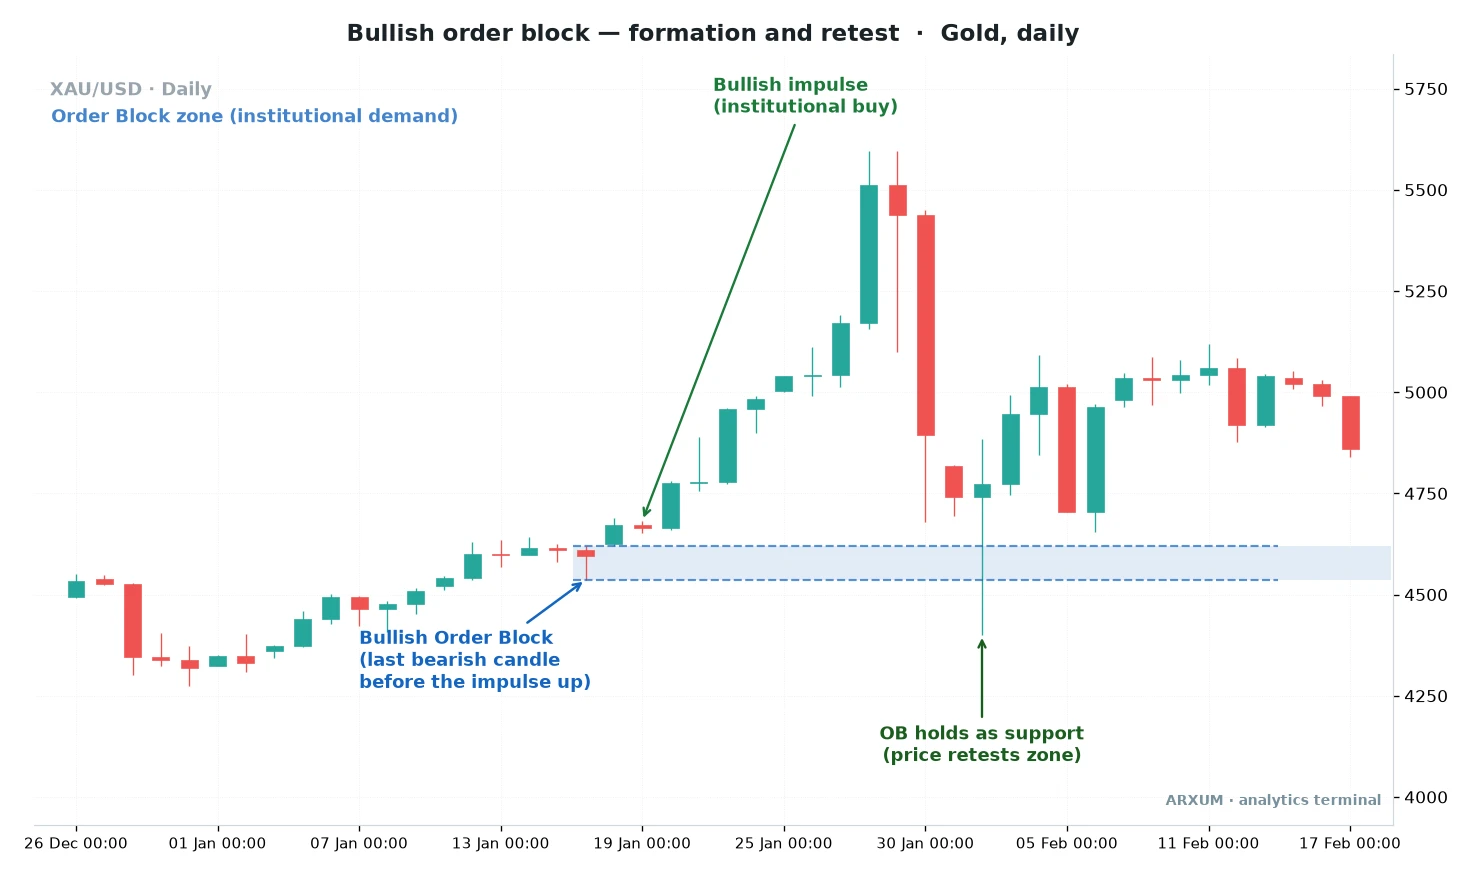
Read that gold chart from left to right, and every label on it maps to one idea.
- The order block zone (blue band) is drawn around that last down candle before the rally. It stands for institutional demand, the price where big buyers were active.
- The bullish order block is the candle itself, the final red candle before price leaves the area in a hurry.
- The bullish impulse is the fast green run that follows. The stronger and more one-sided it is, the more the block matters.
- OB holds as support is the payoff. Price comes back down to the zone, buyers defend it again, and it acts as a floor.
The whole concept lives in that sequence: a block, an impulse away from it, then a retest of the block. No impulse, no order block.
An order block in one glance
| Part | What it is | Plain read |
|---|---|---|
| Order block | The last candle before a strong move | Where the big orders were placed |
| Bullish block | Last down candle before an impulse up | A demand zone, a floor to buy from |
| Bearish block | Last up candle before an impulse down | A supply zone, a ceiling to sell from |
| The impulse | The fast move away from the block | Proof that real size stepped in |
| The retest | Price returning to the zone | The setup you actually trade |
The block is drawn as a rectangle, usually from the candle body to its wick, so you have a zone rather than a single line. Price rarely returns to the exact tick, so a band gives it room to breathe.
The two order blocks you will ever draw
There are only two. A bullish block you buy from, and a bearish block you sell from.
Everything else is a variation on these.
The bullish order block: a demand zone
A bullish order block is the last bearish candle before an impulse higher. You mark the zone and look to go long when price dips back into it.
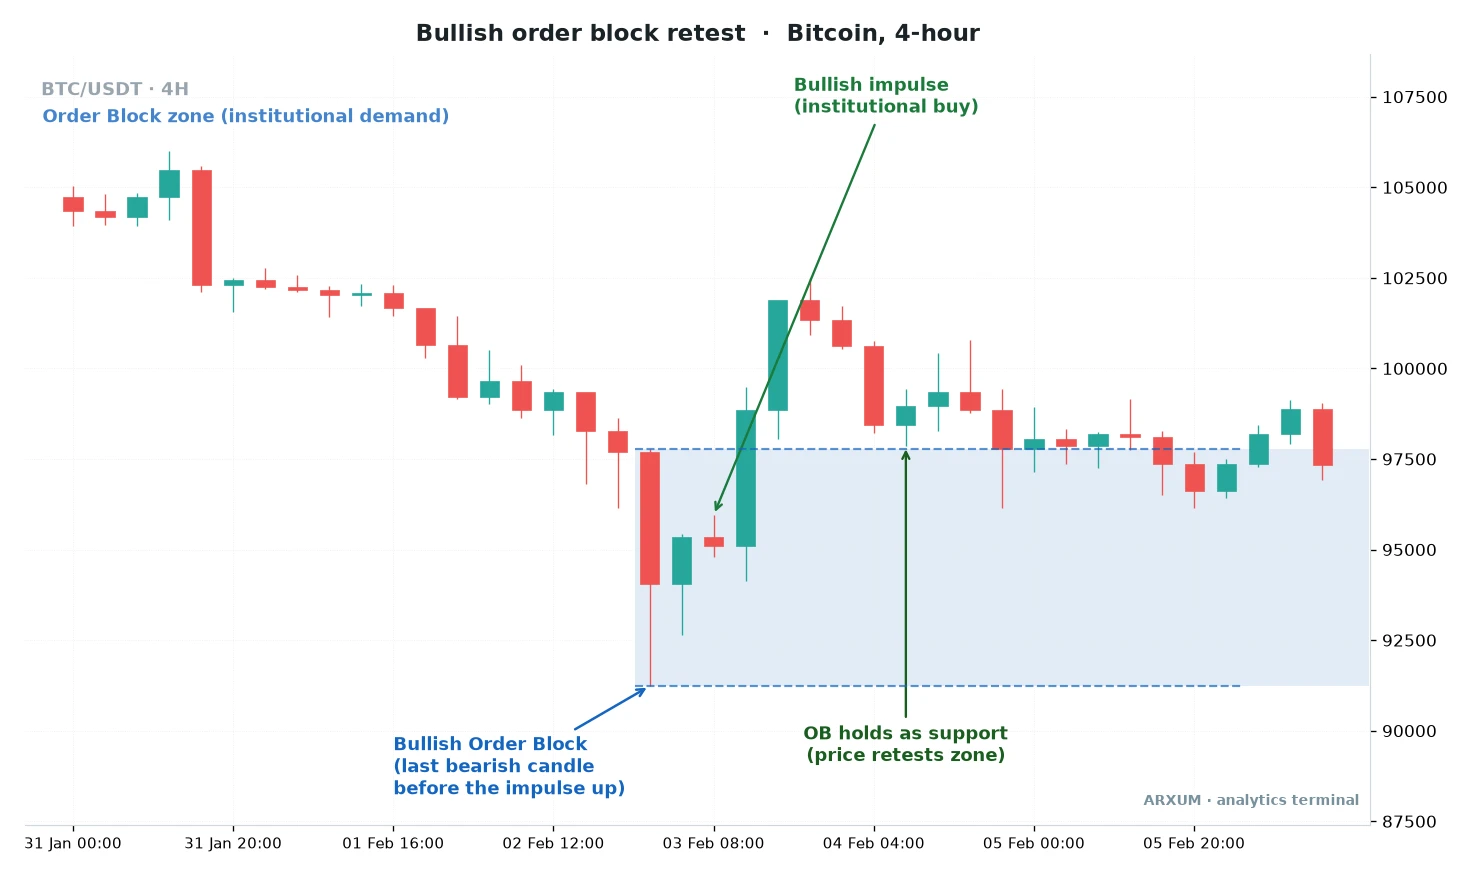
Same three-step story as the gold chart, just faster because it is a lower timeframe.
How it looks:
- A clear down candle (or a small cluster of them) sits right before price rips higher.
- The move away is fast and covers ground, not a slow grind. That impulse is the tell.
- Later, price falls back and taps the top of the zone. Buyers reload and it holds.
- The cleanest ones hold on the first retest and never fully fill the block.
The point of the zone is that it hands you a level to buy from with a tight stop just below it, rather than chasing a candle that already ran.
Application table: the bullish block
| Role | How you use it | Best TF and instrument |
|---|---|---|
| Entry trigger | Buy the first tap of the zone in an uptrend | H4 and D1 on gold, EUR/USD |
| Trend read | Only trust bullish blocks while price makes higher highs | D1 on gold and Bitcoin |
| Confirmation | Wait for a bullish candle to close inside the zone | H1 and H4 on Forex majors |
| Filter | Skip the block if the impulse was weak or overlapping | Any instrument, any TF |
| Exit cue | Trail behind the next demand zone as price climbs | H4 and D1 swing trades |
The bearish order block: a supply zone
Flip everything. A bearish order block is the last bullish candle before an impulse lower, and it marks a supply zone you look to sell from.
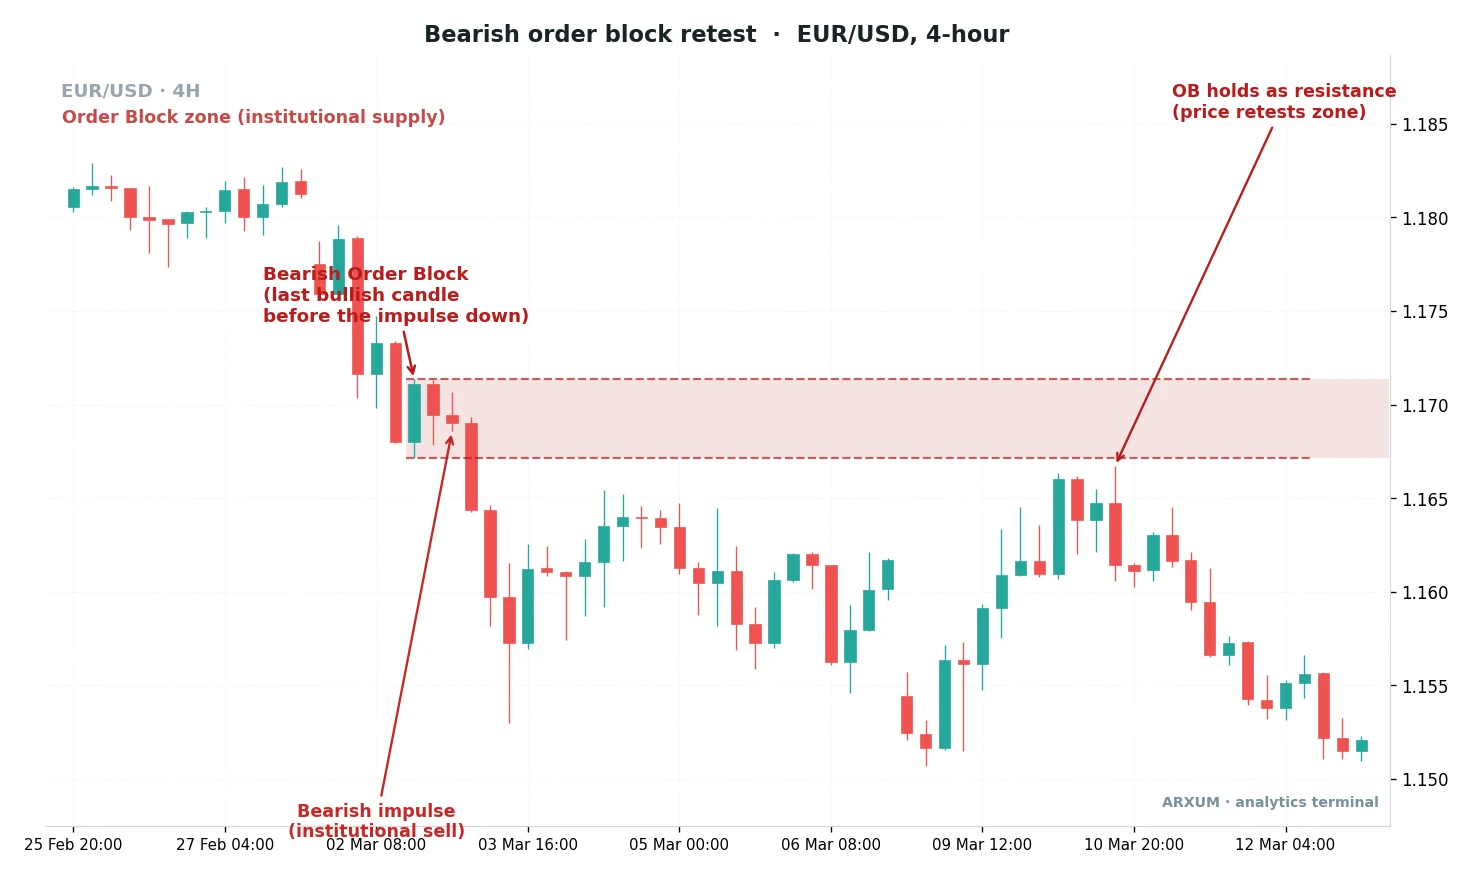
Read that EUR/USD chart around the two dashed lines and the shaded band.
- The bearish order block is the last green candle before the pair fell, marked as institutional supply.
- The bearish impulse is the drop that follows, an institutional sell that leaves the zone fast.
- OB holds as resistance is where price rallies back into the band much later, meets sellers and rolls over.
How it looks:
- A clean up candle prints just before price falls away hard.
- The drop is decisive, a wide-range move rather than a drift.
- Price later climbs back to the zone and stalls. Sellers cap it and it acts as a ceiling.
- A bearish close back inside the zone on the retest is the confirmation to act on.
Application table: the bearish block
| Role | How you use it | Best TF and instrument |
|---|---|---|
| Entry trigger | Sell the first tap of the zone in a downtrend | H4 and D1 on EUR/USD, GBP/USD |
| Trend read | Only trust bearish blocks while price makes lower lows | D1 on Forex and gold |
| Confirmation | Wait for a bearish candle to close inside the zone | H1 and H4 on Forex majors |
| Filter | Ignore the block if price already sliced through once | Any instrument, any TF |
| Exit cue | Take profit near the next support or demand zone | H4 and D1 swing trades |
What makes an order block valid
Not every candle before a move is a tradeable block. Most are noise.
A handful of checks separate a real zone from a line you drew because you wanted a trade.
- A real impulse leaves the block. The move away should be fast and one-sided, often a big engulfing candle or two. A lazy drift does not count.
- The block should be unmitigated. The best zones have not been retested yet. Once price fills a block and moves on, that zone is spent.
- It sits with the trend. A bullish block inside an uptrend is worth far more than one fighting a clear downtrend.
- It broke structure. The impulse should push price past a recent swing high or low, not just wiggle inside a range.
- Fresh beats old. A block from a few days or weeks ago carries more weight than one buried in old, stale price.
Here is the quick sort a lot of desk traders run before drawing anything.
| Draw the block when | Skip it when |
|---|---|
| The move away is sharp and wide | The move away is slow and overlapping |
| It agrees with the higher-timeframe trend | It fights the higher-timeframe trend |
| The zone is untouched since it formed | Price already came back and blew through it |
| The impulse broke a swing high or low | Price stayed stuck inside a range |
| It formed on H4 or D1 | It formed on the 1-minute during dead hours |
The one-line rule: if you cannot point to a fast, structure-breaking impulse leaving the candle, it is not an order block, it is just a candle.
How to trade the retest, not the breakout
The mistake beginners make is buying the impulse. By then the move is already gone.
The order block exists so you can wait for price to come back and give you a second, cheaper entry.
That patience is the whole edge. The retest gives you a tight stop just past the zone, which is what makes the reward-to-risk attractive in the first place.
| Step | What you do | Why it matters |
|---|---|---|
| Mark the zone | Box the last candle before the impulse | Turns a candle into a level to watch |
| Wait for the return | Let price drift back into the block | You enter cheap, not chasing |
| Want confirmation | Look for a candle closing back in your direction | Filters out zones that fail |
| Place the stop | Just beyond the far edge of the zone | A clean invalidation, small risk |
| Set the target | The next opposing zone or swing point | Books profit before the next battle |
A few honest notes on the retest, because it is where most setups fall apart.
- Not every block gets retested. Sometimes price runs and never looks back. That is a missed trade, not a loss. Let it go.
- Some blocks fail. Price taps the zone and slices straight through. The stop past the zone is what keeps that cheap.
- Confirmation costs you the best fill but saves you from the worst. Waiting for a candle to close in your direction skips the zones that were going to break anyway.
Order blocks next to the zones they resemble
Order blocks are not a brand-new idea. They are a tighter, rule-based cousin of levels traders have drawn for decades.
Knowing the family helps you stack them.
| Concept | What it marks | How it differs from an order block |
|---|---|---|
| Order block | Last candle before an impulse | Precise, tied to one candle and a move |
| Supply and demand | A broad area buyers or sellers defended | Wider, less exact, drawn by feel |
| Fair value gap | A price gap left by a fast move | A gap inside the impulse, not the origin candle |
| Support and resistance | Horizontal lines price respects | A single line, not a directional zone |
The useful part is confluence, which just means two reasons lining up in the same spot.
- An order block that also sits on an old support line is stronger than either alone.
- A bullish block with a fair value gap just above it often gets filled on the same retest.
- A supply zone and a bearish order block stacked together make a heavy ceiling.
These concepts all live under the wider ICT trading toolkit, so if order blocks click for you, the rest of that framework will feel familiar.
Which timeframe and which market
Order blocks work on any chart, but they are not equally clean everywhere. The higher the timeframe, the more the zone means, because it takes real size to move a daily candle.
| Timeframe | How order blocks behave | Best used for |
|---|---|---|
| D1 daily | Few, but heavy and reliable | Swing entries on gold and Forex |
| H4 4-hour | The sweet spot, clean and frequent | The main working timeframe |
| H1 hourly | More zones, more noise | Intraday, with a higher-TF filter |
| M15 and below | Constant blocks, many fail | Scalping only, expect false taps |
And the market matters as much as the clock.
- Gold and Forex majors are the natural home. They trend in clean legs and respect zones, which is exactly what an order block needs. EUR/USD and gold on H4 are about as textbook as it gets.
- Bitcoin works but moves fast. Its impulses are violent and its retests are quick, so blocks fill and fail faster. Trade them on H4 and D1, not the 5-minute.
- Quiet, range-bound sessions punish the concept. With no real impulse, every candle looks like a block and none of them hold.
The rule of thumb: find the zone on the daily or 4-hour, then drop a timeframe or two to time the entry. High timeframe for the level, lower timeframe for the trigger.
How to mark an order block on your charts
You do not need a paid indicator. An order block is drawn by hand with the rectangle tool, though a few free scripts will auto-detect them.
| Platform | What to use | Note |
|---|---|---|
| TradingView | The rectangle drawing tool | Box the last candle before the impulse, body to wick |
| TradingView | Search “Order Block” in indicators | Free community scripts auto-mark zones, treat them as a draft |
| MetaTrader 4 and 5 | The rectangle object | No native order block tool ships with the platform |
Two honest points on the tools.
- Auto-detect scripts are a starting point, not gospel. They flag every candle before a move, so you still filter by trend and impulse yourself.
- Hand-drawing is a feature, not a chore. Marking the zone yourself forces you to check the impulse and the structure, which is the part that keeps you out of bad trades.
For the wider context around these zones, a read on price action trading pairs naturally with order blocks, since both come down to reading what price did rather than a lagging line.
What works: the three things to remember
Keep these three and you have the working core of the concept.
- The impulse makes the block. No fast, structure-breaking move away, no order block. That single filter throws out most of the candles you would otherwise mark.
- You trade the retest, not the run. The zone exists so you can enter cheap on the return, with a tight stop past the far edge. Chasing the impulse is the beginner error.
- Higher timeframe, with the trend. Blocks on H4 and D1 that agree with the bigger trend hold far more often than low-timeframe blocks fighting the tape.
Order blocks will not call every move, and plenty of zones fail on contact. Used for what they are, a precise place to buy demand or sell supply in a trending market, they turn a vague “supply and demand” area into a level you can actually act on.
FAQ
What is an order block, in plain terms?
Do order blocks actually work?
What is the difference between a bullish and a bearish order block?
How do I know if an order block is valid?
What is the best timeframe for order blocks?
How is an order block different from a supply and demand zone?
How do I trade an order block retest?
What do the key order block terms mean?
Real-time trade setups with entry, stop loss and take profit. Daily market analysis. No subscription, no complicated theory.
🌍 Our recommended brokers


Reader Reviews
Be the first to review this — tell other traders what actually helped, or where it fell short.
Leave a Review

Momentum Trader & Technical Analyst
Trades momentum across crypto and forex since 2019, built around RSI, MACD, and volume. Turns discretionary setups into rule-based, systematic entries and validates them on data before they go live.
