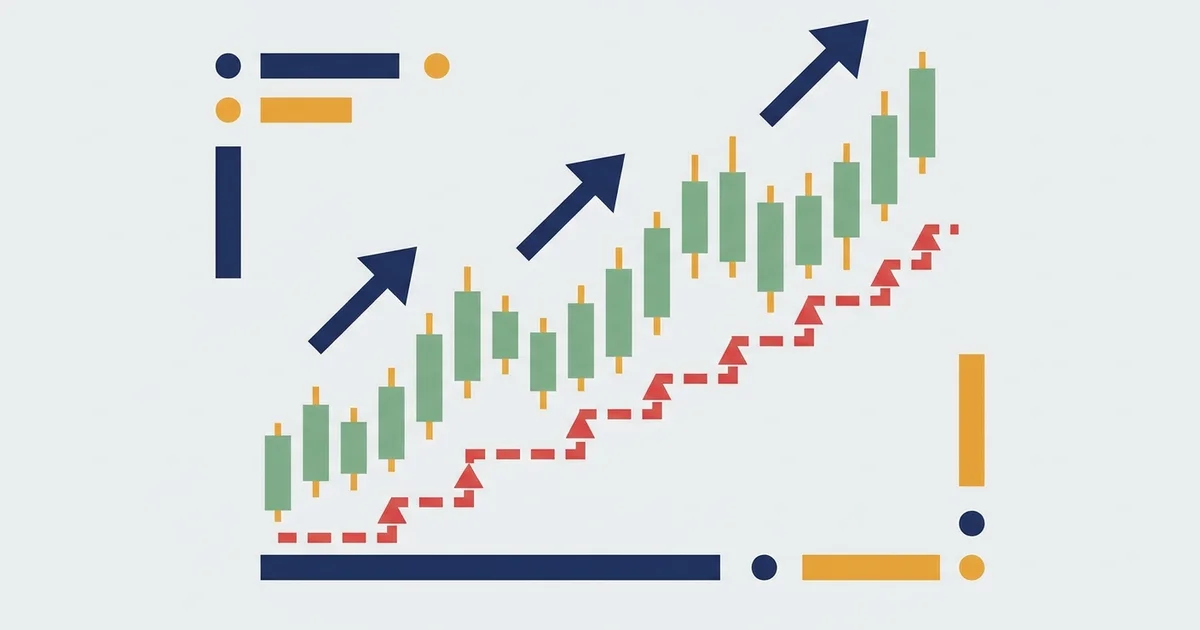

What a stop loss in trading actually is
A stop loss is a pending order that sits at a price below your entry on a long, or above it on a short. When price touches it, the broker closes the trade at market, so a small planned loss never turns into an account-ending one.
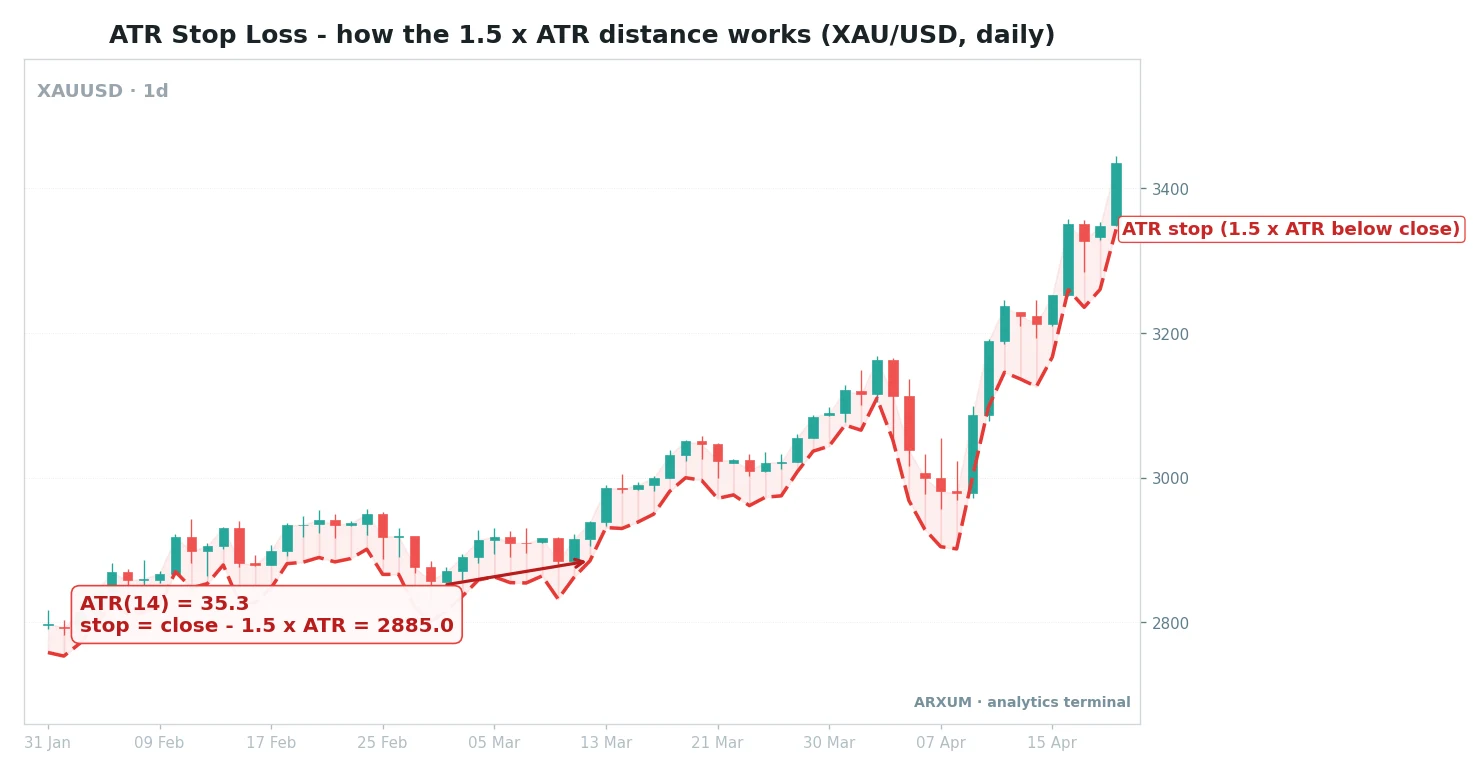
The gold chart above shows the idea in one picture: a stop is just a line under price, and the whole game is choosing how far under.
- The entry is where you get in. The stop is where you admit the idea was wrong.
- The distance from entry to stop is your risk on the trade, measured in pips, points or dollars. A pip is the standard small price step in Forex, the fourth decimal on EUR/USD, so 0.0001.
- ATR (average true range) is a gauge of how much a market typically moves in one bar. A bigger ATR means wider swings, so the stop needs more room. See the ATR guide for the full read.
- The method is what sets that distance: market structure, volatility, a percentage, or a trailing rule.
The order type behind all of this is the plain stop order, one of the core order types every platform offers.
The one thing to remember: the stop order is trivial to place. The edge is in the placement logic, which is the rest of this guide.
Why placement beats the stop itself
A stop in the wrong spot is worse than no plan at all, because it feels safe while quietly bleeding the account. Two traders can take the same entry and one wins while the other stops out, purely on where the line sat.
- Too tight and routine noise, the normal wiggle inside a trend, triggers the stop before the trade works.
- Too wide and the loss when you are wrong is so large it wipes out several good trades.
- On a random round number and you park right where other stops cluster, which is exactly where price tends to get pushed to trigger them.
- Ignoring volatility and the same 20-pip stop that fits a quiet session gets shredded in a fast one.
Good placement ties the stop to something real on the chart, so it only triggers when the reason for the trade has genuinely broken.
The five ways to place a stop loss
Learning how to set stop loss orders well comes down to picking one of these five logics, each answering the same question, “how far below price”, a different way. Tap a row to jump to it.
| Method | The distance is set by | Best used when |
|---|---|---|
| ATR-based | A multiple of the ATR | You want the stop to scale with volatility |
| Structure-based | The last swing low or support | Price respects clear levels |
| Percentage-based | A fixed % from entry | You want a simple, mechanical rule |
| Chandelier Exit | Highest high minus 3x ATR | Riding a strong trend and trailing it |
| Trailing stop | A rule that follows price up | Locking in an open profit as it grows |
The first three are entry stops, set once when you open the trade. The last two are exit engines that move the stop as the trade runs.
1. ATR-based: a multiple of the average range
This is the method on the gold chart at the top. You read the ATR straight off your charting platform, where it is a standard built-in indicator, then set the stop a fixed multiple of it away from entry, usually 1.5 to 2 times.
How it looks:
- The stop sits 1.5 to 2 x ATR below entry for a long, above for a short.
- In a calm market the ATR is small, so the stop is naturally tight.
- In a fast market the ATR expands, so the stop widens to survive the bigger swings.
- It never asks you to guess. The market sets the width for you.
An atr stop loss shines because it adapts. The same rule gives a 15-pip stop on a sleepy EUR/USD session and a 60-pip stop on a volatile gold day, without you touching a setting.
| Role | How you use it | Best read |
|---|---|---|
| Entry stop | Stop at entry minus 1.5 to 2 x ATR | D1 and H4 on gold, BTC |
| Volatility filter | Skip the trade if ATR is spiking wildly | Any instrument, fast sessions |
| Width sanity check | Compare a chart-based stop to the ATR distance | H4 on Forex majors |
| Setting | ATR length 14, multiple 1.5 to 2 | Wider multiple for crypto |
Rule of thumb: start at 2 x ATR(14) and only tighten it if your trade idea depends on a fast exit.
2. Structure-based: below the swing low
Here the chart tells you where the stop goes. On a long you place it just under the last swing low, the most recent point where price turned back up.
If that level breaks, the reason you were long is gone.
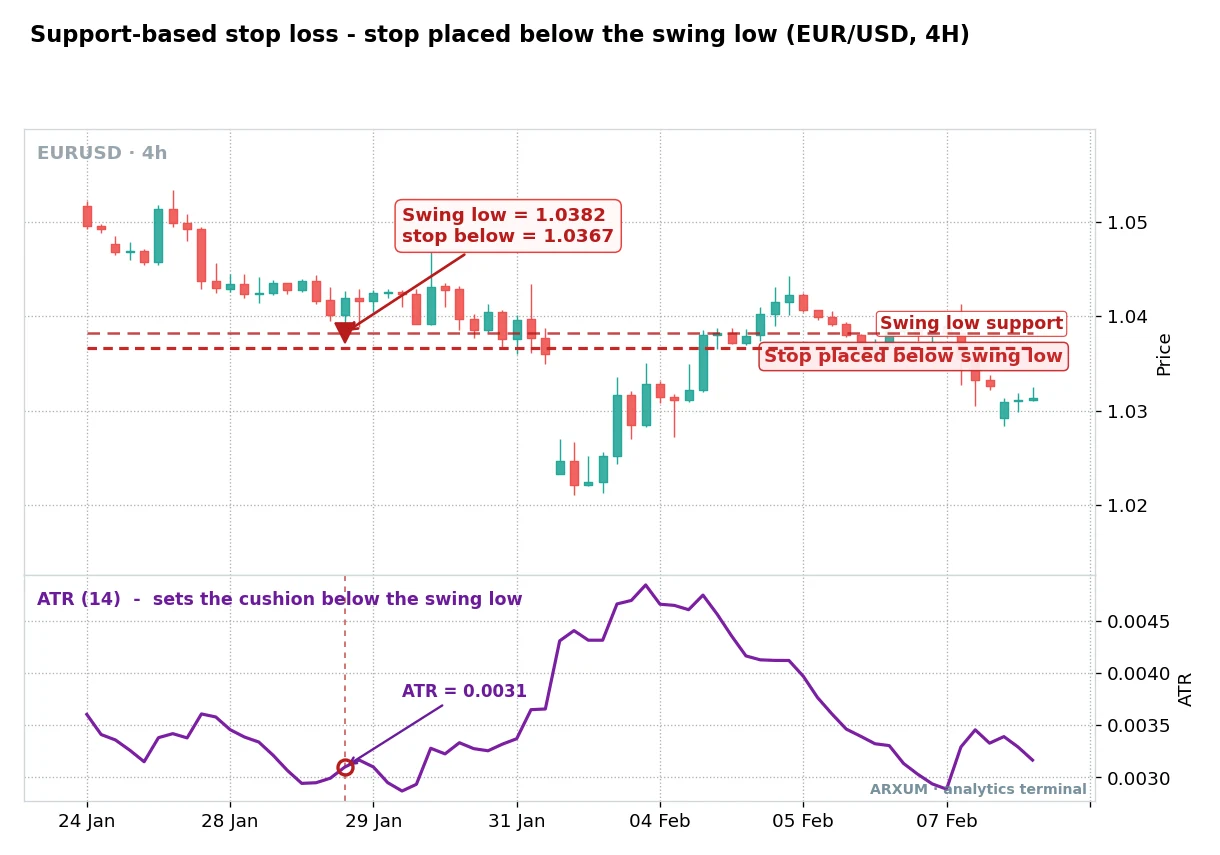
Read the EUR/USD chart around the marked swing low. The upper dashed line is the support the buyers defended, and the lower one is where the stop actually sits, a touch beneath it.
How it looks:
- Find the last clear swing low (long) or swing high (short) before your entry.
- Place the stop a small cushion beyond it, not exactly on it, so a quick wick does not trigger you.
- Size the cushion with the ATR, as the chart does, rather than a random few pips.
- The logic is clean: the stop only fires when the level that mattered has actually broken.
This is the stop loss based on support and resistance that most desk traders default to, because it is tied to a real decision point rather than an arbitrary number. Pair it with the support and resistance guide to spot the levels worth using.
| Role | How you use it | Best read |
|---|---|---|
| Entry stop | Just beyond the last swing low or high | H4 and D1, all instruments |
| Level filter | Only trade toward clean, tested levels | Forex majors, gold |
| Cushion size | Add an ATR-based buffer below the level | H1 to D1 |
| Invalidation | Exit if the structural level breaks and holds | Swing trades |
Rule of thumb: if you cannot point to the exact level your stop is protecting, you are guessing, not placing.
3. Percentage-based: a fixed slice of the move
The simplest method of all. You set the stop a fixed percentage from entry, say 2% on a stock-style asset or a set number of pips on Forex, regardless of what the chart looks like.
How it looks:
- Pick a fixed distance, for example 2% below entry or a set pip count.
- Apply it the same way every trade, no chart reading required.
- It is fast and mechanical, which suits beginners and busy traders.
- The trade-off: it ignores volatility and structure, so it can land in a bad spot.
A percentage stop is a fine starting point, but it is blunt. In a calm market 2% may be far too wide, and in a fast one it can be too tight.
Most traders graduate from it to an ATR or structure stop once they have a few hundred trades behind them.
| Role | How you use it | Best read |
|---|---|---|
| Beginner default | One fixed % or pip stop on every trade | Any instrument to start |
| Crypto swing | A wider % to survive normal crypto swings | D1 on Bitcoin |
| Quick discipline | Guarantees a stop exists when time is short | Fast intraday decisions |
| Upgrade path | Replace with ATR or structure as you improve | H4 and D1 |
Rule of thumb: use it to guarantee you always have a stop, then upgrade to a method that reads the chart.
4. Chandelier Exit: a volatility trail
The Chandelier Exit is a trailing stop built from the ATR. It hangs the stop a set distance, usually 3 x ATR, below the highest high since you entered, so it rises as the trend makes new highs.
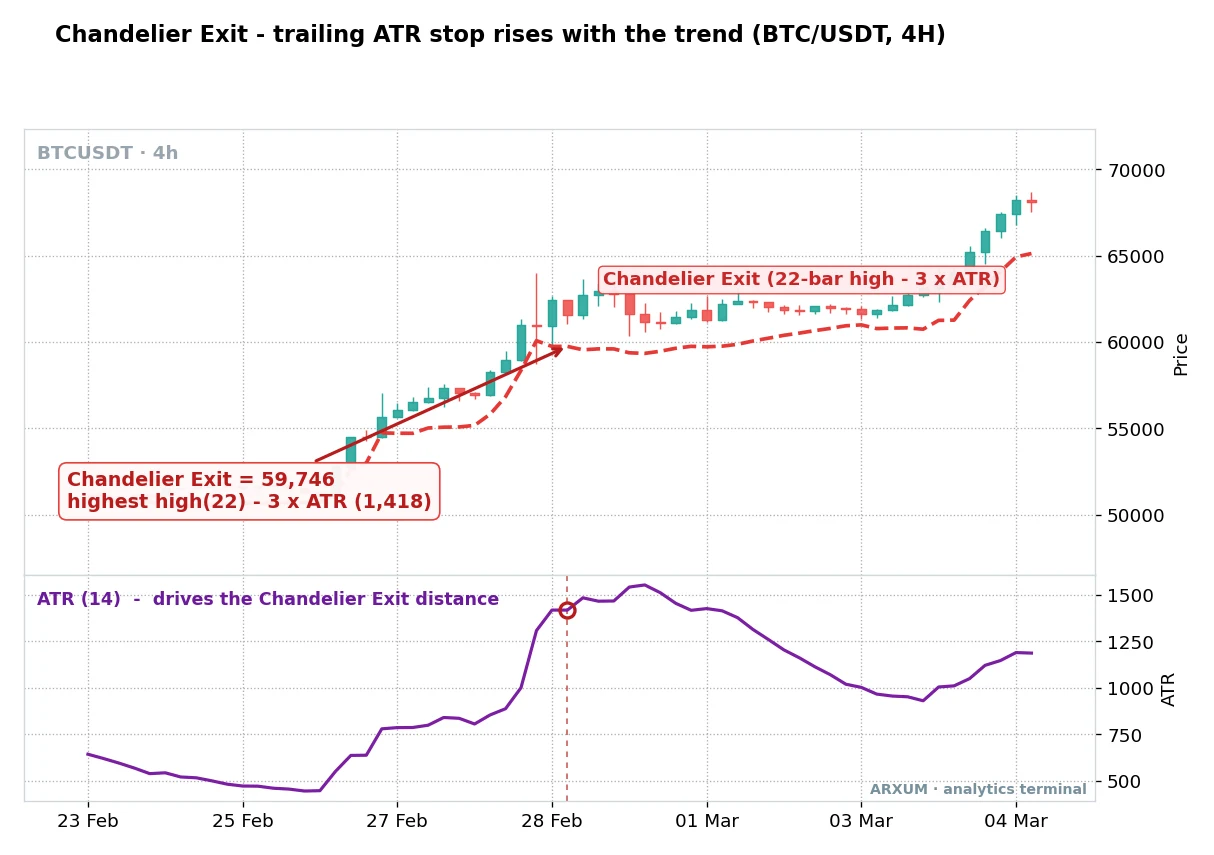
On the Bitcoin chart the dashed line climbs in steps as price pushes higher, always keeping a volatility-sized gap below the market.
How it looks:
- The stop is the highest high since entry minus 3 x ATR.
- It rises as new highs print but does not jump around on small pullbacks.
- The 3 x ATR gap is deliberately generous, so it holds you in a strong trend.
- It flips the job of the stop from capping a loss to protecting an open profit.
The Chandelier Exit suits trend riders who want to stay in a runner and only leave when momentum genuinely rolls over. It is looser than an entry stop on purpose.
| Role | How you use it | Best read |
|---|---|---|
| Trend trail | Trail a winning position, exit on the break | D1 and H4 on BTC, gold |
| Profit lock | Let the stop ride up under the trend | Strong one-way moves |
| Setting | 22-bar high, ATR 14, multiple 3 | Wider on crypto |
| Avoid | Not for choppy, range-bound markets | Sideways sessions |
Rule of thumb: use it when your goal is to catch a big move, and accept it gives back some open profit at the exit.
5. Trailing stop: the ratchet that follows price
A trailing stop is any rule that moves the stop in your favour as price advances, and never moves it back. It ratchets.
Once the stop steps up, it stays up, locking in more of the move with every push.
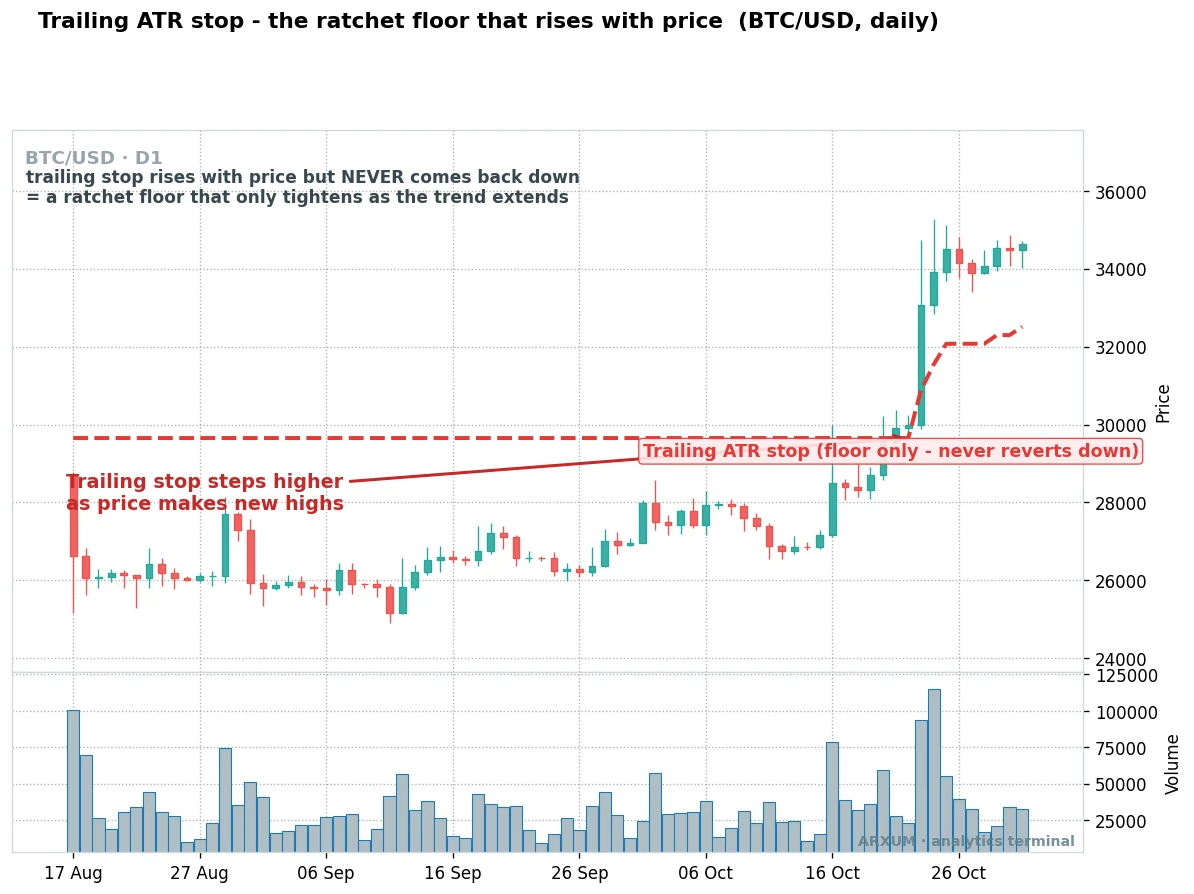
The daily Bitcoin chart shows the ratchet clearly. As price breaks out, the dashed stop jumps up under it and then locks, so a later pullback finds the stop already parked at a higher level.
How it looks:
- The stop moves up with price and never moves down.
- Each new high drags the floor higher, banking more of the open gain.
- The trailing distance can be ATR-based, a fixed amount, or a chart level.
- When price finally turns and hits the ratcheted stop, you keep most of the run.
A trailing stop is the natural tool once a trade is comfortably in profit. It answers a different question than an entry stop: not “was I wrong” but “how much of this winner do I protect”.
The dedicated trailing stop loss guide covers the exact types and how to set them.
| Role | How you use it | Best read |
|---|---|---|
| Profit protection | Trail once the trade is safely in the green | D1 and H4, trending markets |
| Breakeven step | First move the stop to entry, then trail | Any instrument |
| Trail distance | ATR-based or a fixed pip or dollar step | Match to volatility |
| Avoid | Trailing too tight cuts the trend short | Choppy markets |
Rule of thumb: move to breakeven first, then trail, so a winner can never turn into a loser.
Pairing the stop with a take profit
A stop only makes sense next to a target. Together they set your reward-to-risk, written as 1:X, where the 1 is the distance from entry to stop and the X is how many times that distance the target sits away.
This is the core of any stop loss and take profit plan.
- The stop defines your 1R, the risk unit for the trade.
- The target sets the reward, expressed as a multiple of that risk.
- A 1:2 trade risks one to make two. A 1:3 risks one to make three.
- With 1:2, you can be right less than half the time and still come out ahead.
| Reward-to-risk | Win rate to break even | Fits |
|---|---|---|
| 1:1 | About 50% | Scalps, quick intraday trades |
| 1:2 | About 34% | The standard swing target |
| 1:3 | About 25% | Trend trades with room to run |
The break-even column is just that math. At 1:2 roughly one win pays for two losses, so being right about a third of the time keeps you flat, and anything above that is profit.
The math is the whole reason a wide but well-placed stop can beat a tight one. A tighter stop lets you aim for a bigger multiple, but only if the level survives the noise.
The risk-reward ratio guide works through the 1:X framing in full.
Takeaway: decide the stop and the target together, before you enter, and skip trades that cannot offer at least 1:2.
Fixed stop vs trailing stop
Both have a place, and good traders use each at a different stage of the same trade.
A fixed stop protects the entry idea. A trailing stop protects an open profit.
| Fixed stop | Trailing stop | |
|---|---|---|
| Job | Cap the loss if wrong | Lock in an open gain |
| Moves | Stays put until hit | Follows price, never back |
| Best stage | At and just after entry | Once the trade is in profit |
| Risk | Can give back a big winner | Can exit a trend early |
The common flow is simple. Open with a fixed structure or ATR stop, move it to breakeven once price clears the first target, then hand the trade to a trailing rule for the rest of the run.
Takeaway: it is not one or the other. Fixed to survive the start, trailing to harvest the middle and end.
Crypto vs Forex: the stop loss differences that bite
The same method needs different settings across markets, and a stop that fits EUR/USD can be far too tight for Bitcoin. Two structural differences matter most.
- Forex gaps on the weekend. The market closes Friday and reopens Sunday, and price can jump straight past a resting stop, filling worse than your level.
- Crypto trades nonstop with no weekend gap, but it prints violent wicks and flash moves that spear tight stops in seconds.
- Funding-rate spikes on crypto perpetuals can drive sharp, short-lived pushes that trigger stops before price snaps back.
- Round numbers get hunted in both markets, so a stop parked exactly on 1.1000 or 60,000 sits in the crosshairs.
| Factor | Forex | Crypto |
|---|---|---|
| Session | Closed weekends, gaps possible | 24/7, no gaps |
| Typical stop width | Tighter, ATR is smaller | Wider, ATR is larger |
| Main hazard | Weekend gap through the stop | Flash wicks and funding spikes |
| Placement tip | Avoid holding over the weekend naked | Give the stop extra ATR room |
Takeaway: widen your ATR multiple and avoid round-number levels on crypto, and be wary of carrying a Forex position through the Friday close with a tight stop.
Sizing the trade from the stop
The stop is also what sizes the position. You never pick a lot size first.
You decide how many dollars you are willing to lose, then let the stop distance set the size. This is the sizing rule the whole cluster rests on.
The formula is one line:
Position size = (account risk in dollars) / (entry-to-stop distance)
A worked example on a small $1,000 account, risking 2% per trade:
- Risk budget: 2% of $1,000 = $20 you are willing to lose.
- Trade: long EUR/USD at 1.0800, structure stop at 1.0760, so the stop is 40 pips away.
- A lot is the trade-size unit, and a micro lot (0.01 lot) is the smallest common size. On most USD-quoted Forex pairs it is worth about $0.10 per pip, a number your broker shows you.
- Risk per micro lot = 40 pips x $0.10 = $4 per micro lot.
- Size: $20 / $4 = 5 micro lots (0.05 lot).
That 5-micro-lot position risks exactly the planned $20 if the stop is hit, and no more. Those 5 micro lots use only a sliver of the account, so the leverage is modest.
A broker offering 1:100 just gives you the room to open the size, it is not extra risk, because the 2% rule already caps your loss. The full method is in the position sizing guide.
Takeaway: the wider your stop, the smaller your position, so a sensible stop and correct sizing keep every loss the same small size.
Common stop loss mistakes
Most blown accounts come down to a handful of stop errors, repeated. Knowing where to place stop loss orders is half the job, and avoiding these is the other half.
- Stops too tight. The single most common killer. A stop inside the normal noise gets hit on a routine wiggle, then price runs to your target without you.
- Round-number placement. Stops bunch at obvious levels like 1.2000 or 30,000, and price is often pushed there to trigger them before reversing.
- No stop at all. Holding a loser and hoping is not a strategy. One trade with no stop can undo months of discipline.
- Moving the stop wider. Widening a stop to avoid being hit is the fastest way to turn a small planned loss into a large unplanned one.
- Ignoring the news. A stop cannot protect you across a gap or a data spike, so size down or stand aside around big releases.
Takeaway: the stop is a decision you make before the trade and honour during it. The moment you start negotiating with it, the plan is broken.
What works: the three things to remember
If you keep only three points from this guide, keep these.
- Tie the stop to the chart, not a feeling. A structure or ATR stop only triggers when your reason for the trade has actually broken. That is the whole point of a stop.
- Match the width to the market. Give crypto more ATR room than Forex, avoid round numbers, and never set a stop inside the normal noise.
- Let the stop size the trade. Risk a fixed small percentage, size the position off the stop distance, and every loss stays the same manageable size.
A stop loss is not about being right. It is about staying in the game long enough for your edge to show up.
Get the placement right and the losses take care of themselves.
Pair this with a look at reward-to-risk and position sizing, and the risk side of your trading is covered.
FAQ
What is a stop loss in trading, in plain terms?
It is a resting order that automatically closes your trade at a set price to cap the loss. On a long you place it below your entry, on a short above it. When price touches that level the broker exits you at market, so a small planned loss cannot grow into a large one. The order is simple. The skill is deciding where to put it.
Where should I place a stop loss?
Tie it to something real on the chart rather than a random number. The two most reliable choices are just beyond the last swing low or high, which is the structure-based method, or a multiple of the ATR, usually 1.5 to 2 times, which scales with volatility. Both only trigger when the reason for your trade has genuinely broken, not on normal noise.
How tight should a stop loss be?
Tight enough to keep the loss small, but wider than the market's normal wiggle. If the stop sits inside routine noise it gets hit on a random move before the trade works. The ATR is the honest gauge here: set the stop at least 1.5 times the ATR away so ordinary swings do not trigger it. On crypto, widen that because the swings are bigger.
What is an ATR stop loss?
It sets the stop a fixed multiple of the ATR away from entry, usually 1.5 to 2 times. The ATR, or average true range, measures how much a market typically moves in one bar. Because the stop is built from it, the distance tightens automatically in calm markets and widens in fast ones, without you changing any setting.
How do I set a stop loss based on support and resistance?
On a long, find the last clear swing low or support level below your entry, then place the stop a small cushion beneath it, not exactly on it, so a quick wick does not stop you out. Size that cushion with the ATR. If the level breaks and holds, your trade idea is invalid and the stop takes you out cleanly.
What is the difference between a stop loss and a trailing stop loss?
A fixed stop loss stays put and protects your entry idea by capping the loss if you are wrong. A trailing stop moves up with price and never moves back, so it protects an open profit as the trade runs. A common flow uses a fixed stop at entry, moves it to breakeven, then trails the rest of the winner.
What is the Chandelier Exit?
It is a trailing stop built from the ATR. It hangs the stop a set distance, usually 3 times the ATR, below the highest high since you entered, so it rises as the trend makes new highs. The wide gap is deliberate, to hold you in a strong trend and only exit when momentum genuinely rolls over.
How do I coordinate a stop loss and take profit?
Decide both before you enter. The stop distance is your risk, or 1R. The target is set as a multiple of that, written 1:2 or 1:3. A 1:2 trade risks one to make two, which means you can win less than half your trades and still profit. Skip any setup that cannot offer at least 1:2 reward-to-risk.
How does the stop loss size my position?
You risk a fixed small percentage of the account, then divide it by the stop distance. On a 1,000 dollar account risking 2 percent, that is 20 dollars. If the stop is 40 pips away on EUR/USD and a micro lot risks about 4 dollars over that distance, you trade 20 divided by 4, which is 5 micro lots. The wider the stop, the smaller the position.
Do crypto and Forex need different stop loss settings?
Yes. Crypto swings are larger, so it needs a wider ATR multiple and more room, and it trades 24/7 with violent wicks and funding spikes that hunt tight stops. Forex is tighter but closes on weekends, so price can gap straight past a resting stop. Widen stops on crypto, and avoid holding a tight Forex stop naked over the Friday close.
Real-time trade setups with entry, stop loss and take profit. Daily market analysis. No subscription, no complicated theory.
🌍 Our recommended brokers


Reader Reviews
Be the first to review this — tell other traders what actually helped, or where it fell short.
Leave a Review

Momentum Trader & Technical Analyst
Trades momentum across crypto and forex since 2019, built around RSI, MACD, and volume. Turns discretionary setups into rule-based, systematic entries and validates them on data before they go live.
