

For the wider map of breakout and reversal shapes, see the chart patterns guide. This piece takes one pattern and finds the exact markets and timeframe where it earns its keep.
What the pattern actually is
A cup and handle is an uptrend taking a breath and then continuing:
- The cup: price drifts down from a high, rounds out at a bottom, and climbs back to roughly where it started. The base should be a gradual arc, not a sharp V. The rounder it is, the more it reflects real accumulation rather than a panic bounce.
- The handle: a short, shallow pullback after price returns to the old high. It should stay in the upper half of the cup. A handle that sinks deeper than that is a warning the buyers are not in control.
- The breakout: a candle that closes above the rim, ideally on a jump in volume.
A line across the two rims is the rim resistance, and a close above it is the trigger. There is also an inverted version, the same shape flipped at a top, that points down. Here are both, the way a textbook draws them.
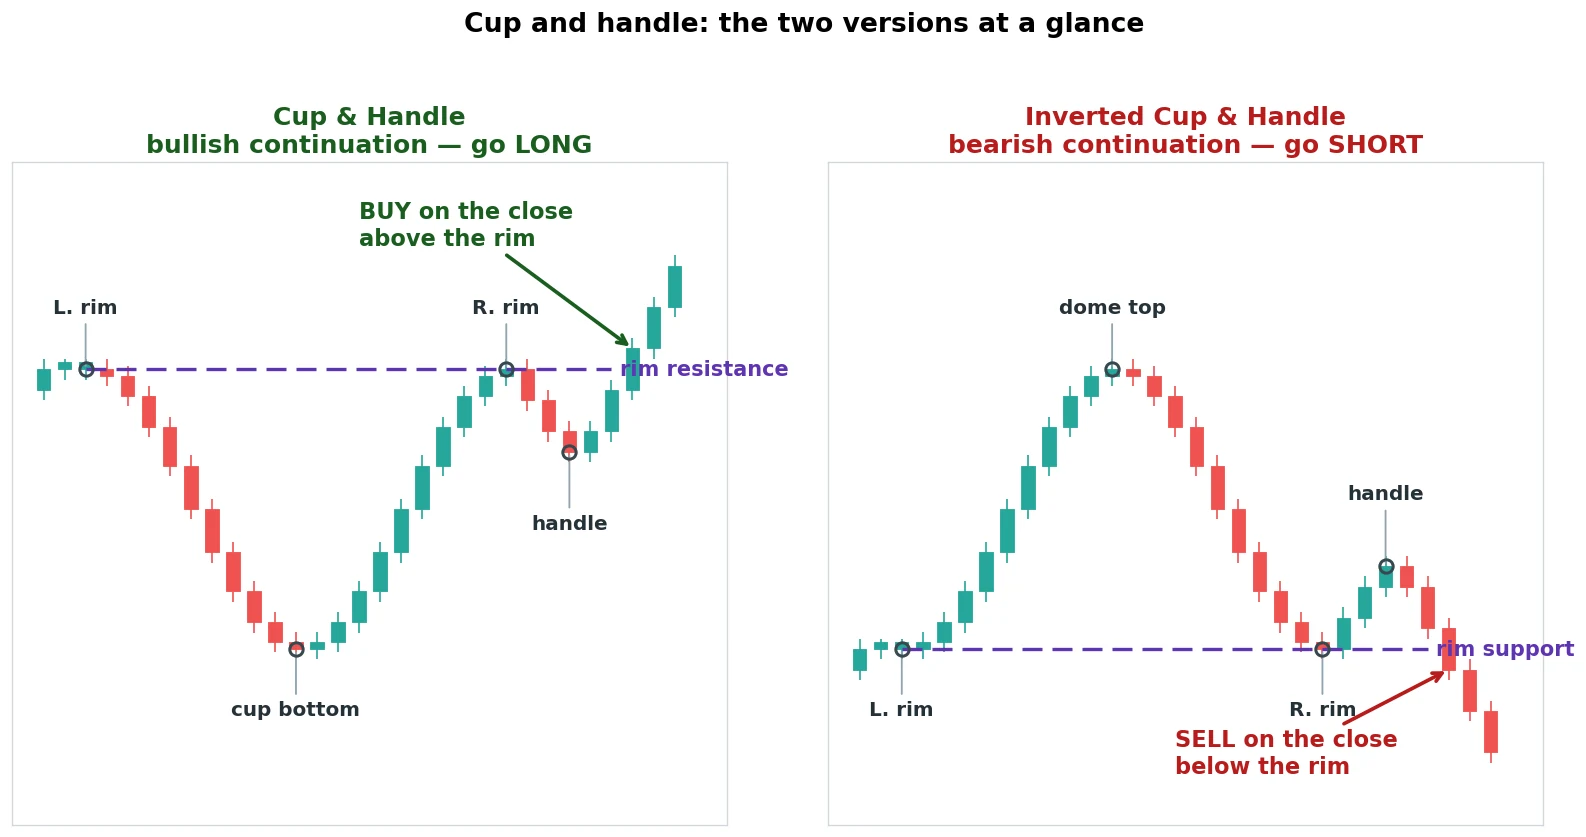
A quick note on direction, because it matters. I tested the bearish inverted version too, as a short. It lost across every market, for a simple reason: shorting a continuation pattern means betting against the very uptrend the cup sits inside. So this is a long-only pattern, and the rest of this guide is about the bullish cup. Here it is in battle mode, a cup that built on gold’s daily chart into mid-2025.
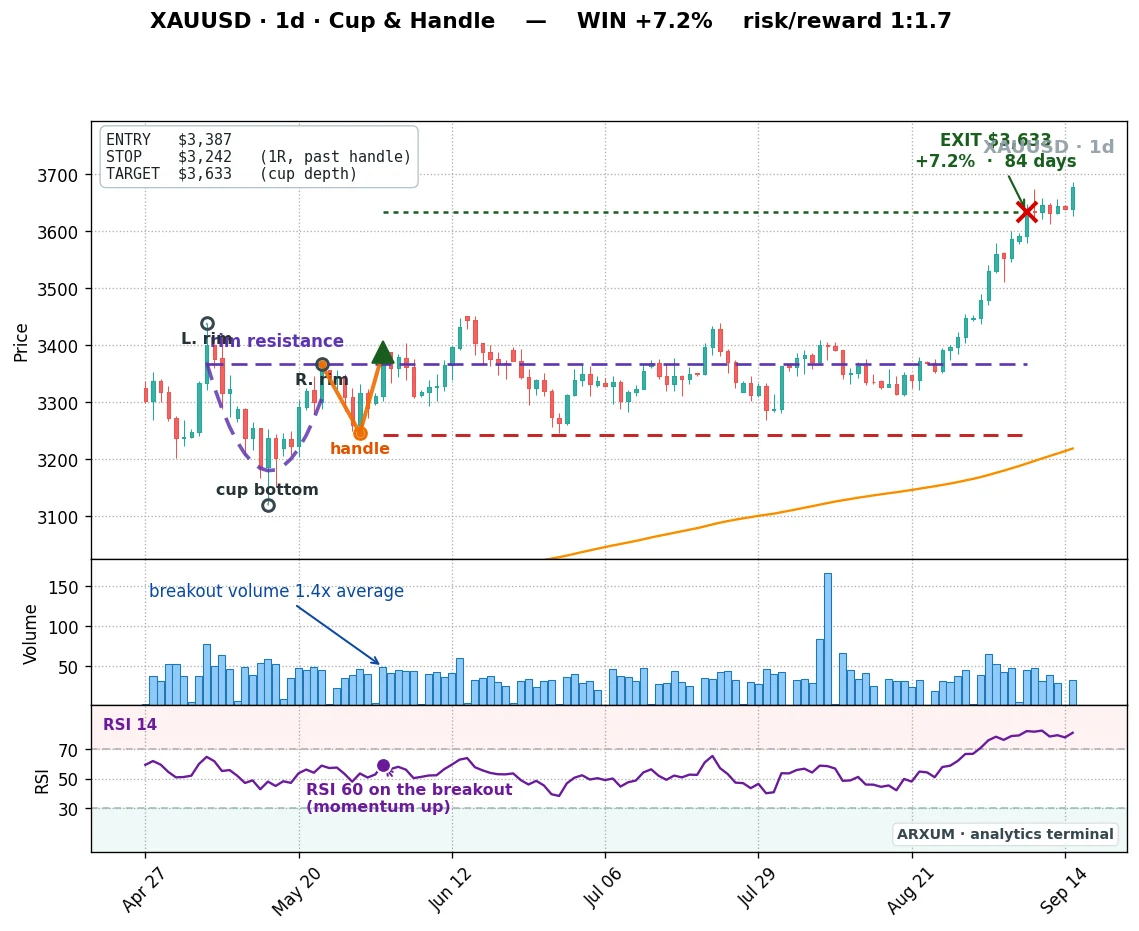
Five things define the trade, and they are all on that chart:
- The two rims, roughly level, marking the cup’s resistance.
- The rounded base, gradual, not a spike.
- The handle, a shallow pullback holding the upper half of the cup.
- The entry, on the candle that closes above the rim.
- The measured target, the cup’s depth projected up the same distance from the breakout.
On that last point: on the gold trade the rim sat near $3,387 and the cup bottom near $3,141, so the cup was about $246 deep. Project that $246 up from the breakout and the target lands near $3,633, which is roughly where the move topped out.
That is the textbook. Now the question the textbook dodges: where does trading it actually make money?
The honest problem: it only works where price trends
Most guides show you a cup and handle on whatever chart makes the prettiest picture, usually a hot crypto. So I built a detector that finds every clean cup and handle, then traded the rim break by the book across gold, the pound, the euro, and Bitcoin. On the daily chart, the home of this slow pattern, the result sorts the markets cleanly into two camps.
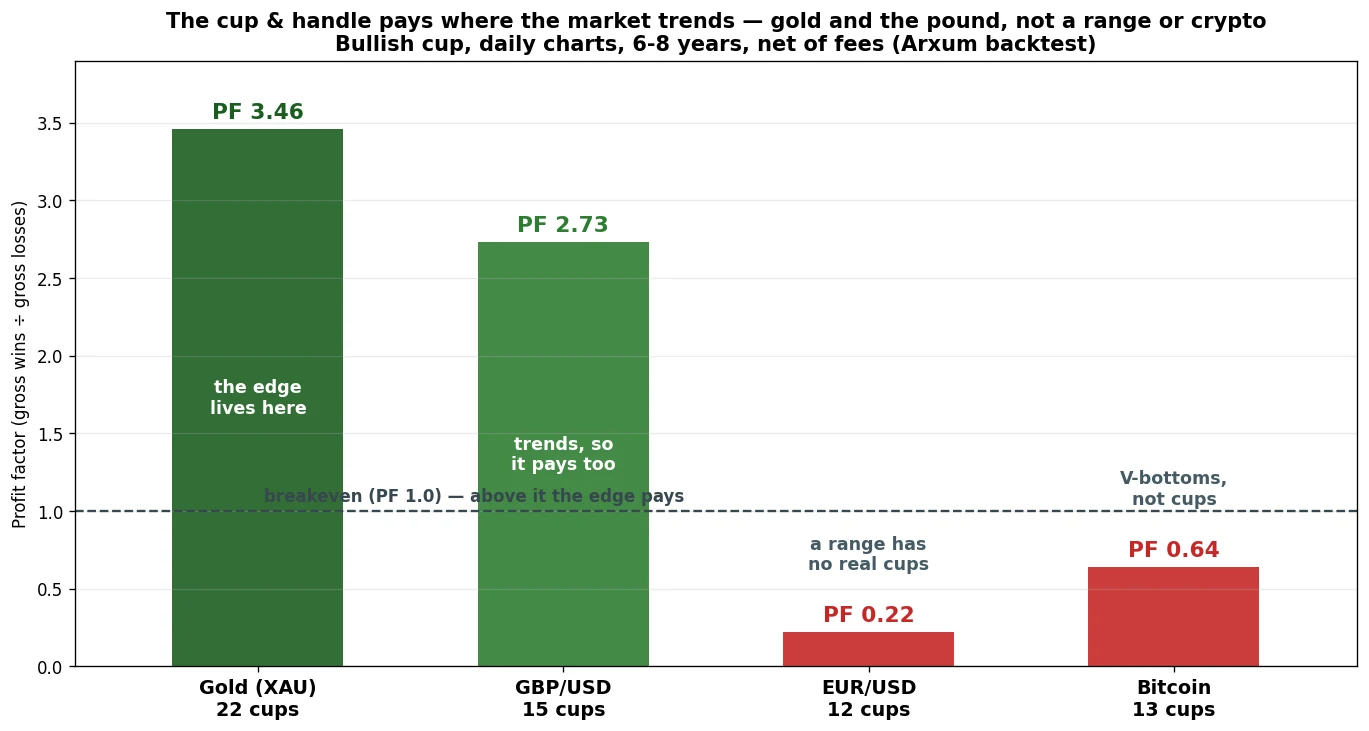
Gold scored a 3.46 profit factor and GBP/USD a 2.73, both clear edges. EUR/USD managed only 0.22, a heavy loser, and Bitcoin 0.64.
Same pattern, same rules, two very different outcomes. And the split is not metal versus Forex. It is trend versus range.
Gold and the pound both trended hard over these eight years, the pound through Brexit and its 2022 collapse and recovery. They built real rounded cups that followed through.
The euro spent most of the window stuck in a range, where a cup is just noise. And Bitcoin bottoms in violent V-shapes that never round out at all.
This is the single most useful thing to know about the pattern, and almost no guide says it: the cup needs a trending market on a slow chart. Gold and a trending major give it that. A range or a crypto do not.
The timeframe decides it too
Picking a trending market is half the answer. The other half is the chart you trade it on. The cup is a patient pattern, so it rewards a patient timeframe.
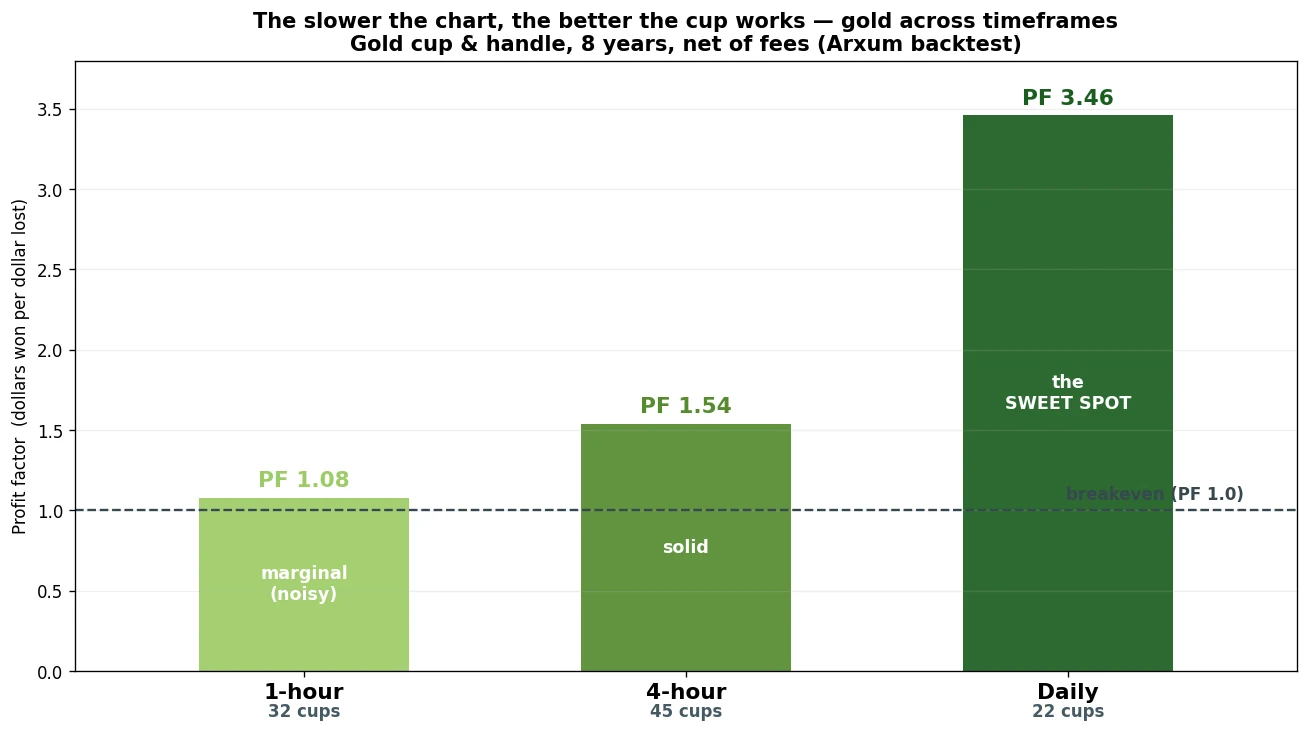
On the 1-hour chart the gold cup was barely above breakeven at a 1.08 profit factor, too much noise. On the 4-hour it firmed up to 1.54. On the daily it jumped to 3.46. A cup that takes weeks to round out is real accumulation, while one that forms in a few hours is usually just noise that happens to look like one. The slower the chart, the more the pattern means what it says.
This is where the cup parts ways with most setups, including its cousin the head and shoulders method, which is a coin flip until you stack three filters on it. The cup is different: its edge is mostly about fit, the right market and the right timeframe, and far less about indicators. Get the fit right and the raw pattern already pays.
The setup on gold’s daily chart
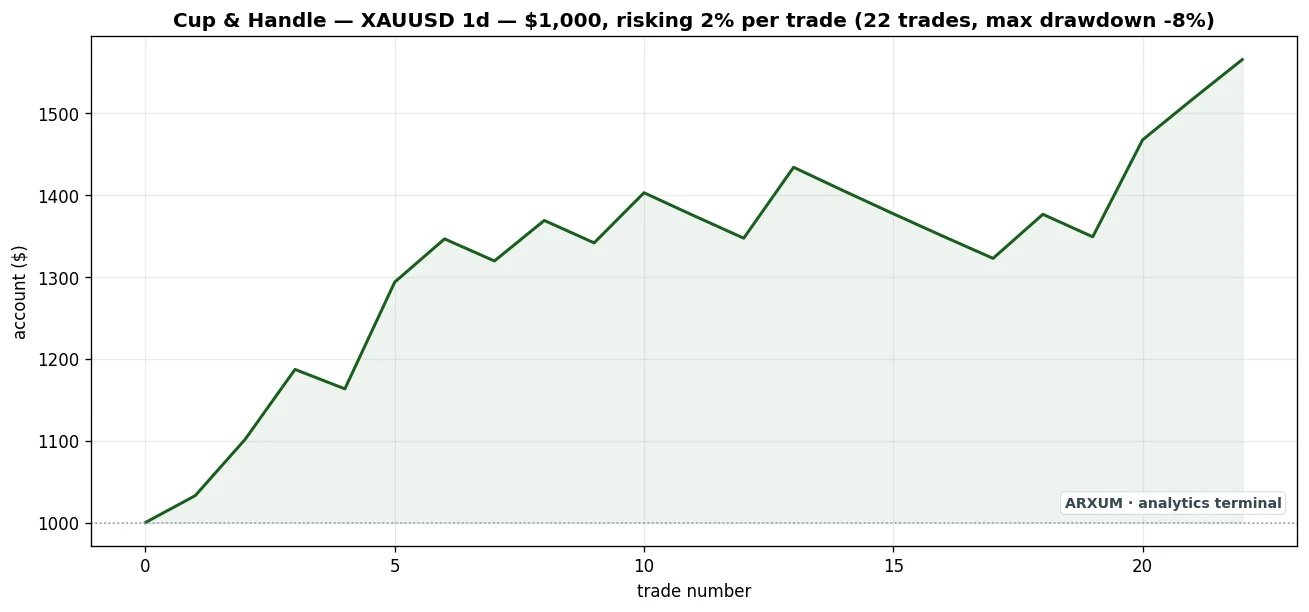
The daily is where the gold cup is strongest. Over eight years it traded 22 times, won 55 percent, and returned a 3.46 profit factor.
And the edge held in both halves of the data: a 4.66 in the first four years, 2.52 in the last four. That matters. An edge that only shows up in the recent rally is usually a rising market in disguise, and this one was there the whole time.
Here is the full trade history, not just the bottom line. Two of its rows are worth reading slowly: reward-to-risk of 1:2.9 means the average winner was 2.9 times the average loser, and the profit factor of 3.46 means the strategy won $3.46 for every $1.00 it gave back.
| Trades | 22 |
| Win rate | 55% |
| Average win / loss | +5.5% / −1.9% |
| Reward-to-risk | 1:2.9 |
| Profit factor | 3.46 |
| Max drawdown | −8% |
| First half / second half PF | 4.66 / 2.52 |
| $1,000 at 2% risk | → $1,566 |
And it is not one lucky trade carrying the results. Drop the single best winner and the profit factor is still 2.85; drop the best three and it is 2.03. The edge is spread across the trades, not hiding in one outlier.
Twenty-two trades in eight years is about three a year. That is the honest nature of a clean daily cup: a rare, high-quality setup, not a daily signal.
It is also why you scan more than one market and timeframe, gold and the pound on the daily, gold on the 4-hour. Across them, a setup shows up every few weeks instead of every few months. Here is the equity curve.
The setup on GBP/USD: the cup works on Forex too
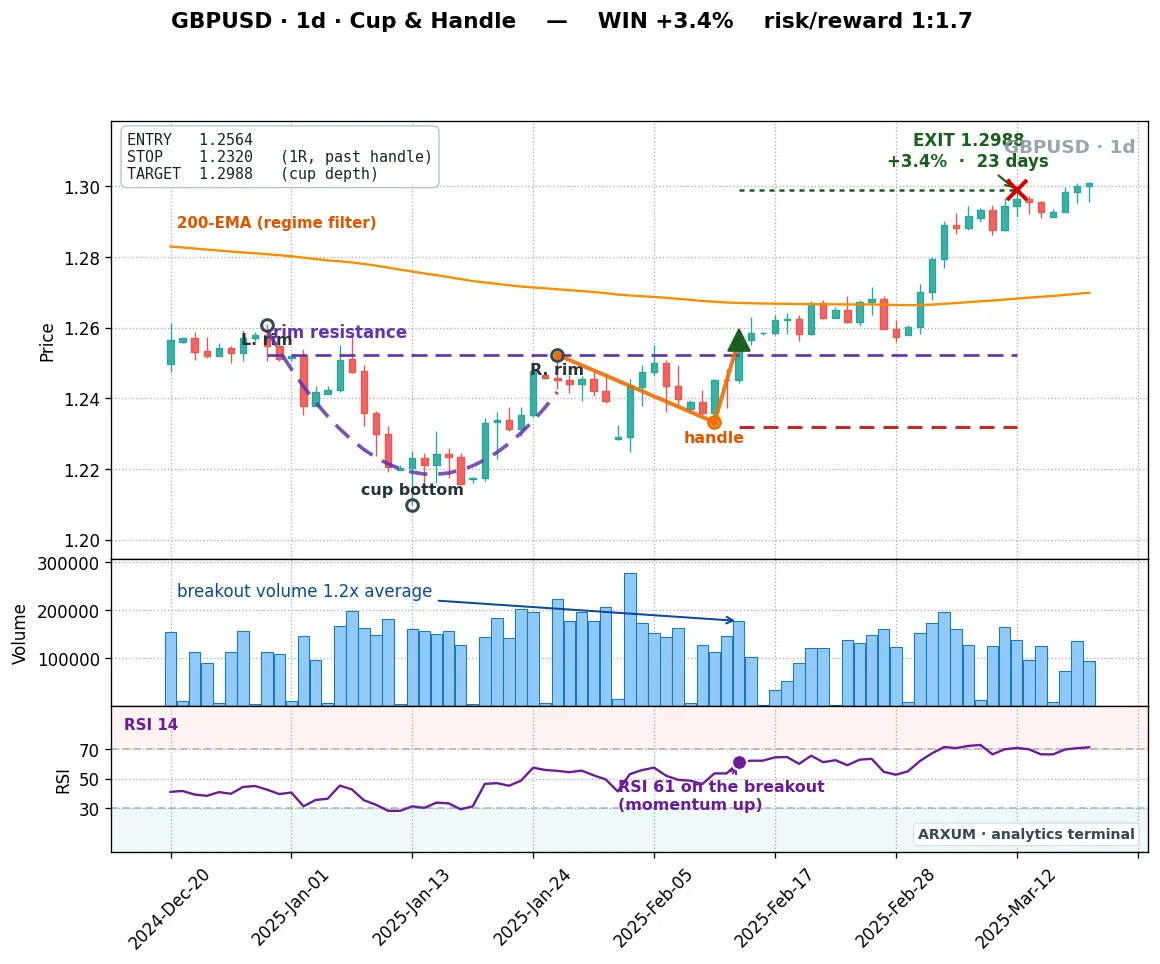
The pound is the proof that this is not only a gold trade. GBP/USD trended hard over the test window, and its daily cup paid almost as well as gold’s: 15 trades, 53 percent winners, a 2.73 profit factor. Same rules, a different trending market.
| Trades | 15 |
| Win rate | 53% |
| Reward-to-risk | 1:2.4 |
| Profit factor | 2.73 |
| Max drawdown | −6% |
| First half / second half PF | 6.62 / 1.45 |
| $1,000 at 2% risk | → $1,180 |
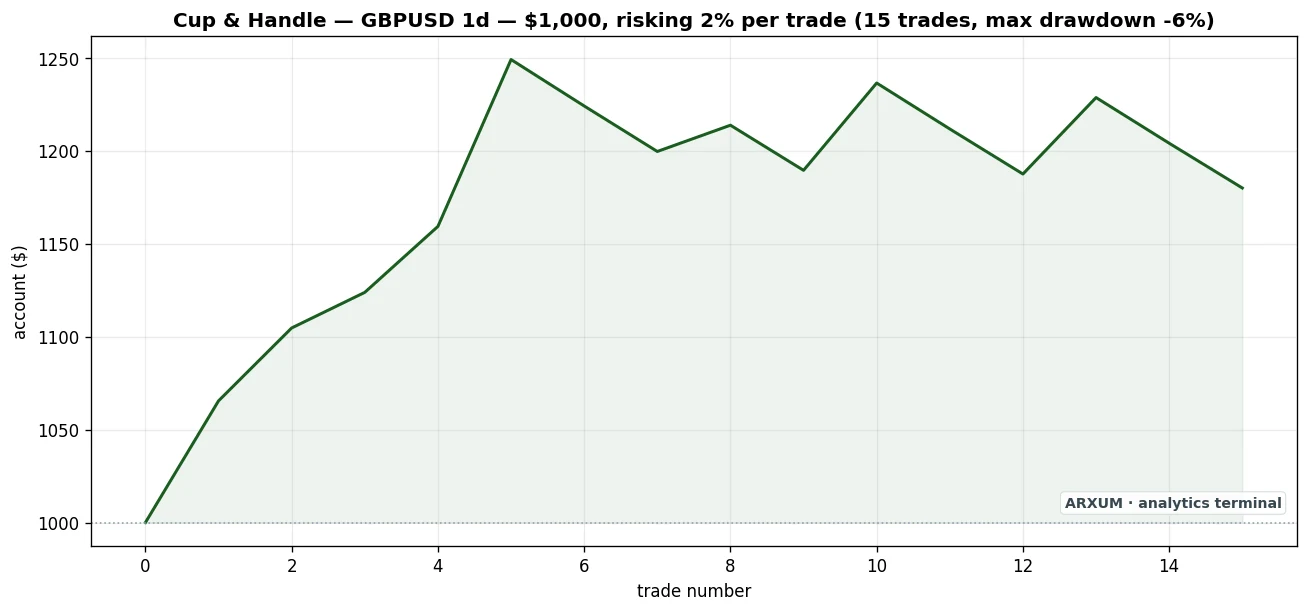
The dollar total is smaller than gold’s $1,566 for one plain reason: 15 trades instead of 22, so the same strong edge has fewer chances to compound. It is a weaker count, not a weaker pattern.
One honest note on the pound. Its edge was strongest in the first four years, a 6.62 profit factor, and softer in the recent four, 1.45.
Still profitable, but a clear fade, where gold stayed steadier (4.66 then 2.52). So the pound cup works. Just lean on it a little less than gold, and keep checking the pair is still trending.
The lesson from the pound versus the euro is the whole point of the pattern: it is not the asset, it is the trend. The pound trended and paid, the euro ranged and did not.
Before you take a cup on any pair, ask one question first: has this pair actually been trending?
The setup on gold’s 4-hour chart, and where the filters help
If three trades a year on the daily is too slow, the 4-hour gold cup gives you more: 45 trades over the same eight years, at a 1.54 profit factor.
A 38 percent win rate that still makes money looks wrong at first. The reward-to-risk explains it: at 1:2.5 the winners are more than twice the size of the losers, so you can be right barely a third of the time and still come out ahead.
It is lower quality than the daily, but still profitable. And it is the one place the confirmations earn their keep. On the noisier 4-hour chart, filtering for a volume-backed break in an uptrend lifts the result.
| Raw, no filter | 45 trades · 38% win · PF 1.54 |
| Volume ≥ 1.5× average | 17 trades · 41% win · PF 1.56 |
| Volume + above the 200-EMA | 15 trades · 47% win · PF 1.75 |
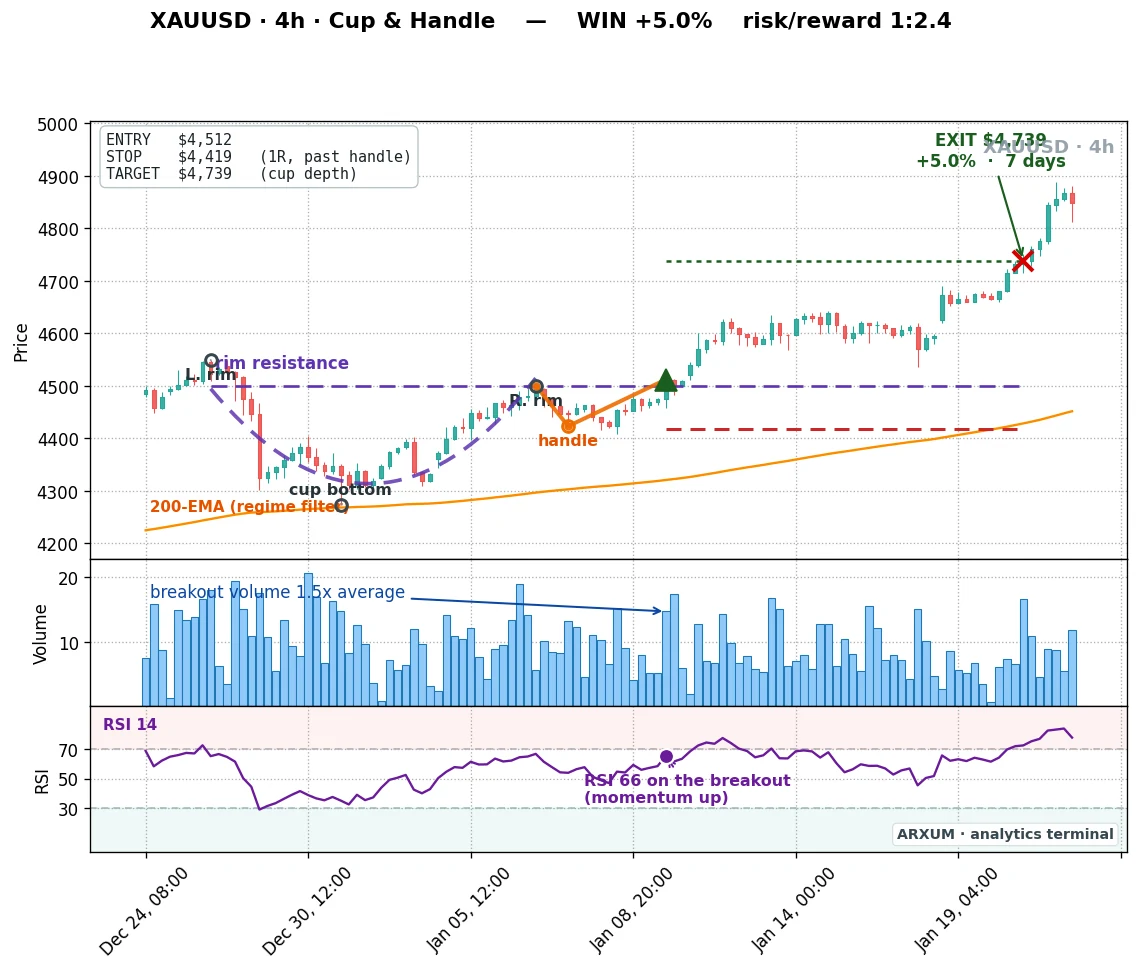
Demanding both a volume jump and an uptrend takes the 4-hour cup from a 1.54 to a 1.75 profit factor and lifts the win rate from 38 to 47 percent. The third check, RSI above 50 on the breakout, was already true on those 15 qualifying trades, so it did not prune any further, but it is on the chart and worth watching: it keeps you out of breakouts that fire on fading momentum. Here is a recent 4-hour example with all three confirmations visible, and the strict numbers below it.
| Trades | 45 |
| Win rate | 38% |
| Reward-to-risk | 1:2.5 |
| Profit factor | 1.54 |
| Max drawdown | −13% |
| $1,000 at 2% risk | → $1,506 |
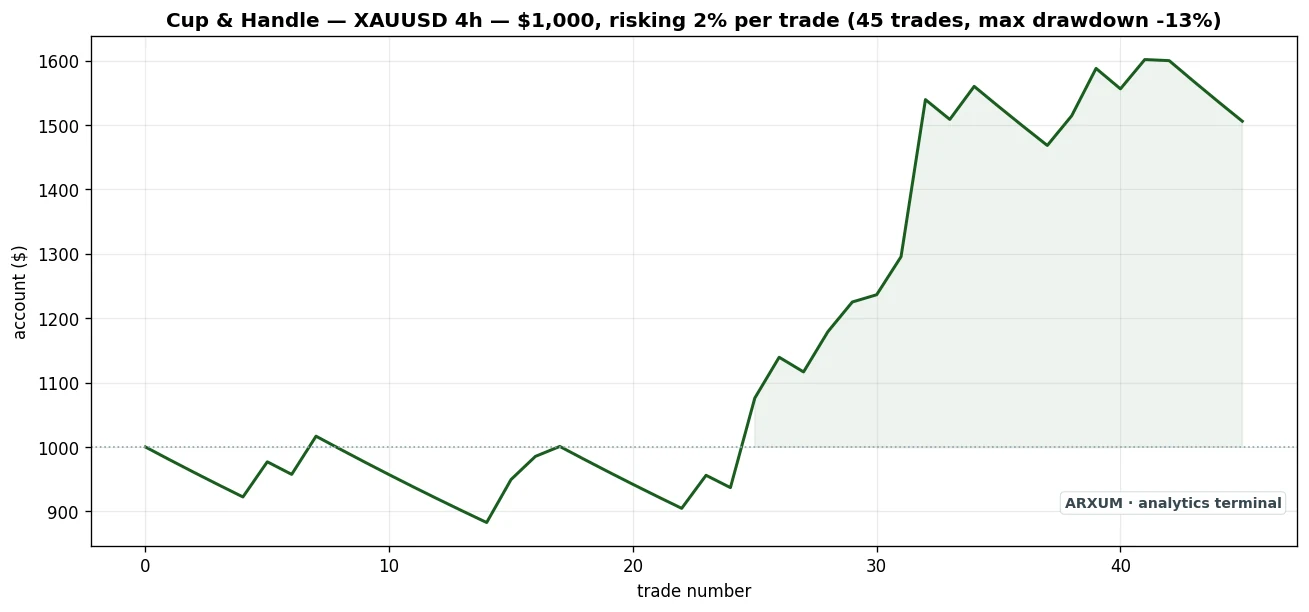
So the rule splits by timeframe. On the daily, the cup pays raw, the slow chart does the filtering for you. On the 4-hour, add the volume and trend checks to clean out the noise.
The three confirmations, and when they matter
The short answer to “do I need indicators” is: on the daily, no, the pattern pays without them; on the 4-hour, yes. Even so, the confirmations are worth knowing, because they keep you out of the bad setups on faster charts:
Volume on the rim break. The breakout candle should trade at least 1.5 times the 20-period average. Volume usually dries up through the handle, so a real expansion on the break tells you buyers are stepping in.
One caveat for gold and Forex: they have no single exchange, so the volume shown is tick volume, a proxy. Only Bitcoin here has true traded volume. That is part of why the daily, where the timeframe itself does the filtering, beats leaning on the volume reading alone. See volume profile trading for the wider idea.
The 200-EMA trend. Take the cup only when price is above the 200-period exponential moving average. A cup is a continuation, so a cup below the 200-EMA is not continuing anything.
Rising momentum. The RSI at or above 50 on the breakout, pushing up through the midline rather than rolling over. It does not need to be overbought, it needs to point the right way.
On the daily these are confirmation. On the 4-hour they are the difference between 1.54 and 1.75. Below that, on the 1-hour and in the wrong markets, no amount of filtering rescues the pattern, which is the honest limit.
Profit factor and reward-to-risk are not the same number
Two numbers run through this article and they answer different questions:
- Reward-to-risk is per trade. It compares your average winner to your average loser. The daily gold cup’s 1:2.9 means a typical win was nearly three times a typical loss.
- Profit factor is the whole strategy. Every dollar won divided by every dollar lost across all trades. Above 1.0 is profitable. The daily cup’s 3.46 means it earned $3.46 for every $1.00 it gave back.
They can disagree, so you want both pointing the right way, and on the daily gold and pound cups they do. For the full breakdown of the first number, see the risk-reward ratio guide.
Risk, position sizing, and the discipline rule
Sizing a cup trade is three steps:
- Set your risk per trade. A small fixed slice of the account, half a percent to one percent. On $1,000 at 1 percent, that is $10 at risk.
- Measure the stop distance. From the entry down to just below the handle low.
- Size to fit. Position size equals your risk dollars divided by the stop distance. Wider stop, smaller position, so every loss is the same size.
Here it is in plain dollars, start to finish:
- You have $1,000 and risk 1 percent, so $10 is on the line.
- Gold’s cup breaks out at $3,387. Your stop, just under the handle, sits at $3,242, which is $145 of risk per ounce.
- To risk only $10, you trade about 0.07 of an ounce, a tiny position.
- Price hits the $3,633 target, about $246 per ounce, so roughly $17 lands on your 0.07 of an ounce.
Small numbers on a small account, the same percentages on a larger one. And a fifth of an ounce is a real, placeable position: most brokers let you trade gold in fractional or micro contracts, and Forex in micro-lots, so you are never forced to size up past your risk. Forex traders just count the stop in pips and size in those micro-lots instead of ounces, but the arithmetic is identical: risk dollars divided by the stop.
And the rule that keeps you in the game: with a win rate near 55 percent, losing a couple in a row is normal, but a string of three to six losses in a row is a signal. On this pattern it usually means the market has stopped trending, the thing the cup was meant to continue. When that happens, stop. Wait a week, check that price is still above the 200-EMA, and only come back when the trend filter says yes.
One honest word on realism. This is a pattern, not a robot:
- The backtest is fragile. Shift the detection a little and the numbers move, so do not run it blind on autopilot.
- Your eye does the last filter. Whether a base is truly rounded or a handle too deep is a judgment that sharpens with screen time. Treat these numbers as the edge a disciplined trader gets, not a button you press.
- It compounds with other signals. As you gain experience you will start pairing the cup with confluences you trust, a support level under the cup, a higher-timeframe uptrend, a clean volume profile. Each one improves the odds.
What does not work
The losers are as instructive as the winners, and the biggest one is trading this pattern on the wrong market. Here is a textbook-looking cup on Bitcoin that did everything right and still failed.
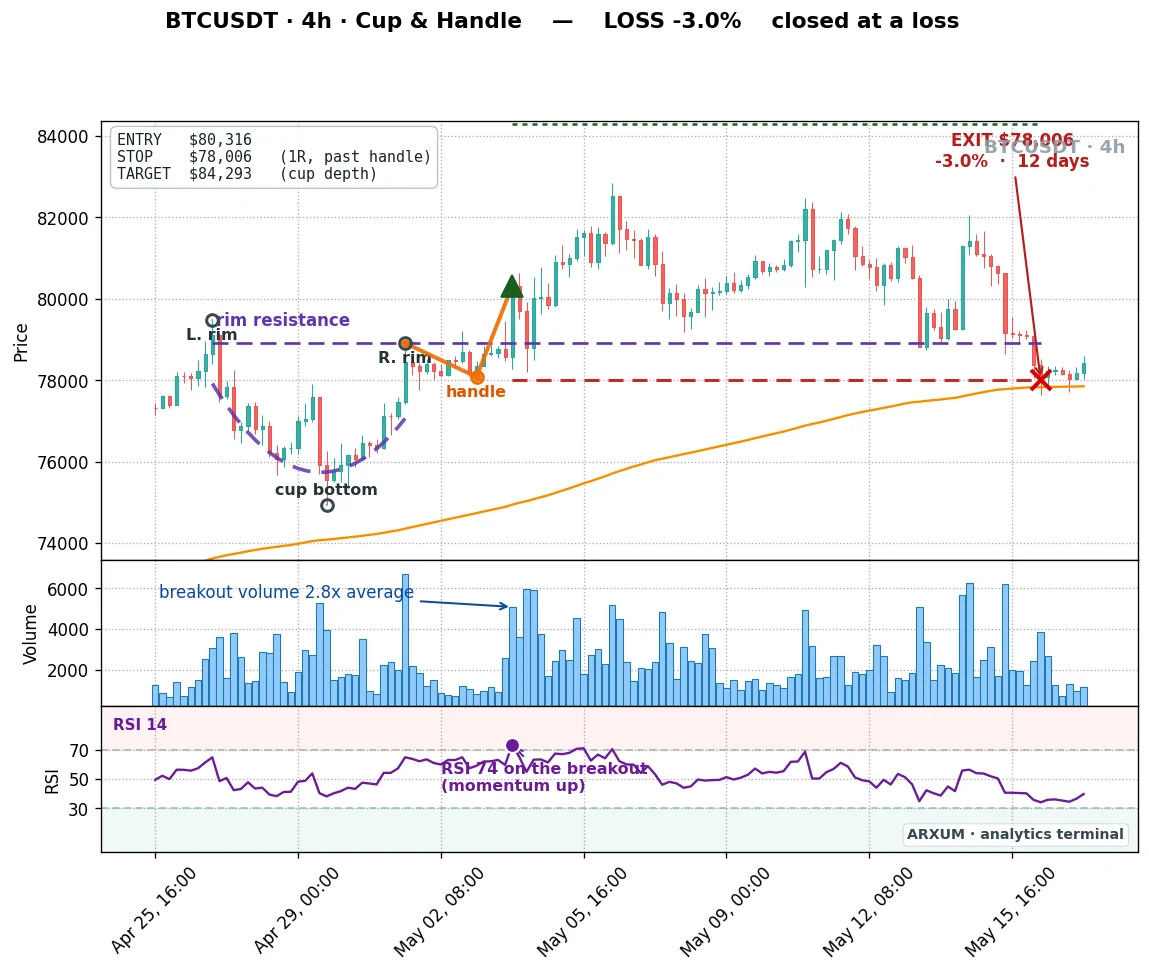
That is not a one-off. On Bitcoin the cup lost money on both timeframes: a 0.87 profit factor across 124 trades on the 4-hour, and 0.64 across the 13 daily cups in six years.
Its bottoms are violent and V-shaped, not the slow rounded base the pattern needs. The rest of the avoidable mistakes:
- Trading it in a downtrend. A U-shape below the 200-EMA is a hopeful bottom, not a continuation. The trend filter exists to stop you taking it.
- A deep handle. If the handle sinks past the middle of the cup, the buyers are not in control. Skip it.
- No volume on the break. A breakout on thin volume is the most common fakeout. Wait for the expansion or a retest of the rim.
- Forcing it on a range. EUR/USD barely forms clean cups and lost money on them. A continuation pattern needs a trend to continue.
How to trade it, step by step
- Pick the market. A trending one. Gold and the pound paid; a rangebound euro and crypto did not. Ask whether the pair has actually been trending before you take its cup.
- Pick the timeframe. The daily for the best quality, the 4-hour for more setups. Skip the 1-hour.
- Find the trend. Confirm price is above the 200-EMA.
- Spot the cup and wait for the handle. A rounded base between two level rims, then a shallow pullback that holds the upper half. The handle is the patience step that filters out half the bad trades.
- Trade the break. Enter on the close above the rim. On the 4-hour, require volume above 1.5 times average and RSI above 50. Stop below the handle, target the cup’s depth from the rim. You can take partial profit at the 1:1 mark and trail the rest, or simply hold for the full target, but never move the stop down.
Any charting platform with volume and an RSI does this, the free tier of TradingView included.
Decision tree
- A trending market (gold, the pound), daily or 4-hour, price above the 200-EMA? Take the cup. This is the setup.
- Bitcoin or another fast crypto? Skip it. The cup does not follow through there.
- A flat range like the euro, or a cup below the 200-EMA? Pass. It is not a continuation.
- Three to six losses in a row? Stop. The market has likely stopped trending. Re-check before the next trade.
Bottom line: where the cup and handle works
The cup and handle is not a magic shape, and it is not a setup for every chart. It is a slow, patient continuation pattern, and it pays where price moves the way it expects: a trending market on a high timeframe. Here is the whole map from the testing:
- Gold, daily: the strongest edge. 3.46 profit factor, 55 percent wins. Trade it raw.
- GBP/USD, daily: a real edge too. 2.73 profit factor, 53 percent wins. Proof it works on Forex when the pair trends.
- Gold, 4-hour: solid. 1.54 raw, 1.75 with a volume and trend filter.
- Gold, 1-hour: marginal, barely above breakeven. Not worth it.
- EUR/USD: loses. A range does not give the pattern a trend to continue.
- Bitcoin, any timeframe: loses. V-shaped bottoms, not rounded cups.
Unlike most setups, the cup does not need a stack of indicators to work. It needs a trending market and a slow timeframe. Get that fit right and the raw pattern is one of the cleaner measured-move trades there is. Force it onto a range or a crypto because the chart looks like a cup, and it quietly bleeds. For the other big continuation pattern, see the bull flag.
FAQ
What is the cup and handle pattern in trading?
Does the cup and handle pattern actually work?
Does the cup and handle work on Forex?
Why does the cup and handle work on gold but not Bitcoin?
What timeframe is best for the cup and handle?
How do you measure the target for a cup and handle breakout?
Where do you put the stop loss on a cup and handle trade?
Do I need volume and indicators to trade the cup and handle?
Is there a bearish version of the cup and handle?
Why was my cup and handle a losing trade?
Real-time trade setups with entry, stop loss and take profit. Daily market analysis. No subscription, no complicated theory.
🌍 Our recommended brokers


Reader Reviews
Be the first to review this — tell other traders what actually helped, or where it fell short.
Leave a Review

Momentum Trader & Technical Analyst
Trades momentum across crypto and forex since 2019, built around RSI, MACD, and volume. Turns discretionary setups into rule-based, systematic entries and validates them on data before they go live.
