
What the iron condor options strategy actually is
An iron condor is one position built from four options at four different strikes. A call is a bet on price rising, a put is a bet on price falling, and a spread is simply two of them at different strikes.
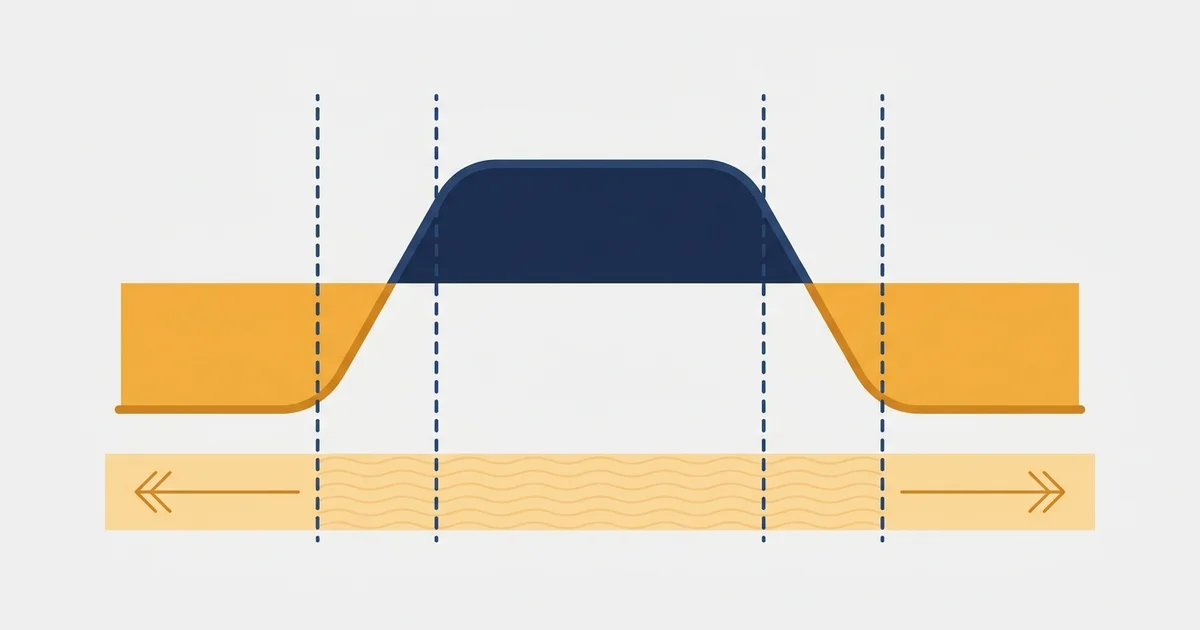
Two legs are sold to bring in money, two are bought further out to cap the risk. Here is the shape before the parts.
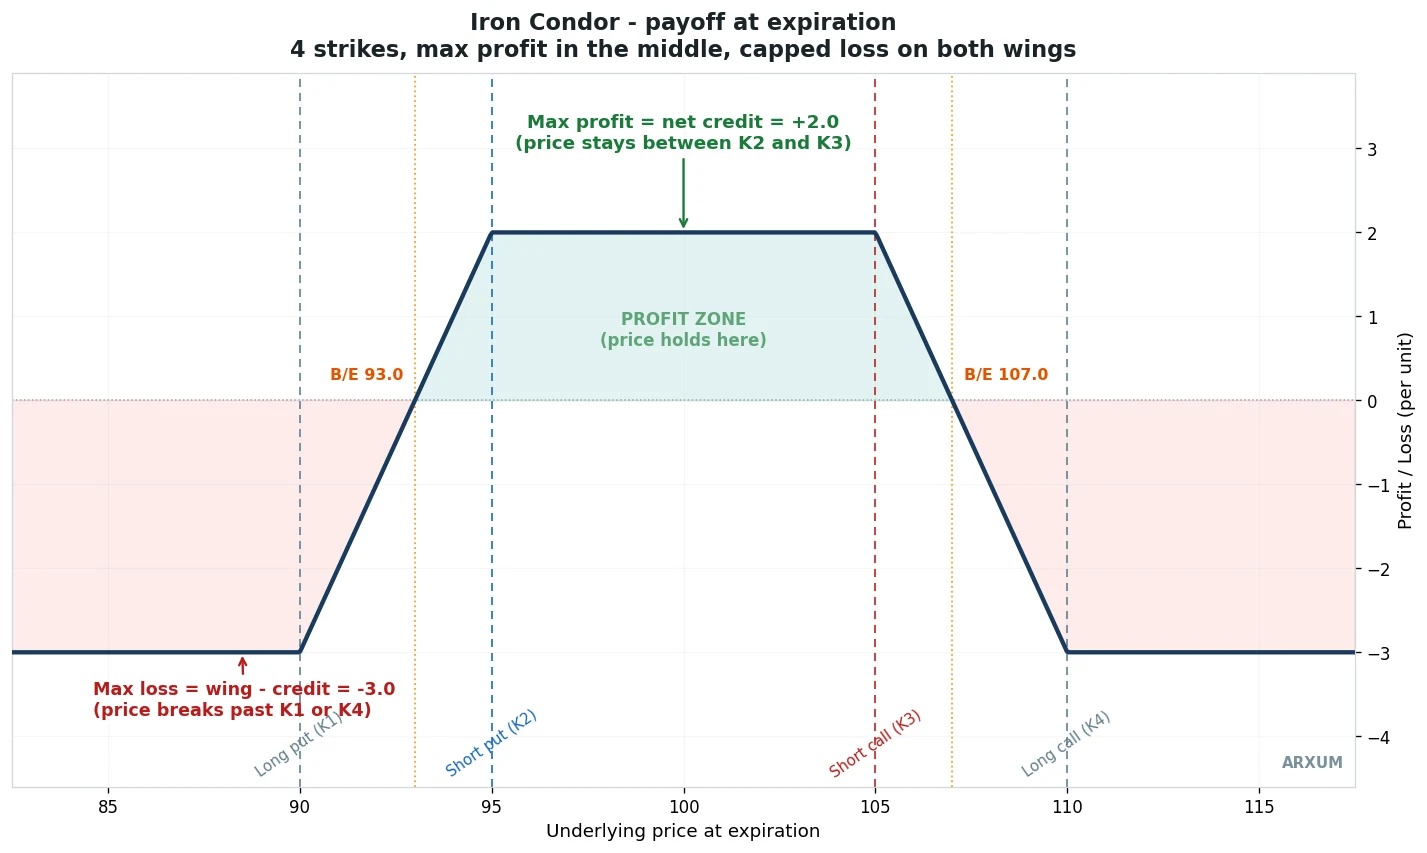
Read the four legs from the low strike up. The two outer legs you buy, the two inner legs you sell.
| Leg | You | Strike | Its job |
|---|---|---|---|
| Long put (K1) | Buy | 90 | Caps the downside loss |
| Short put (K2) | Sell | 95 | Collects premium, floor of the range |
| Short call (K3) | Sell | 105 | Collects premium, ceiling of the range |
| Long call (K4) | Buy | 110 | Caps the upside loss |
The two sold legs are the engine. They bring in more premium than the two bought legs cost, so you open the trade with cash in hand.
That cash is the net credit, and it is the most you can make.
The pair of bought wings is the seatbelt. They turn an open-ended risk into a known, capped number, which is why the trade is called defined-risk.
Iron condor explained: the payoff in plain terms
Three numbers define every condor. Work them off the illustrative strikes above and the math is simple arithmetic.
- Max profit is the net credit. In the diagram that is 2.0 per unit. You keep it in full if price sits between the short strikes, 95 and 105, at expiry. This answers the common “iron condor max profit” question: the credit you collected, no more.
- Max loss is the wing width minus the credit. One wing is 5 wide (90 to 95). Minus the 2.0 credit, the most you lose is 3.0 per unit, and only if price runs past 90 or past 110.
- Two break-evens frame the zone. Short put minus credit, 95 minus 2, gives 93. Short call plus credit, 105 plus 2, gives 107. Anywhere between 93 and 107 you finish at or above breakeven, the level traders call scratch.
In real money. Option prices are quoted per share, and one contract covers 100 shares.
So the illustrative 2.0 credit is $200 collected per contract, and the 3.0 max loss is $300 per contract. One contract of this condor risks $300 to make $200, and on a small account you trade one at a time and size from that $300 max loss, not the credit.
Notice the shape of the bet. You risk 3.0 to make 2.0.
The trade wins often because price spends a lot of time doing nothing, but each loss is bigger than each win, so the math only survives if you pick your moments. That trade-off is the heart of the risk-to-reward question here, and it is why timing beats frequency.
One honest note up front. A true iron condor needs an options-enabled account, the kind a broker switches on after you apply for options permission.
It trades on index options like the US market’s SPX or QQQ, or on FX options. Spot Forex and CFD traders cannot build the four-leg structure directly.
The part that transfers to any account is the read below: knowing when a market is calm enough to fade a range. Keep that in mind as the value here, whatever you trade.
When to use an iron condor: the calm, range-bound market
An iron condor is a bet on boredom. It wants price to stall and volatility to fade, so the options you sold lose value while you sit still.
Trend is the enemy. A clean one-way move drags price into a wing and hands you the max loss.
So the entire “when to use iron condor strategy” question comes down to reading the market state first.
| Market state | Iron condor read | Why |
|---|---|---|
| Range-bound, flat | Favorable | Price stays between the strikes |
| Low and falling volatility | Favorable | Sold premium decays, range holds |
| Quiet post-event drift | Favorable | The shock is out, price settles |
| Strong trend | Avoid | Price breaks through a wing |
| Volatility expanding | Avoid | A fast run risks the tail loss |
| Major event ahead | Avoid | Gap risk jumps the range |
Two ideas do all the work in that table: is price ranging, and is volatility low. You can see both on a normal chart without any options data.
The next two sections show the exact reads on the two markets Forex and CFD traders watch most.
Reading the calm on gold with ATR
The Average True Range measures how much a market moves in an average bar. A high reading means big daily ranges and a nervous market.
A low, falling reading means the market has gone quiet, which is the condor’s home turf.
Here is spot gold on the daily chart, with ATR in the lower panel.
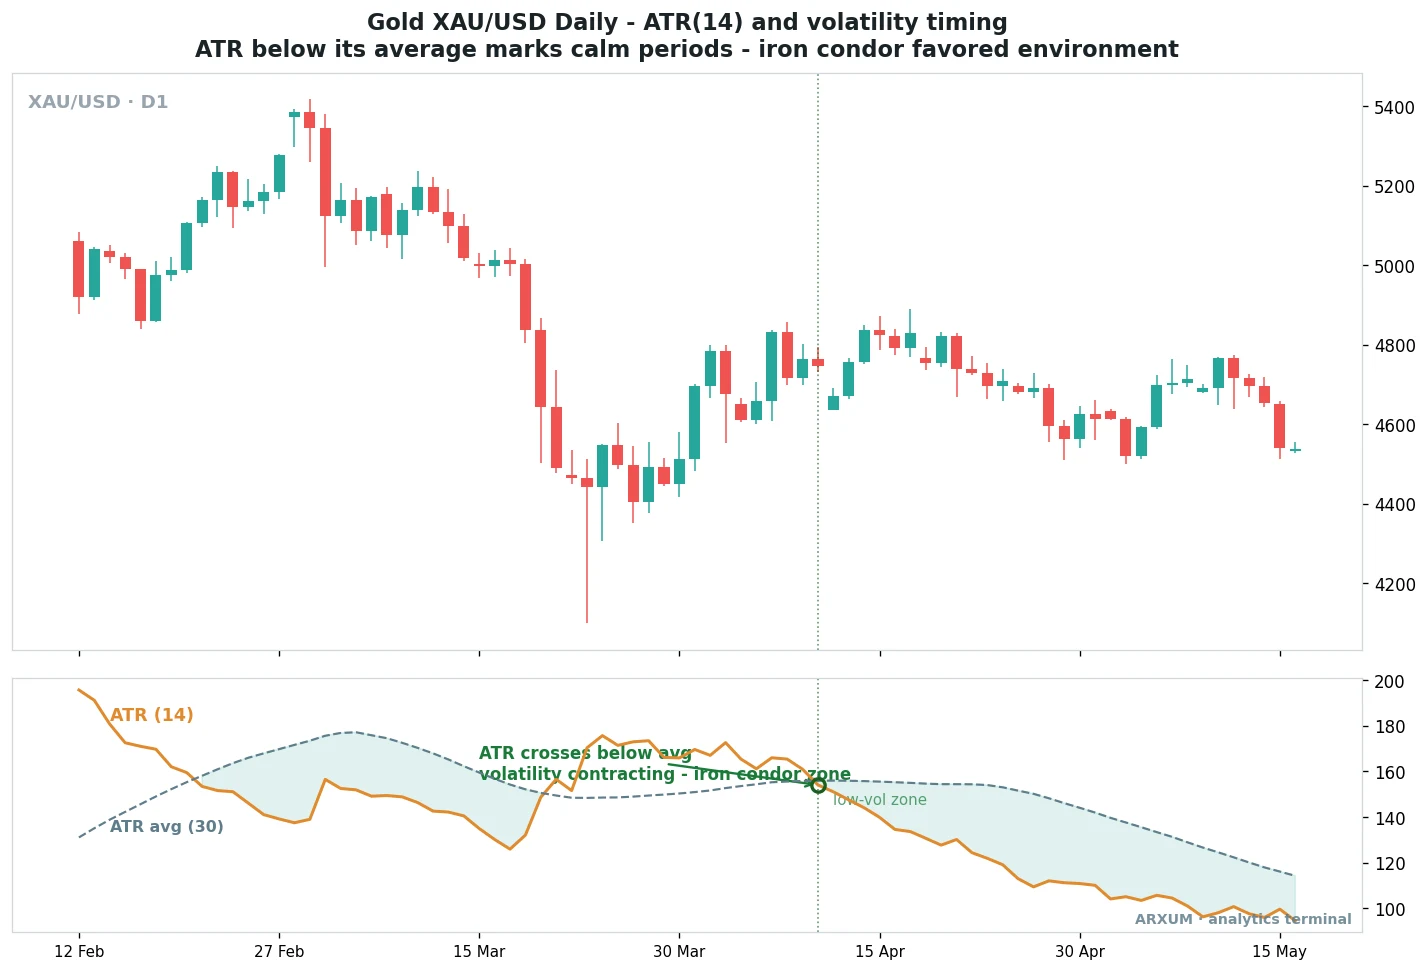
The read is a comparison, not a fixed number. You are asking whether today’s range is smaller than the recent norm.
- ATR below its own average and sloping down means the market is cooling. Ranges are shrinking, so price is less likely to sprint through a wing.
- ATR spiking up is the warning. The market just woke up, and a live condor is exposed to a run.
- The size of ATR also sets your strike distance. A wider ATR means a wider expected range, so the short strikes belong further from price.
| Role | How to read it | Best on |
|---|---|---|
| Calm filter | ATR under its average, falling | Gold D1, indices |
| Range-width gauge | Higher ATR, strikes further out | Any market |
| Event warning | ATR jumps, stand aside | Any market |
Gold is a useful teaching case because its volatility swings hard. When the metal is trending, ATR stays high and you leave condors alone.
When it settles into a shelf, ATR rolls under its average and the range fade opens up.
Reading the squeeze on EUR/USD with Bollinger Band Width
Bollinger Bands wrap price in an upper and lower band set a couple of standard deviations from a moving average. When a market is quiet the bands pinch together.
Band Width simply measures that gap, so a low reading is a squeeze and a high reading is an expansion.
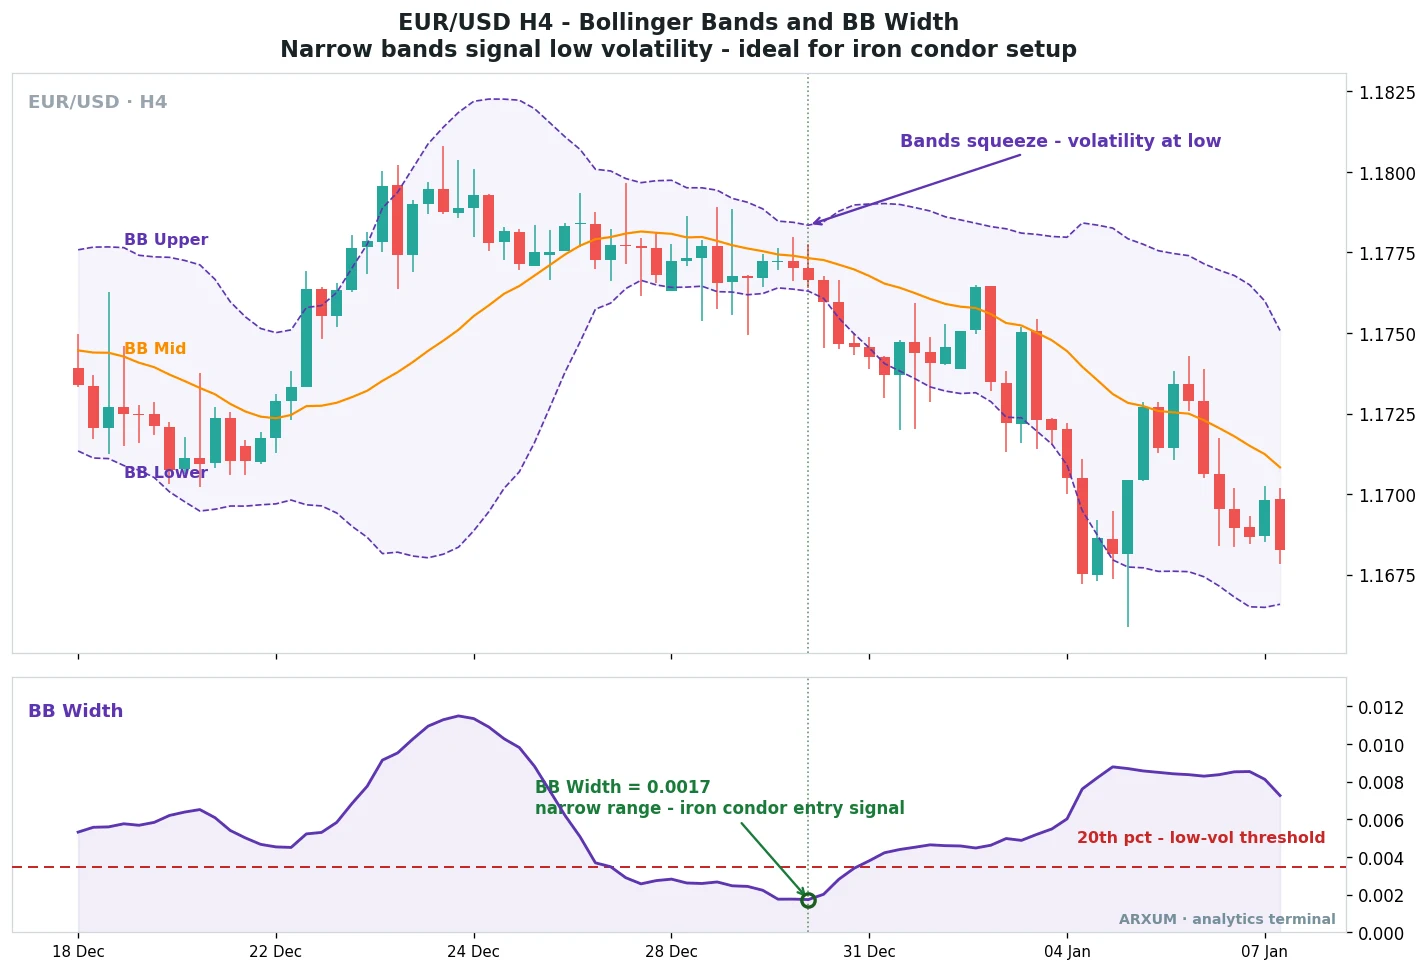
Two things on this chart say the same thing in two ways.
- The bands visibly pinch as price stops trending and coils sideways. That pinch is the squeeze everyone talks about.
- Band Width falls below its 20th-percentile line. In plain terms, the bands are narrower than they are 80% of the time, so volatility is unusually low right now.
That percentile line matters more than any single value. Band Width numbers differ between gold, EUR/USD and Bitcoin, so an absolute figure means nothing across markets.
A percentile puts every market on the same scale: below the 20th percentile is quiet, wherever you are.
| Role | How to read it | Best on |
|---|---|---|
| Squeeze detector | Band Width under its 20th percentile | EUR/USD H4, FX majors |
| Range confirm | Price bouncing between flat bands | Any market |
| Breakout warning | Band Width turns up sharply | Any market |
For a fuller walk through the bands themselves, the Bollinger Bands guide covers the settings and the squeeze in detail. Here they are doing one job: confirming the market is calm before you sell premium into it.
Two gauges, one go or no-go decision
Neither gauge is a system on its own. They are a checklist.
Before an iron condor, you want them agreeing that the market is quiet and pinned between levels.
| Gauge | What it measures | Condor-favorable read | Where it shines |
|---|---|---|---|
| ATR vs its average | Size of the daily range | Below average, falling | Gold, indices, D1 |
| Bollinger Band Width | The band squeeze | Under the 20th percentile | FX majors, H4 |
| Support and resistance | The range edges | Clear levels holding | Every market |
| Implied volatility | Option premium richness | Elevated when you sell, then easing | Index and FX options |
The first three you read off any chart. The fourth is options-only, and it is a quiet edge.
Implied volatility is the market’s expectation of future movement baked into an option’s price, and it sets how rich the premium is.
Because the condor sells options, you want that premium rich when you open and fading afterward. High implied volatility that then cools pays you twice, once from time decay and once from the volatility drop.
The practical rule is a simple one. If ATR is calm, Band Width is squeezed, and price is boxed inside levels that have held before, the environment is green.
If any one of those is flashing a trend or an expansion, you wait.
How to trade an iron condor, step by step
This is the “how to trade iron condor” sequence, start to finish. It assumes an options-enabled account, then the CFD note follows.
- Confirm the calm. ATR below its average and sloping down, Bollinger Band Width under its 20th percentile. No major event on the calendar in the trade window.
- Mark the range. Draw the support and resistance that price keeps respecting. Those levels, not a guess, set where the danger is.
- Place the short strikes just outside the range. Options traders pick strikes around a delta of 0.15 to 0.20, meaning a low, roughly 15% to 20%, chance price reaches them. Your platform lists a delta column on the option chain, so you read it straight off the strike list. Further out is safer and pays less.
- Buy the wings further out. These are the long put and long call that cap your loss. Wider wings risk more for more credit, tighter wings risk less for less. This choice sets your max loss.
- Collect the net credit. That credit is your max profit, and time decay works in your favor every day price sits still.
- Manage it, do not marry it. Many traders close early, often near half of the max credit, rather than holding to expiry for the last scraps. Have a hard exit if a short strike is tested or if volatility starts expanding again.
The Forex and CFD version. You cannot sell the four legs on spot FX or a CFD account.
What you can do is trade the same read: fade the range with a defined stop. Sell near resistance and buy near support inside a confirmed squeeze, with a hard stop just beyond the level and a target back at the middle.
It is not an iron condor, but it trades the same calm, range-bound market the condor is built for.
On the risk. The appeal is the defined loss, but respect the shape of it.
You risk more than you can win on any single trade, so one breakout can erase several quiet winners. Size each condor small, keep the wings sensible rather than chasing yield, and never hold one through a scheduled event.
The gauges keep you out of the trades that blow the math up.
Where the iron condor strategy goes wrong
Most losing condors fail for the same handful of reasons. Almost all of them are timing, not structure.
- Opening into a trend. The single most common mistake. If ATR is high and price is marching, no strike distance saves you.
- Selling before a big event. Central bank meetings, inflation prints and jobs data gap markets straight through a wing. Check the calendar first.
- Chasing credit with wings too wide. More premium feels good until the max loss lands. Wide wings quietly raise the risk you signed up for.
- Holding a tested position. When a short strike breaks, hope is not a plan. Take the managed loss and move on.
- Ignoring volatility expansion. Band Width turning up sharply is the market telling you the calm is over. That is an exit cue, not a wait-and-see.
What works: three things to remember
If you keep only three points from this guide, keep these.
- An iron condor is a bet on a quiet range. It pays when price stalls between your short strikes and volatility fades. Trend and expansion are the two things that break it.
- Time the entry with ATR and Band Width. ATR below its average says the range is shrinking. Band Width under its 20th percentile says the bands are pinched. Wait for both before you sell premium.
- The risk shape demands discipline. You risk more than you can make per trade, so size small, skip the event calendar, and manage the position rather than hoping it back.
The structure is the easy part. The edge, if there is one, lives in the read of the market before you place the trade.
Get the calm right and the iron condor is a patient, defined-risk way to trade a market that is doing nothing.
FAQ
What is an iron condor, in plain terms?
It is a single options position built from four strikes. You sell one option spread above the market and one below it, and buy a further-out option on each side to cap the risk. You collect a net credit and keep it if price finishes between your two sold strikes. It is a defined-risk bet that a market goes nowhere.
Does the iron condor strategy actually work?
It works in the market state it is built for, a calm, range-bound one with low or falling volatility. It wins often because price spends a lot of time doing nothing, but each loss is larger than each win, so the results only hold up if you enter in genuine calm and skip trending or event-driven markets. It is not a set-and-forget system.
When should I use an iron condor?
When a market is flat and volatility is low or fading. In practice that means ATR sitting below its average and sloping down, Bollinger Band Width squeezed under its 20th percentile, price boxed inside clear support and resistance, and no major economic event due while the trade is open. If any of those flags a trend or an expansion, wait.
What is the max profit on an iron condor?
The net credit you collect when you open the trade. That is the whole payout, and you keep it in full only if price finishes between your two short strikes at expiry. You cannot make more than the credit no matter how quiet the market stays.
What is the max loss on an iron condor?
The width of one wing minus the credit you collected. If a wing is 5 points wide and you took a 2-point credit, the most you lose is 3 points per unit, and only if price runs past your outer long strike on either side. That capped number is why it is called a defined-risk trade.
How do I trade an iron condor?
Confirm the market is calm with ATR and Band Width, mark the range with support and resistance, sell a put spread below the range and a call spread above it with short strikes at a low delta, and buy the outer wings to cap risk. Collect the credit, then manage the trade, often closing early rather than holding to expiry, and exit if a short strike is tested.
Can I trade an iron condor on Forex or CFDs?
Not the four-leg structure itself, which needs an options-enabled account such as index or FX options. What transfers to a spot Forex or CFD account is the timing skill: fading a confirmed range with a defined stop. You sell near resistance and buy near support inside a squeeze, with a hard stop beyond the level, which trades the same calm market the condor targets.
What is the best market for iron condors?
Markets that spend long stretches range-bound. Stock indices are the classic home. Among the instruments Forex traders watch, gold and the major currency pairs both go through quiet, sideways phases that suit the trade. The read matters more than the market: any instrument in a low-volatility range can host one, and any instrument in a strong trend cannot.
Do I need volatility to be falling?
Low volatility is the core requirement, and falling volatility is the ideal. Because an iron condor sells options, richer premium when you open and easing premium afterward pays you from both time decay and the volatility drop. A market where volatility is rising works against you on both counts, which is why the ATR and Band Width reads come first.
What do the key iron condor terms mean?
Short strikes: the two options you sell, the floor and ceiling of your profit range. Wings: the two options you buy further out, which cap the loss. Net credit: the cash you collect on opening, also your max profit. Break-even: the short strike plus or minus the credit, the edges of the no-loss zone. Delta: a rough chance an option strike is reached, near 0.15 to 0.20 for the sold strikes. ATR: the Average True Range, a gauge of how big the daily range is. Bollinger Band Width: the gap between the bands, low when the market is quiet.
🌍 Our recommended brokers


Reader Reviews
Be the first to review this — tell other traders what actually helped, or where it fell short.
Leave a Review

Forex Analyst & Senior Trader
Former FX desk trader with 8 years in institutional forex. Works in multi-timeframe analysis and order flow, turning desk experience into systematic, testable rules across forex and metals.