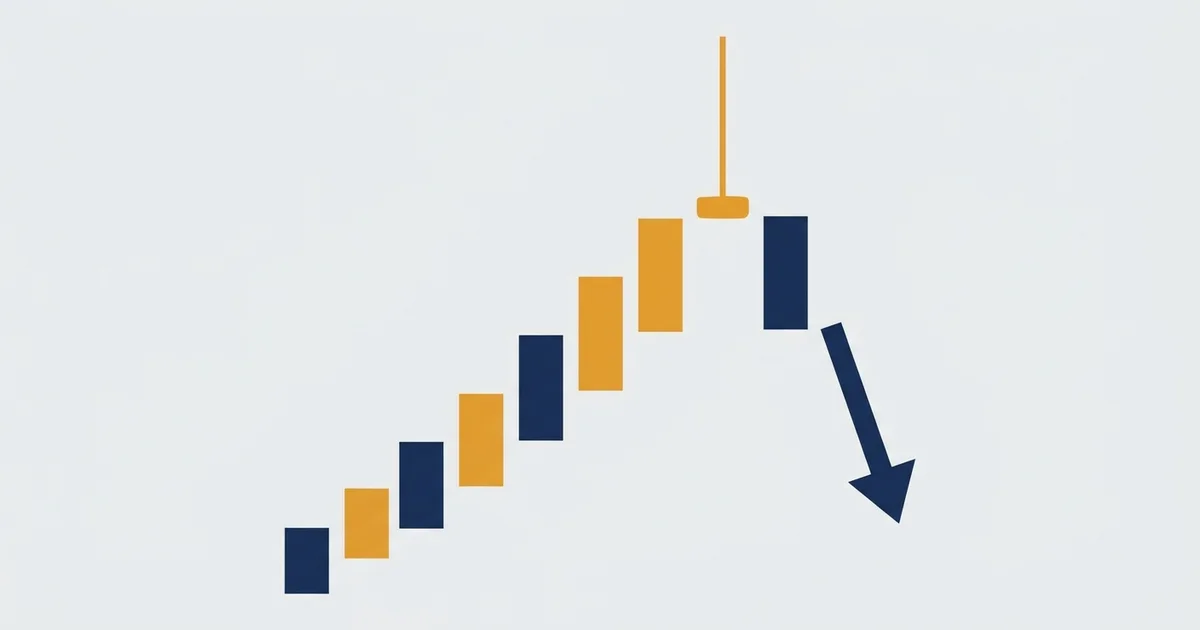

What a gravestone doji looks like
The gravestone doji is one candle with no real body and a tall spike on top. Here it is by the textbook, with its mirror twin on the right.
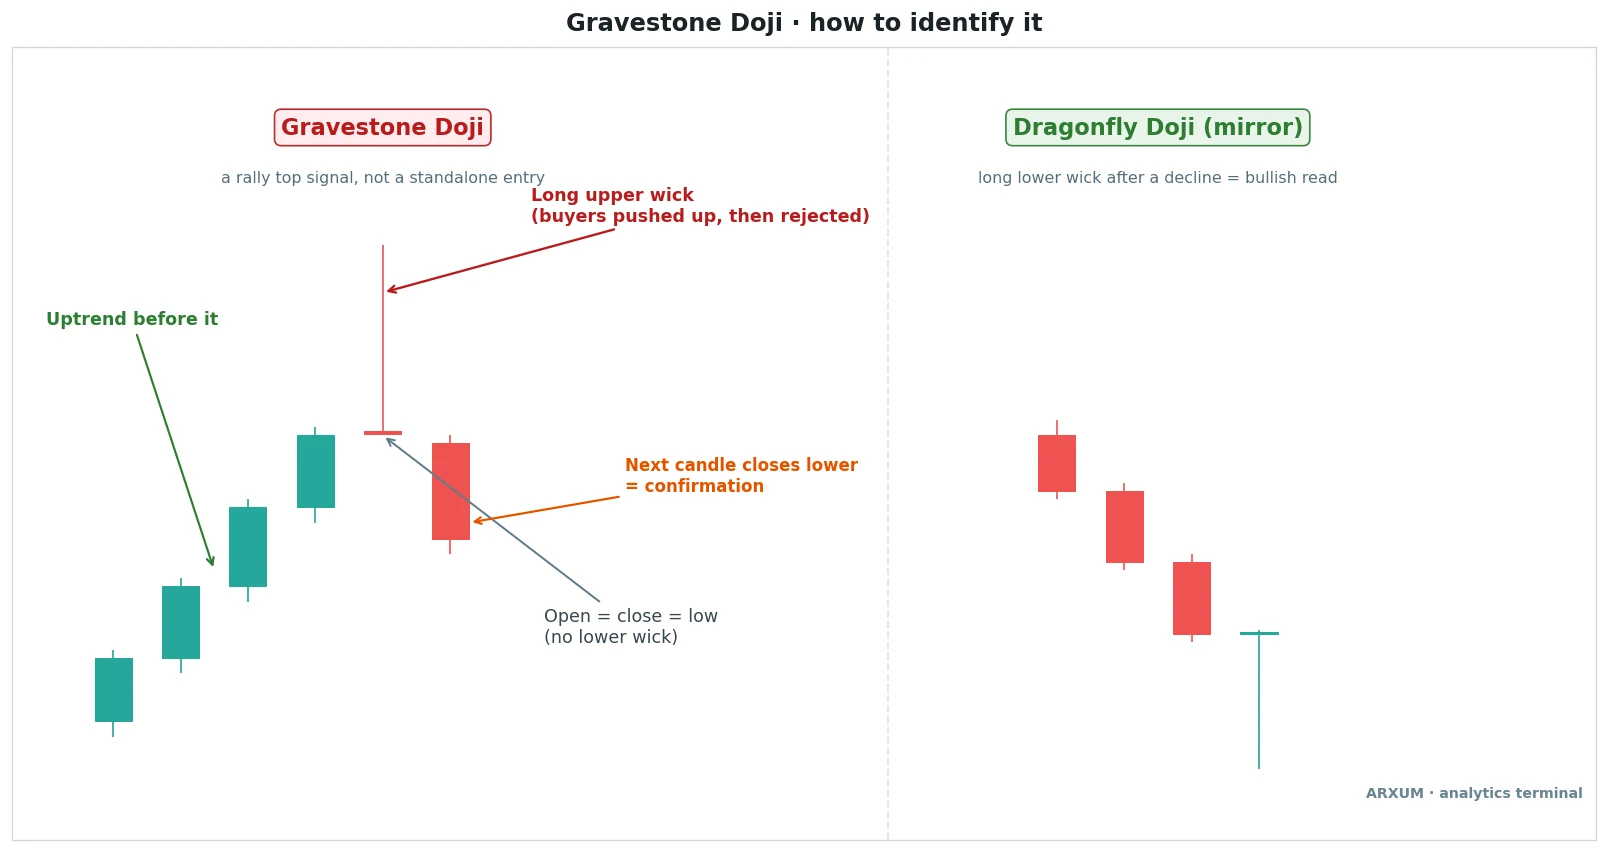
Every label on that schematic is one item of the checklist. Read it left to right:
- Uptrend before it. Without a prior rise there is nothing to reject, so the candle carries no message.
- Long upper wick. Buyers drove price well above the open during the session. Then sellers pushed it all the way back.
- Open = close = low. The flat line at the bottom is the “body”. There is no lower wick, or only a hair of one.
- Next candle closes lower. This is the confirmation, the orange tag. Most traders do nothing until it prints.
- The dragonfly on the right. Same idea upside down. Long lower wick, flat top, and it belongs after a decline.
The gravestone sits next to two other doji shapes, and the difference is where the wicks sit.
| Doji type | Wicks | Usual read |
|---|---|---|
| Gravestone | Long upper only | Bearish at a top |
| Dragonfly | Long lower only | Bullish at a bottom |
| Long-legged | Long both sides | Pure indecision |
| Standard | Short both sides | Pause, weak signal |
How strict should “open equals close” be? In practice, nobody demands a perfect tie.
| Feature | Rule | Tolerance |
|---|---|---|
| Body | Open and close equal | Under 10% of range |
| Body position | At the candle's low | Bottom 10-15% |
| Upper wick | Long | Most of the range |
| Lower wick | None | A hair is fine |
| Location | After a rally | Several higher closes |
| Next candle | Closes lower | Below the doji body |
If candle parts like the body and the wick are still fuzzy, the candlestick chart reading guide starts from zero.
Gravestone doji meaning: the session in four steps
A single candle compresses a whole session. The gravestone’s version is short and brutal.
- Price opens near the top of a rise, and buyers are in charge.
- Buyers push hard and print a fresh high, often the highest price in weeks.
- Sellers step in at that high and drive price straight back down.
- The close lands right where the open was, so the buyers’ whole push is erased.
The flat close at the low is the point. Buyers had the whole session to hold even part of their gain and could not.
| It tells you | It doesn't tell you |
|---|---|
| Higher prices were rejected | The trend is over |
| Sellers defend that high | How far price falls |
| Next close decides | Sell immediately |
| Longs should tighten up | Where support is |
Gravestone doji: bullish or bearish? After a rally it is bearish. In a downtrend or mid-range, it means far less and is mostly noise.
Gravestone doji vs shooting star, and its other lookalikes
Four candles share the long upper wick, and that is where most misreads start. Body size and location sort them.
| Candle | Body | Prints after | Read |
|---|---|---|---|
| Gravestone doji | None | A rally | Bearish warning |
| Shooting star | Small | A rally | Bearish reversal |
| Inverted hammer | Small | A decline | Bullish warning |
| Long-legged doji | None | Anywhere | Indecision |
The pairs that get mixed up:
- Gravestone vs shooting star. Almost the same candle. The shooting star keeps a small body, the gravestone has none. Many charting sources treat the gravestone as the stronger version, because the close gave back every tick of the push.
- Gravestone vs inverted hammer. Identical shape possible, opposite location. After a fall the long upper wick is buyers probing, which is a mild bullish hint.
- Gravestone vs long-legged doji. If a real lower wick appears, sellers also failed. That is two-way indecision, not a rejection of highs.
- Gravestone vs the hanging man. Both warn at a top, but the wick points the other way. The hanging man shows sellers testing below; the gravestone shows buyers failing above.
Rule of thumb: check the trend first, then the body, then the wicks. In that order, the name picks itself.
Method 1: the confirmed gravestone doji
This is the read on the anatomy chart. You spot the doji, wait for one more candle, and act only if that candle closes lower.
These shorthand terms show up in the rules and on the charts below:
| Term | Meaning |
|---|---|
| D1 / H4 | One candle per day / 4 hours |
| H1 / M15 | One candle per hour / 15 minutes |
| Long / short | A buy trade / a sell trade |
| Pip | Usual smallest FX step, 0.0001 |
| Micro lot | 0.01 lot, about $0.10 per pip on EUR/USD |
| Sell-stop | Order that sells if price falls to it |
The rules, written for a daily or 4-hour chart:
- Timeframe: D1 or H4. Lower charts print doji shapes all session long.
- Trend: at least three or four higher closes before the doji.
- Shape: body under a tenth of the range, sitting at the low, long upper wick.
- Confirmation: the next candle closes below the doji’s body. Because the body sits at the low, that close is usually below the low too.
- Entry: on that close, or with a sell-stop a pip or two under the confirmation candle’s low.
- Stop: a few pips above the top of the upper wick.
- Target: the nearest support below, or twice the stop distance (a risk/reward of 1:2), whichever comes first.
One quirk is specific to this candle. The longer the upper wick, the more convincing the rejection, but the wider your stop has to be.
- A tall wick means a stop far from entry.
- A wide stop means a smaller position for the same 2% risk.
- Some traders trim this by placing the stop above the confirmation candle’s high instead. It is tighter, and it gets hit more often.
| Next candle | Strength | Cost |
|---|---|---|
| Small red close below body | Basic | More false starts |
| Full red candle, closes near its low | Solid | Later entry |
| Bearish engulfing | Strong | Rare, worse price |
| Gap down that holds | Strong | Mostly stocks |
A bearish engulfing candle is a red candle whose body covers the one before it. Right after a gravestone it reads as a loud second vote; the engulfing candle guide covers it.
| Role | How you use it | Best read |
|---|---|---|
| Entry trigger | Sell the confirming close | D1 EUR/USD, D1 gold |
| Stop anchor | Stop above the wick | Any timeframe |
| Skip filter | No lower close, no trade | All markets |
| Exit cue | Cover at next support | D1, H4 |
Where Method 1 breaks down:
- Powerful trends. A strong market can print a confirmed gravestone and still make a new high three candles later.
- Thin markets. Late Friday or holiday sessions print odd wicks with little behind them.
- News spikes. A data release can fire price up and back in minutes, leaving a gravestone that is pure reaction.
Method 2: the gravestone doji at resistance
A gravestone in empty space is a guess. One that prints into a level sellers have already defended is a far better read.
Here is a 4-hour EUR/USD chart. The pair was sliding, bounced, and ran straight back into the zone where the slide had started.
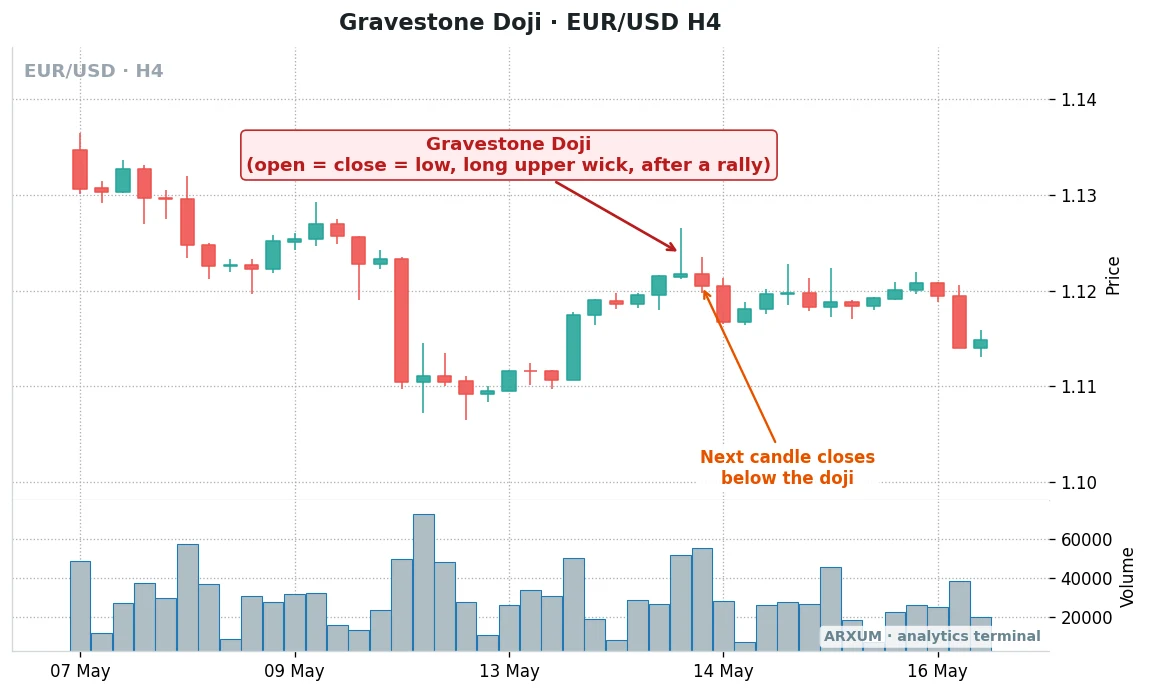
What the chart shows, in order:
- The bigger trend. Early in the window EUR/USD falls from above 1.13, then drops hard to around 1.107.
- The bounce. A large green candle starts a climb that carries the pair back above 1.12.
- The level. The 1.122 to 1.127 area is where price had been stalling before the big drop. Old support often turns into resistance (a ceiling).
- The candle. The gravestone’s wick stabs up into that zone, and the close lands back at the open.
- The follow-through. The next candle closes lower, price drifts sideways for a couple of days, then slides toward 1.114.
The doji agreed with the larger downtrend and printed at a level. That combination is the friendliest version to trade.
How to mark the level before the candle shows up:
- The start of an earlier sell-off, as on this chart.
- A prior swing high on the same timeframe.
- A round number, such as 1.1200 on EUR/USD or a whole $50 on gold.
- The top of a range that has held for weeks.
- A higher-timeframe high, read off the daily or weekly chart.
The support and resistance guide shows how to draw these zones in advance.
| Instrument | Timeframe | Level to watch |
|---|---|---|
| EUR/USD | H4, D1 | Round numbers |
| GBP/USD | H4 | Range tops |
| Gold (XAU/USD) | D1 | Prior swing highs |
| Silver (XAG/USD) | D1 | Prior swing highs |
| Bitcoin (BTC) | H4, D1 | Round thousands |
| Oil (WTI) | D1 | Range tops |
Rule of thumb: a gravestone whose wick pokes into resistance and closes back below it is the shape doing exactly its job.
Method 3: the gravestone doji as an exit cue
You don’t need to be short to use this candle. If you already hold a long, a gravestone is a reason to protect the gain.
This matters most on fast charts, where gravestones mark pauses more often than turns. Here is a 15-minute Bitcoin chart.
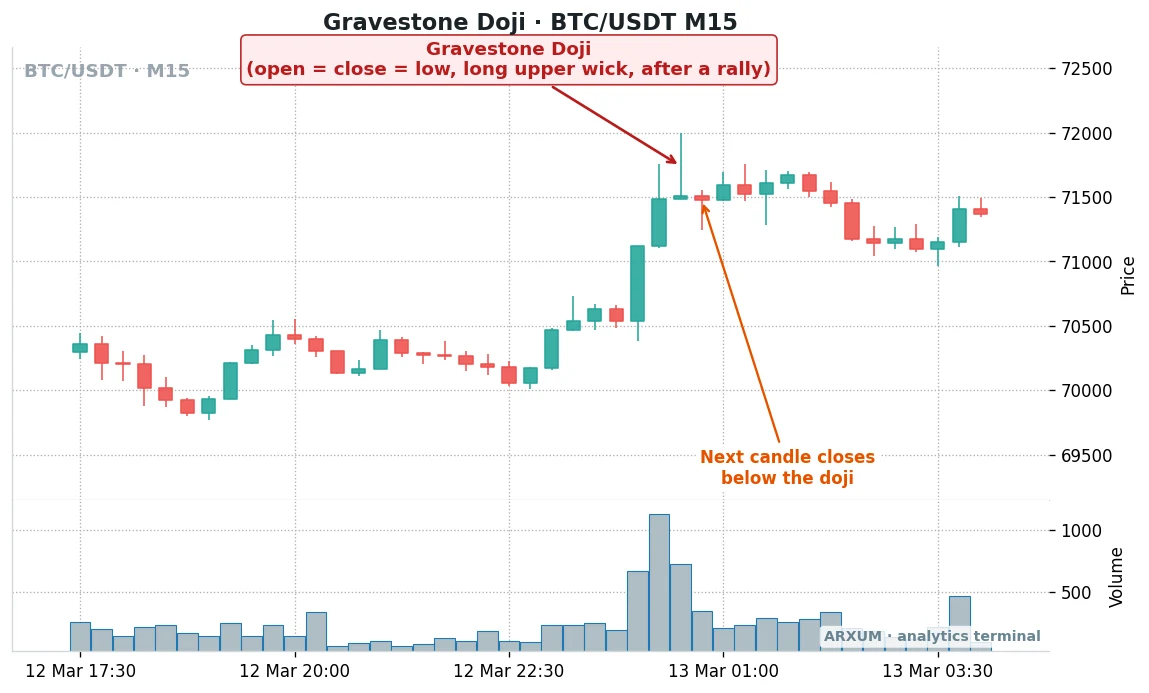
What happened around that doji:
- The run. Bitcoin broke out of a tight range and climbed over 1,000 points in a few candles, on a volume surge.
- The rejection. The gravestone’s wick tagged about 72,000, then the candle closed back near 71,500.
- The confirmation. The next candle closed just below the doji, which ticks the Method 1 box.
- The reality. Price never collapsed. It hovered near the highs, faded toward 71,100, then bounced again.
- The useful part. The doji’s high capped the move for the rest of the window, and it was the best place to lock in a long.
So a short off that signal had little room to run. A buyer who raised the stop under the breakout area, or took half off near 71,500, kept most of the move.
| Situation | Action | Best read |
|---|---|---|
| Long in profit | Raise stop under last swing low | H4, H1 |
| Long near target | Take partial profit | Any timeframe |
| Confirmed lower close | Cut size, keep the rest | D1 gold, H4 BTC |
| Fast chart only | Treat as a pause | M15, H1 |
Why this role suits newer traders:
- It never asks you to fight a rising market.
- You stay in the trade if the doji turns out to be a pause.
- You bank more of the move if it turns out to be the top.
- It works on any timeframe, including fast charts where shorts are a coin flip.
The trailing stop guide explains how to step a stop up behind a trend.
Pairing the gravestone with a second gauge
A doji is one candle, so most traders want one more reason. Here is the usual menu and what each item adds.
| Gauge | What it adds | Fits |
|---|---|---|
| Next-candle close | Basic confirmation | Every market |
| Resistance level | A reason to reject | FX, gold, BTC |
| RSI above 70 | Stretched rally | D1, H4 |
| Bearish RSI divergence | Fading momentum | D1 |
| 200-EMA side | Main trend context | All timeframes |
| Higher-timeframe high | Bigger ceiling | H4 inside D1 |
| Volume spike | Real selling | Bitcoin only |
What each gauge means in plain words:
- RSI (Relative Strength Index) is a 0 to 100 momentum gauge. Readings above 70 suggest the rally has stretched; the RSI guide covers the settings.
- Bearish RSI divergence means price makes a higher high while RSI makes a lower one. It is rare, so treat it as a bonus.
- The 200-EMA is a moving average of the last 200 candles that weights recent prices more. A gravestone well above it is more likely a pause than a top.
- Volume on gold and spot Forex is tick volume. A spike there says activity rose, not that sellers piled in.
On Arxum’s backtested strategy pages, running this whole menu against one pattern and keeping only what improves it is what we call the filter sweep. This explainer just lays out the options; it doesn’t rank them.
Indicator recipe for the gauges above:
- TradingView: click Indicators and add “Relative Strength Index” (length 14) and “Moving Average Exponential” (length 200).
- MT4/MT5: Insert → Indicators → Oscillators → Relative Strength Index (14), then Insert → Indicators → Trend → Moving Average, period 200, method Exponential.
- No built-in “gravestone doji” scanner is worth relying on. The tolerance rules vary, so check each candle against the checklist yourself.
Rule of thumb: one extra gauge sharpens the read. Four of them means you will hardly ever trade.
Gravestone doji across markets and timeframes
The shape is the same everywhere, but each market prints it for different reasons. These are the quirks worth knowing.
| Market | Cleanest on | Quirk |
|---|---|---|
| EUR/USD | D1, H4 | Respects round numbers |
| GBP/USD | H4 | Spiky, more fakes |
| USD/JPY | D1 | Intervention wicks |
| Gold (XAU/USD) | D1 | News-day spikes |
| Silver (XAG/USD) | D1 | Very long wicks |
| Oil (WTI) | D1 | Inventory-day wicks |
| Bitcoin (BTC) | H4, D1 | Trends run through it |
| Timeframe | Signal quality | Best use |
|---|---|---|
| W1 | High, rare | Big-picture warning |
| D1 | Best balance | Methods 1 and 2 |
| H4 | Good | Methods 2 and 3 |
| H1 | Noisy | Fine-tune a D1 setup |
| M15 and lower | Mostly pauses | Method 3 only |
Two details change how a gravestone looks before you even judge it:
- Broker close time. A Forex daily candle depends on when your broker ends the day. A New York 5pm close gives the cleanest daily candles, and a different close can turn a gravestone into a plain red candle.
- Crypto has no close. Bitcoin trades around the clock, so the daily candle simply cuts at midnight UTC on most exchanges. Weekend sessions are thin and print plenty of fake wicks.
Which method to use when
Each read suits a different position and a different market mood. Pick from here.
| Your situation | Use | Timeframe |
|---|---|---|
| Flat, rally looks tired | Method 1 | D1, H4 |
| Flat, price at a level | Method 2 | H4, D1 |
| Already long | Method 3 | Any |
| Strong uptrend | Method 3 only | Any |
| Sideways range | Method 2 at the top | H4 |
| Fast chart, M15 | Method 3 only | M15, H1 |
How to place a gravestone doji trade, step by step
If you want to use Method 1 or 2 yourself, this is the sequence. The prices below are an example to show the arithmetic, not a result.
- Before the session, mark resistance on the daily chart.
- Let the doji candle close. Mid-session, a candle can look like a gravestone and still change shape.
- Wait for the next candle to close below the doji’s body.
- Place a sell-stop a pip or two under the confirmation candle’s low.
- Put the stop-loss a few pips above the top of the upper wick.
- Set the take-profit at twice the stop distance, or at the nearest support if that is closer.
- Size the trade so the stop costs 2% of the account.
Here is the arithmetic for a 4-hour EUR/USD setup on a $1,000 account. At 2% risk, even a streak of five losses leaves roughly 90% of the account in place.
| Step | Value |
|---|---|
| Top of upper wick | 1.0880 |
| Confirmation candle low | 1.0832 |
| Sell-stop entry | 1.0830 |
| Stop-loss (5 pips above wick) | 1.0885 |
| Stop distance | 55 pips |
| Risk budget (2%) | $20 |
| Take-profit (1:2) | 1.0720 |
The division, step by step:
- One micro lot (0.01) of EUR/USD moves about $0.10 per pip.
- Risk per micro lot: 55 pips × $0.10 = $5.50.
- Micro lots allowed: $20 ÷ $5.50 = 3.6, rounded down to 3 micro lots (0.03).
- Actual risk: 55 × $0.30 = $16.50, inside the 2% budget.
- Target: 110 pips away (2 × 55), worth about $33 if it fills.
On leverage: 0.03 lots is 3,000 euros, around $3,250 of exposure, so roughly 1:3 on $1,000. A broker’s 1:100 leverage only lowers the deposit (margin) needed to open that size; the 55-pip stop is what caps the loss.
Gold is trickier on a small account because its wicks are long:
- A daily gold gravestone can easily need a stop $40 to $50 above entry.
- At most brokers the smallest gold size is 0.01 lot, which is 1 ounce, so it gains or loses $1 per $1 move.
- With a $45 stop, the smallest clickable size risks $45, or 4.5% of $1,000. That breaks the 2% rule.
- The fix: use the H4 gold chart, where a $15 stop at 0.01 lot risks $15 (1.5%), or trade the setup on EUR/USD.
Bitcoin sizes more flexibly, since many brokers allow positions as small as 0.001 BTC. A 600-point stop there costs $0.60 per 0.001 BTC, so $20 of risk buys about 0.033 BTC.
The position sizing guide runs the same math for other pairs and metals.
Trading a rejection candle without wrecking the account
A gravestone is cheap to act on and often wrong. Handling the misses is the real skill.
- Expect failures in strong trends. The Bitcoin chart shows how a confirmed gravestone can lead nowhere much. A planned small loss there is normal.
- Keep each loss at 2%. Wide gravestone stops mean smaller positions, not bigger risk.
- Pause after 3 to 6 losses in a row. A run like that usually means the market is trending too hard for reversal reads. Step back, and lean on Method 3 until it calms down.
- Don’t double up on the next doji to win it back. The next candle owes you nothing.
- Don’t chase a confirmation that already fell far. If the red candle dropped most of the way to support, the trade is gone.
- Only trade money you can afford to lose. Rent and savings don’t belong in a trading account.
Common gravestone doji mistakes
- Selling the doji itself. Wait for the next close. Until then it is only a warning.
- Calling every long upper wick a gravestone. A visible body makes it a shooting star; a real lower wick makes it a long-legged doji.
- Ignoring location. Mid-range or inside a downtrend, the candle means very little.
- Stop inside the wick. A stop halfway up the spike gets taken by the next probe higher.
- Oversizing to fit a wide stop. Shrink the position instead.
- Trusting M15 gravestones as reversals. On fast charts they mostly mark pauses.
- Reading tick volume as conviction. On gold and Forex it only counts price updates.
- Skipping the higher timeframe. An H4 gravestone right under a daily high is worth far more than one in open air.
What works: the short version
- Wait for confirmation. A close below the doji’s body turns the warning into a signal.
- Want a level. The best gravestones stab into resistance, like the EUR/USD example.
- Use it as an exit cue in strong trends and on fast charts, as the Bitcoin example showed.
- Respect the wick. Stop above it, and let its length set a smaller position.
A gravestone followed by a strong red candle sometimes grows into a three-candle top called an evening star. The morning star and evening star guide covers it, and the bearish candlestick patterns guide places the gravestone among its relatives.
Glossary
- Doji: a candle whose open and close are equal or nearly equal.
- Real body: the thick part of a candle between the open and the close.
- Wick (shadow): the thin line showing how far price traveled beyond the body.
- Confirmation: a follow-up candle that backs the pattern’s read before you act.
- Resistance: a price zone where rallies have stalled before.
- Sell-stop: a pending order that sells only if price drops to your level.
- Micro lot: 0.01 of a standard lot, about $0.10 per pip on EUR/USD.
- RSI: Relative Strength Index, a 0 to 100 momentum gauge.
- 200-EMA: a moving average of the last 200 candles, weighted toward recent prices.
- Tick volume: a count of price updates, used on gold and Forex charts.
- Risk/reward 1:2: risking one unit to aim for two.
FAQ
What is a gravestone doji, in plain terms?
A gravestone doji is a candle that opens and closes at the same price, at the very bottom of its range, with a long upper wick. It shows buyers pushed price up during the session and then lost the whole gain before the close. After a rally it warns that the move may be running out of buyers.
Is a gravestone doji bullish or bearish?
Bearish, when it prints after a rally. Elsewhere it carries little meaning.
What is the difference between a gravestone doji and a shooting star?
Both have a long upper wick and appear after a rally. The shooting star keeps a small real body near the low, while the gravestone has no body at all, because the open and close are equal. Many traders treat the gravestone as the stronger rejection, since buyers kept none of their push. Both still need the next candle to close lower before you act.
Does a gravestone doji need confirmation?
Yes. Wait for the next candle to close below the doji's body before treating it as a sell signal.
What timeframe works best for the gravestone doji?
The daily chart gives the best balance on Forex and gold, and the 4-hour is a good second choice, especially at clear resistance. On the 15-minute and 1-hour charts the shape appears constantly and usually marks a short pause rather than a turn. Use fast-chart gravestones to manage a long you already hold, not to open shorts.
Where should the stop-loss go on a gravestone doji trade?
A few pips or points above the top of the upper wick. A long wick means a wide stop, so the position must shrink to keep the loss at 2% of the account. Some traders place the stop above the confirmation candle instead, which is tighter but gets hit more often.
Can I trade a gravestone doji with a $500 to $1,000 account?
Yes on major Forex pairs like EUR/USD, where micro lots let you keep a 50 to 60 pip stop within 2% risk. Daily gold is harder, because its long wicks force a stop that can exceed 2% even at the smallest 0.01 lot. On a small account, start with EUR/USD or use the 4-hour gold chart, where stops are shorter.
What do the terms on the gravestone doji charts mean?
The upper wick is the thin line above the candle showing the rejected high. Confirmation is the next candle closing lower. H4 and M15 mean one candle per four hours and per fifteen minutes. Tick volume, under the EUR/USD chart, counts price updates rather than money traded, while the Bitcoin chart shows real exchange volume.
Real-time trade setups with entry, stop loss and take profit. Daily market analysis. No subscription, no complicated theory.
🌍 Our recommended brokers


Reader Reviews
Be the first to review this — tell other traders what actually helped, or where it fell short.
Leave a Review

Quant Researcher & Systems Builder
Quantitative researcher who builds the automated systems behind Arxum strategy testing. Works in Python and Pine Script, using AI alongside classic backtesting to validate strategies on years of real data.