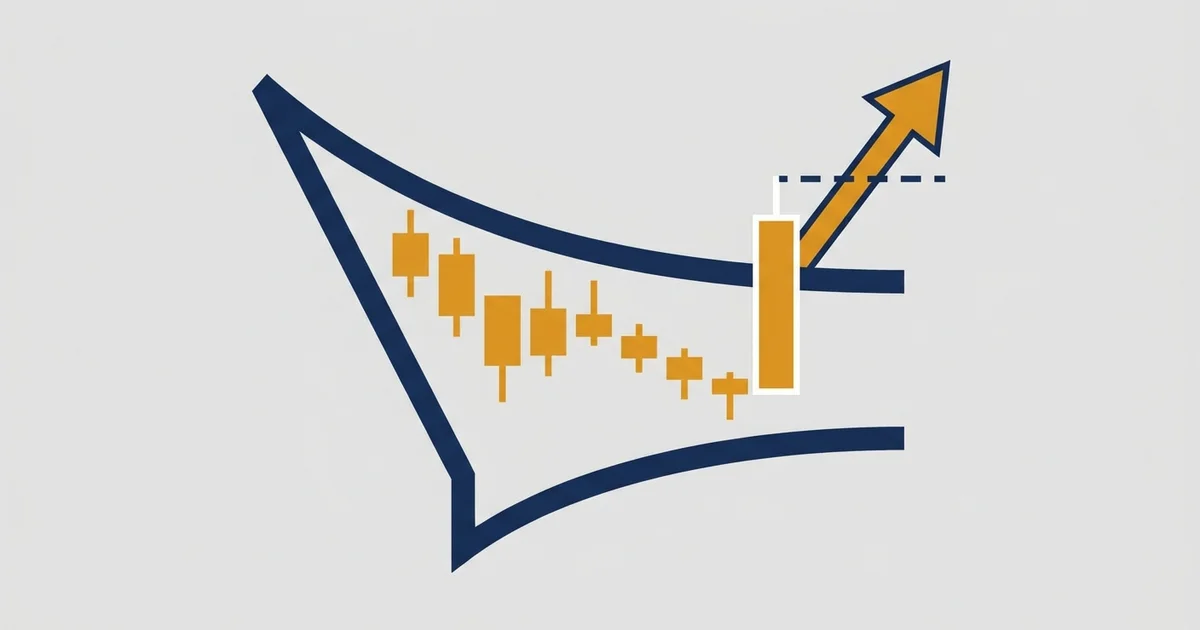

What the falling wedge pattern looks like
Two falling lines that squeeze together, with price boxed in between. Here is the textbook shape as a clean schematic.
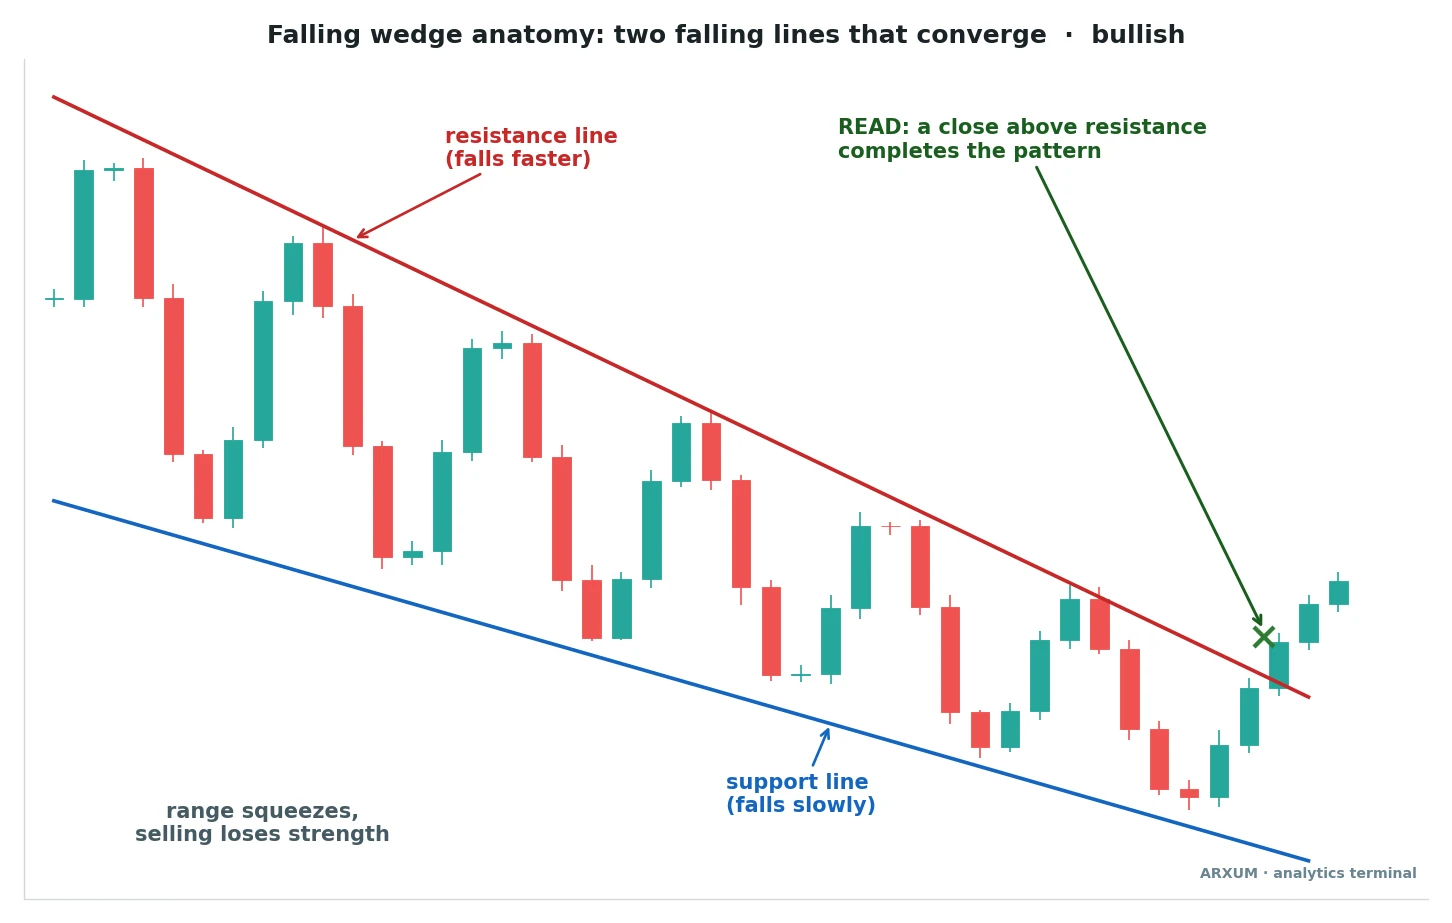
Now map each label on the picture to what it means:
- Resistance line (red, falls faster): joins the reaction highs. Each bounce tops out well below the one before.
- Support line (blue, falls slowly): joins the reaction lows. Each new low is only a little under the last.
- “Range squeezes, selling loses strength”: the gap between the lines narrows, and each push down covers less distance.
- “READ: a close above resistance completes the pattern”: until a candle closes over the red line, it is just a shape forming.
- The green candles after the cross: price lifts away from the wedge. That is the expected path, never a promised one.
The core idea: sellers still win each swing, but by less every time, until there is nobody left willing to sell lower.
Is a falling wedge bullish or bearish?
Bullish, in both places it shows up. Only its job changes.
To tell the two apart, read the trend with the 200-EMA. That is an exponential moving average of the last 200 closes, a line that smooths price and leans on recent candles.
| Where it forms | Pattern type | What it signals |
| Bottom of a downtrend | Reversal | Selling exhausted, base forming |
| Pullback in an uptrend | Continuation | Dip ending, trend resumes |
| Middle of a range | Weak or none | Usually noise |
- Price above a rising 200-EMA means uptrend. A falling wedge there is a pullback, and the breakout trades with the main move.
- Price below a falling 200-EMA means downtrend. A falling wedge there is a possible bottom, so it needs more proof.
- Inside a flat, sideways market, the wedge has no tired move to end. Skip most of those.
The continuation version is the friendlier trade for a beginner. You buy a dip in a market that already wants to go up.
Falling wedge vs rising wedge, triangle and flag
The falling wedge has four close relatives. Mixing them up is the drawing mistake that costs the most money.
| Pattern | Line slopes | Usual break |
| Falling wedge | Both down, converging | Up |
| Rising wedge | Both up, converging | Down |
| Descending triangle | Flat floor, falling top | Down |
| Bull flag | Both down, parallel | Up |
| Falling channel | Both down, parallel, long | None implied |
- The rising wedge pattern is the mirror image. Both lines climb, and it usually breaks down.
- A flat floor under a falling top is a descending triangle. That one tends to break down, the opposite of the wedge.
- A short, parallel drift down after a sharp rally is a bull flag. Same bullish lean, but the lines do not converge.
- The wider family of converging shapes sits in the triangle chart patterns guide.
One trap catches people often. In a falling wedge the direction of the lines and the direction of the trade are opposite: the lines point down, you buy.
How to draw a falling wedge correctly
A badly drawn wedge produces a bad trade before the market even moves. Go through these steps in order:
- Find a decline that has run for a while, at least 15-20 candles on your timeframe.
- Mark the swing highs, the candles where price turned back down. Two minimum, three is better.
- Mark the swing lows, the candles where price turned back up. Same count.
- Draw resistance through the highs so it touches the turning points, not floating over them.
- Draw support through the lows the same way.
- Check the slopes: resistance must fall faster than support, so the lines would meet ahead of price.
- Check the reactions: price should bounce off each line, not slice through it again and again.
| Error | Why it hurts | Fix |
| Only one touch per line | Any two points make a line | Wait for another touch |
| Mixing wicks and bodies | Break level gets fuzzy | Pick one, stay consistent |
| Lines run parallel | It is a channel or flag | Treat it differently |
| Support steeper than top | Lines widen, no squeeze | Not a wedge, skip |
| Redrawing after a fake break | Hides a failed read | Keep the first lines |
For more on anchoring lines to real turning points, the trendline trading guide goes deeper. A wedge is simply two of those lines at once.
Falling wedge pattern trading: three methods
Traders put the same falling wedge to work in three ways. Two are buy trades, and the third protects a short you already hold.
D1 below means the daily chart, H4 the 4-hour chart and H1 the 1-hour chart. TF is short for timeframe.
| Method | You act when | Fits best |
| 1. Close-above breakout | A candle closes above | H4 and D1, Bitcoin |
| 2. Retest buy | Price dips back and holds | H4, EUR/USD, GBP/USD |
| 3. Pullback wedge | A dip in an uptrend breaks up | D1, gold, silver |
1. The close above resistance
This is the textbook entry. You wait for one full candle to close above the falling resistance, then buy on that close.
Here it is on a 4-hour chart of Bitcoin (BTC/USDT), after a sharp drop that slowly lost its force.
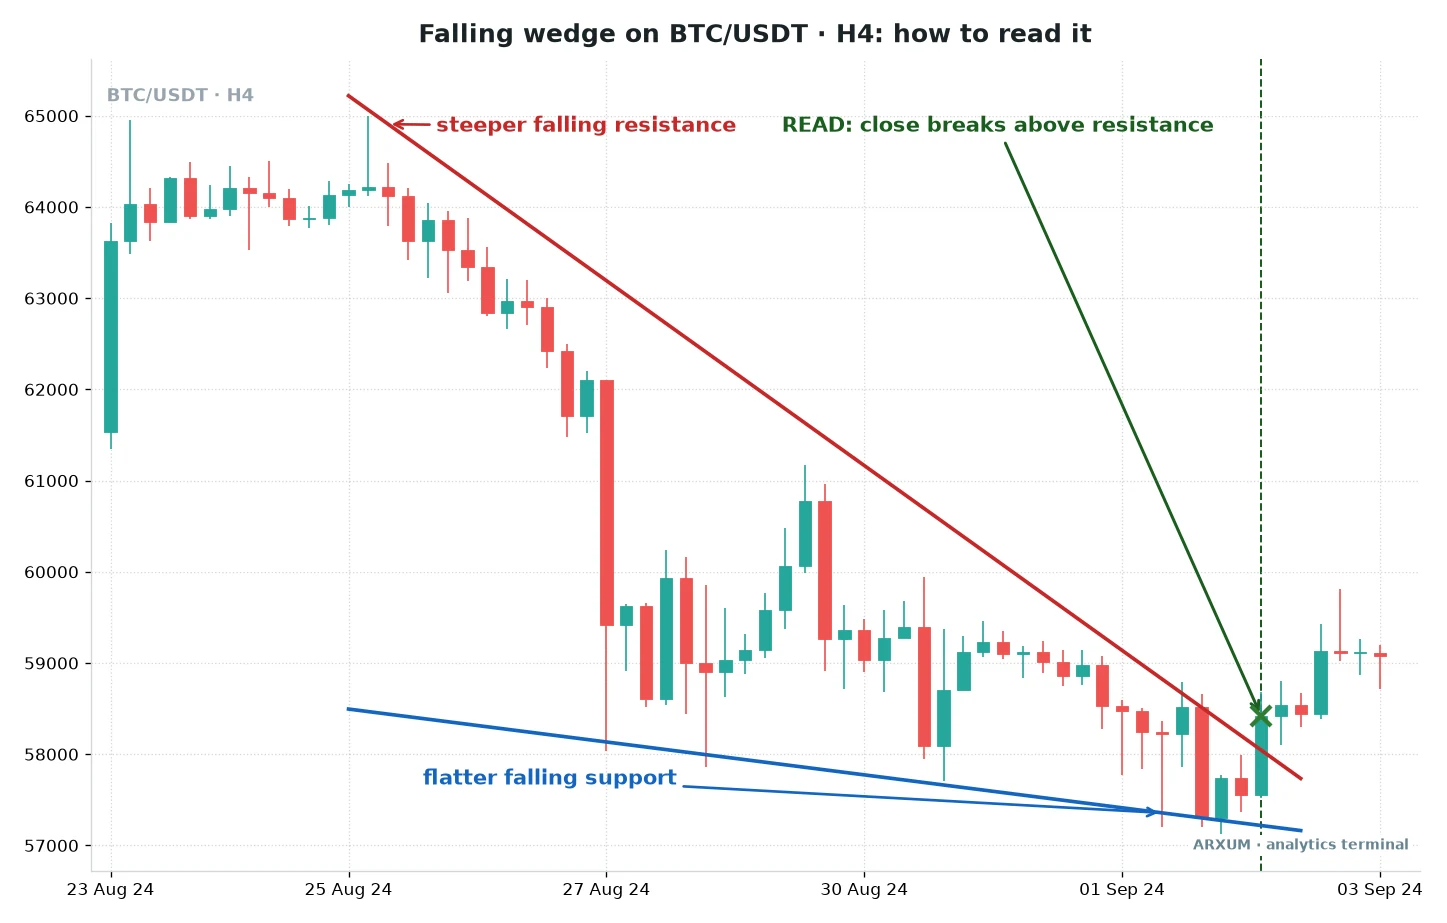
Reading it from left to right:
- The wedge starts near 65,000 on the red line, with the first support touch around 58,500 on the blue line.
- A long red candle drops price to about 59,400. The next bounce stalls near 61,100, well under the previous high.
- After that, the lows barely move. They grind from about 57,800 to about 57,200 while the highs keep falling hard.
- The read candle closes near 58,400, above the red line. A few candles later price is trading around 59,100.
What a clean breakout candle looks like:
- A real body closes over the line. A wick poking through and slipping back does not count.
- The next candle opens and holds above the old resistance.
- The candles shrank in the last third of the wedge, a sign the sell-off had already gone quiet.
- On crypto, exchange volume picking up after the break is a mild plus, not a requirement.
| Role | How you use it | Best read |
| Entry trigger | Buy the close above | H4 or D1 Bitcoin |
| Trend read | Where price sits vs 200-EMA | D1, any market |
| Confirming gauge | Next candle holds above | Same TF as entry |
| Filter | Skip into heavy resistance | Higher TF levels |
| Exit cue | Close back inside wedge | Same TF as entry |
Rule of thumb: the candle close decides, not the first wick through the line.
Bitcoin falling wedges did pay in our wedge study, but most of that came from one strong bull market. Read the crypto version as a decent setup, not a sure one.
2. The retest of broken resistance
Plenty of traders skip the first close. They wait for price to dip back to the broken resistance, see it hold as a floor, and buy there.
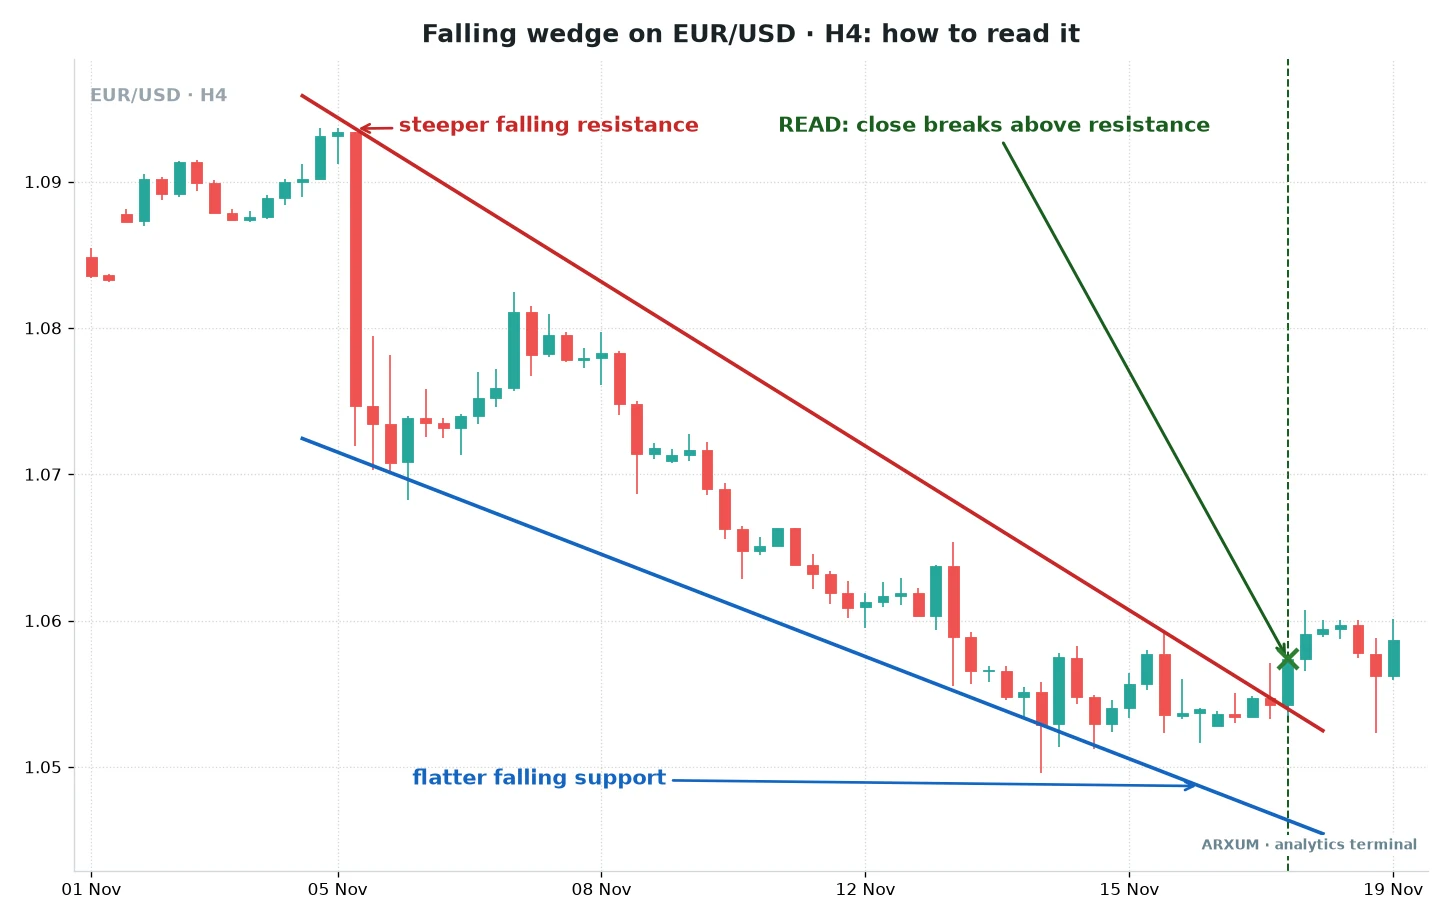
The EUR/USD sequence, step by step:
- Resistance falls from about 1.0960 to about 1.0525. Support falls far more gently, from about 1.0725 to about 1.0465.
- Bounces get weaker: one tops near 1.0825, the next near 1.0655.
- The read candle closes around 1.0570, above the red line.
- Price lifts to about 1.0605, then a wick drops to roughly 1.0525, right where the broken line was. That candle closes back near 1.0560.
That last dip is the setup for this method. The line that capped price for two weeks now holds it up.
| Role | How you use it | Best read |
| Entry trigger | Buy the held retest | H4 EUR/USD, GBP/USD |
| Trend read | D1 up, or flat and basing | D1 over the H4 |
| Confirming gauge | Lower wick at the line | H4, H1 |
| Filter | No retest, no trade | Any instrument |
| Exit cue | Close back under the line | H4 |
Why the retest suits currency pairs:
- Currency breakouts often snap back to the line before moving on. The retest turns that habit into your entry.
- The stop sits just under the retest wick, much closer than a stop under the whole wedge.
- A closer stop means a bigger position for the same risk. Or the same position for less.
- When no retest comes, you miss the move. That is the price of the better entry.
Rule of thumb: on Forex pairs, let the break prove itself on a pullback before you buy.
In our wedge study the euro’s falling wedges lost money overall. The retest is a more careful way in, not a proven fix, so keep FX wedges low-confidence and small.
3. The pullback wedge in an uptrend
This version happens inside a market that is already climbing. Price pulls back in a falling wedge, the dip loses steam, and the breakout rejoins the main trend.
Spot gold (XAU/USD) is the clearest home for it. Look back at the anatomy schematic: picture that same shape forming while gold sits above a rising 200-EMA on the daily chart.
- The trend is up, so you only take the long side. That is the regime doing half the work.
- The wedge is a rest, not a reversal. You are buying a dip with a defined stop.
- In our wedge study, gold’s daily falling wedge was the strongest bullish case of every market looked at.
- Silver behaves similarly but swings harder, so it needs smaller size.
| Role | How you use it | Best read |
| Regime check | Price above rising 200-EMA | D1 gold, silver |
| Entry trigger | Buy the close above | D1, or H4 for timing |
| Confirming gauge | Pullback holds a prior level | D1 |
| Filter | Skip below the 200-EMA | D1 |
| Short-exit cue | Wedge forms against your short | Any TF you hold |
The last row matters if you trade the other side. A falling wedge forming under your open short (a sell position that profits when price falls) warns that the drop is running out.
- Move the short’s stop down to just above the red resistance line.
- Take part of the profit near the blue support line.
- If price closes above resistance, the stop takes you out with most of the move banked.
Rule of thumb: in an uptrend, a falling wedge is a dip to buy.
Confirmations that count, and one that doesn’t
A falling wedge on its own is just a shape. These extra reads decide whether it deserves your money.
| Confirmation | What to look for | Weight |
| Trend context | Price above 200-EMA | High |
| Higher-TF agreement | D1 points up too | High |
| Shrinking candles | Range tightens near apex | High |
| Failed new low | Wick under support, close back in | Medium |
| RSI divergence | Lower price, higher RSI | Bonus, rare |
| Volume spike | Volume jump on the break | Low |
The apex in that table is the point ahead of price where the two lines would meet.
In our wedge study, the filter sweep ran the standard confirmation menu against wedge breakouts, and the volume spike added nothing. A wedge breaks out because selling dries up, not because buyers rush in, so the breakout candle is often quiet.
- Trend context: read it off the 200-EMA in one glance. Price above a rising line means you are buying with the market.
- Higher-TF agreement: if you trade the H4 wedge, the daily chart should not be in a steep fall.
- Shrinking candles: a by-eye check. Compare the size of the candles near the apex to those at the start.
- Failed new low: a wick that dips under support and closes back inside shows sellers trying and failing.
- RSI divergence: RSI (Relative Strength Index) is a 0-100 momentum gauge. Bullish divergence means price prints a lower low while RSI prints a clearly higher low. It is a nice extra, and genuinely rare; the RSI divergence guide shows a real one.
- Tick volume: on gold and Forex your platform shows a count of price updates, not money traded. It is too noisy to confirm a wedge break.
The falling wedge across markets and timeframes
The pattern forms on every chart, but it does not pay the same everywhere. Here is how it tends to behave on the markets our readers trade most.
| Instrument | Typical read | Best method |
| Gold (XAU/USD) | Strongest bullish case | Pullback wedge, D1 |
| Bitcoin (BTC) | Fast breaks, trend-led | Close-above, H4/D1 |
| EUR/USD | Breaks often snap back | Retest buy, H4 |
| GBP/USD | Sharper, noisier breaks | Retest buy, H4 |
| Silver (XAG/USD) | Violent both ways | Pullback wedge, small size |
| Oil (WTI) | Turns at cycle lows | Close-above, D1 |
- Gold has spent a long stretch in a bull market, so its falling wedges are mostly pauses in an uptrend. That is exactly the shape that suits the buy side.
- Bitcoin wedges break fast, and they work best when the bigger crypto trend is already turning up.
- Currency pairs print wedges all the time but tend to drift back toward their recent average. The retest method respects that.
- Oil is cyclical, so a falling wedge near the bottom of a supply-driven slump has a real reason to turn.
| Timeframe | Quality | Use it for |
| D1 | Cleanest, fewest signals | Main trade decisions |
| H4 | Good, more frequent | Swing entries, retests |
| H1 | Noisy, many fakes | Timing a D1 or H4 idea |
| M15 and below | Mostly noise | Managing open trades only |
Rule of thumb: find the wedge on the daily or 4-hour chart, and use the 1-hour only to time the entry.
Falling wedge target and stop placement
The textbook target is the measured move: the wedge’s height at its widest point, projected up from the breakout. A second, closer target is the last swing high inside the wedge.
| Step | Calculation | Result |
| Widest point, top | Resistance at start | ~65,200 |
| Widest point, bottom | Support at start | ~58,500 |
| Wedge height | 65,200 - 58,500 | ~6,700 |
| Breakout close | Read candle | ~58,400 |
| Measured target | 58,400 + 6,700 | ~65,100 |
| Closer target | Last swing high inside | ~61,100 |
- The measured move sends price all the way back to where the wedge began. That is a ceiling for expectations, not a forecast.
- By the end of the chart window, price had covered about half the distance to the closer target.
- A common plan: take part of the position off at the closer target and trail a stop on the rest.
Stop options, from widest to tightest:
| Stop location | Width | Suits |
| Below the wedge's last low | Widest | Close-above method |
| Below the breakout candle | Medium | Strong break candles |
| Below the retest wick | Tightest | Retest method |
Compare the distance to the target with the distance to the stop before you enter.
Risking 40 pips to make 80 is a risk-to-reward of 1:2. The 1 is what you risk, and the 2 is what you aim to make back.
The risk-reward ratio guide covers the idea in full.
Below about 1:1.5, most traders pass on the setup.
How to trade a falling wedge, step by step
Here is the whole routine, using the EUR/USD retest from the 4-hour chart. A pip is the smallest standard price step, 0.0001 on EUR/USD.
- Check the daily chart. You want EUR/USD flat or turning up, not in a steep fall.
- Draw the wedge on the 4-hour chart with at least two touches per line.
- Wait for a 4-hour close above resistance. On the chart it came near 1.0570.
- Wait for the retest. Price wicked down to about 1.0525 and closed near 1.0560.
- Buy near 1.0560 and set the stop under the retest wick, at 1.0520. That is 40 pips.
- Set the first target at the last swing high inside the wedge, about 1.0640. That is 80 pips away.
- Check reward-to-risk: 80 ÷ 40 = 2, so 1:2. Worth taking.
- The measured move is the stretch goal: a height of about 235 pips (1.0960 - 1.0725) from the 1.0570 break points near 1.0805.
- Size the position, then place the order.
Sizing it on a small account
Risk 2% of the account per trade and size the position to the stop. On EUR/USD, one micro lot (0.01 lot) is worth about $0.10 per pip.
| Step | $1,000 account | $500 account |
| Risk budget at 2% | $20 | $10 |
| Risk per micro lot | 40 × $0.10 = $4.00 | 40 × $0.10 = $4.00 |
| Division | $20 ÷ $4.00 = 5 | $10 ÷ $4.00 = 2.5 |
| Round down | 5 micro lots (0.05) | 2 micro lots (0.02) |
| Actual risk | $20, 2% | $8, 1.6% |
- Round down, never up. Rounding 2.5 up to 3 would push the $500 account past its 2% limit.
- Five micro lots control 5,000 euros, about $5,300 at 1.0560. On $1,000 that is an effective leverage of roughly 1:5.3.
- Broker leverage of 1:100 or more is just margin room that lets you open the size. The 2% stop already sets your risk, though a price gap can still jump past it.
A broker offering micro lots is what makes this sizing work on a small account.
The same 2% rule lands very differently on other markets:
| Market and stop | Risk at minimum size | Fits $1,000? |
| Gold D1, $30 stop | 0.01 lot (1 oz) = $30 | No, 3% |
| Gold H4, $15 stop | 0.01 lot = $15 | Yes, 1.5% |
| Bitcoin H4, 1,250 stop | 0.01 BTC = $12.50 | Yes, 1.25% |
| Bitcoin H4 on $500 | 0.01 BTC = $12.50 | No, 2.5% |
- On gold, one micro lot is 1 ounce, so every $1 move in price is $1 of profit or loss.
- A daily gold wedge usually needs a wider stop than a small account can carry at 2%. Timing the same idea on the H4 can bring the stop inside the budget.
- For a $500 account, EUR/USD is the market where the numbers actually work.
Placing the order
- Retest method: once the retest candle closes back above the line, open a market buy (an order that buys at the current price). Or set a buy limit just above the broken resistance before price returns, an order that fills only if price drops to your level.
- Close-above method: open a market buy right after the breakout candle closes. Some traders use a buy stop a few pips over that candle’s high instead, an order that buys if price rises to your level.
- Stop-loss field: type 1.0520 in the example.
- Take-profit field: type 1.0640 for the first target.
- Volume or lot field: type 0.05 or 0.02 from the sizing table.
Setting up the chart
- On TradingView (free), choose the Trend Line tool in the left toolbar and draw both lines through the swing points.
- For the trend read, open Indicators and add “Moving Average Exponential” with length 200.
- For the optional momentum check, add “Relative Strength Index” with length 14.
- On MT4 or MT5, draw lines via Insert, Objects, Trendline. Add the EMA through Insert, Indicators, Trend, Moving Average with method Exponential, and RSI through Insert, Indicators, Oscillators.
Keeping the risk in check
A falling wedge will fail some of the time even when every box is ticked. Its edge shows across a run of trades, never inside one.
- Losing streaks come with the territory. After 3-6 losses in a row, pause: the market regime may have changed, for example a slow bleed turning into a crash.
- A bad week is normal noise and no reason to quit. A long run of results clearly worse than you expected is a reason to step back and recheck the conditions.
- Breakouts that fail feel personal. Don’t revenge-trade the next wedge with a bigger size to win it back.
- After a winner, the next trade still risks 2%. Euphoria is when traders size up and hand the profit back.
- Only trade money you can afford to lose.
The position sizing guide walks through the 2% rule and the division step in more detail.
Where the falling wedge fails
Every pattern has failure modes, and the falling wedge’s are fairly predictable.
| Failure | What happens | How to avoid it |
| Downside break | Price drops through support | Respect the stop |
| Fake breakout | Close above, then back in | Use the retest method |
| Drift into the apex | No break, just stalls | Step aside near apex |
| Strong bear trend | Wedge is just a pause | Avoid under falling 200-EMA |
| Target too far | Rally stalls early | Use the closer target first |
- The downside break hurts most. When a falling wedge breaks the wrong way, the sell-off often speeds up as buyers who bought the dip bail out.
- Near the apex, where the lines almost meet, the shape loses meaning. If nothing has broken by then, walk away.
- In a powerful downtrend, many falling wedges are just short breathers before the next leg lower.
- On EUR/USD, the snap-back after a break is common enough to plan around, which is why method 2 exists.
Which method to use when
| Your situation | Method | Timeframe |
| Gold in an uptrend | Pullback wedge | D1, H4 timing |
| Trading Bitcoin or oil | Close-above | H4, D1 |
| Trading EUR/USD or GBP/USD | Retest buy | H4 |
| Holding a short | Short-exit cue | Same as the short |
| $500 account | Retest buy | H4 EUR/USD |
What works, in three lines:
- Buy the falling wedge with the bigger trend: a pullback wedge above a rising 200-EMA, broken on a daily close. Gold is its best home.
- On currency pairs, wait for the retest of broken resistance and keep the stop under the retest wick.
- In a hard downtrend, don’t buy it. Use it to tighten the stop on a short instead.
For the tested numbers behind both wedge types, the wedge chart patterns guide is the next read. Other bullish shapes worth knowing sit in the bullish chart patterns roundup.
Key terms
- Falling wedge: two falling, converging trendlines, with resistance steeper than support. Usually breaks up.
- Rising wedge: the mirror image, two rising, converging lines. Usually breaks down.
- Swing high / swing low: a candle where price turned down or up, used to anchor the lines.
- Apex: the point where the two lines would meet.
- Retest: price returning to a broken line before moving away again.
- Measured move: the wedge’s height projected from the breakout, used as the target.
- 200-EMA: an exponential moving average of the last 200 closes, used to read the trend.
- RSI: Relative Strength Index, a 0-100 momentum gauge.
- Tick volume: a count of price updates, shown instead of traded volume on Forex and gold.
- Micro lot: 0.01 of a standard lot, about $0.10 per pip on EUR/USD.
FAQ
What is a falling wedge pattern, in plain terms?
It is a chart shape where price keeps making lower highs and lower lows, but the highs fall faster than the lows. The two trendlines squeeze together, and each drop gains less ground than the one before. It shows sellers running out of steam, and it usually ends with a break above the upper line.
Is a falling wedge bullish or bearish?
Bullish. At the end of a downtrend it warns of a bottom, and as a pullback inside an uptrend it signals the climb is about to resume.
Does the falling wedge pattern actually work?
It works best when it agrees with the bigger trend, such as a pullback wedge on gold while price sits above a rising 200-EMA. That was the strongest bullish case in our wedge study. It works poorly in a hard downtrend, where many falling wedges are just pauses before the next drop. On currency pairs, breakouts often snap back, so the retest entry is the safer route. No pattern wins every trade, so the stop and the position size matter more than the shape itself.
What is the difference between a falling wedge and a rising wedge?
They are mirror images. A falling wedge has two falling, converging lines and usually breaks up. A rising wedge has two rising, converging lines and usually breaks down.
How is a falling wedge different from a descending triangle or a bull flag?
A descending triangle has a flat floor under a falling top and usually breaks down, the opposite of the wedge. A bull flag also slopes down and breaks up, but its two lines run parallel and it follows a sharp rally. In a falling wedge both lines fall and close in on each other.
What is the best timeframe for a falling wedge?
The daily and 4-hour charts. Wedges there take days or weeks to form, so the break carries more weight. Use the 1-hour chart only to time an entry the higher chart has already set up.
Where do I put the stop loss on a falling wedge?
Below the wedge's last swing low if you buy the first close above resistance. If you buy the retest, put it just under the retest wick. The retest stop is tighter, which lets you hold a larger position for the same risk, or the same position for less. Whichever you pick, set it before you enter and don't move it further away.
Do I need volume to confirm a falling wedge breakout?
No. A wedge breaks out because selling dries up, so the breakout candle is often quiet. Trend context, shrinking candles and a clean close above the line matter more. On gold and Forex your platform shows tick volume, which is too noisy to lean on.
How much money do I need to trade a falling wedge?
With micro lots, a few hundred dollars works on EUR/USD. At 2% risk, a $1,000 account risks $20, which fits 5 micro lots on a 40-pip stop, and a $500 account fits 2. Gold and Bitcoin often need wider stops, so a small account may not fit even the minimum size there.
What do apex, retest and measured move mean?
The apex is where the two wedge lines would meet. A retest is price coming back to the broken resistance line and holding above it. The measured move is the wedge's height at its widest point, projected up from the breakout to set a target.
Real-time trade setups with entry, stop loss and take profit. Daily market analysis. No subscription, no complicated theory.
🌍 Our recommended brokers


Reader Reviews
Be the first to review this — tell other traders what actually helped, or where it fell short.
Leave a Review

Momentum Trader & Technical Analyst
Trades momentum across crypto and forex since 2019, built around RSI, MACD, and volume. Turns discretionary setups into rule-based, systematic entries and validates them on data before they go live.